Книга: Embedded Linux development using Eclipse
Installing Cygwin
Installing Cygwin
Go to http://www.cygwin.com/ and click on the Install Cygwin now icon. There are several icons and links on this page that point to the same target, setup.exe.
When you click one of these links, Windows asks if you want to run or save the file. I generally save executables and then run them locally, but it’s your call.
In either case, execute setup.exe. You may get a warning saying that the publisher could not be verified and asking if you really want to run it. Go ahead, it’s safe. Following an initial information screen, you are offered three installation types:
• Install from Internet (default)
• Download Without Installing
• Install from Local Directory
The next screen lets you specify a root directory and select a couple of options. The recommended defaults for the options are good. Next you’re asked to select a directory in which the downloaded packages will be stored. These are then available for subsequent reinstallation. Oddly, the default is the Desktop for the current user. I prefer to put stuff like this in the downloads directory.
The next screen asks how you connect to the Internet. Select appropriately and continue. You are presented with a list of download mirror sites with the intention that you pick one geographically close to you. But again, most of the names offer no clue about where they may be located. Continuing to the next screen causes another setup program to be downloaded and you are presented with a package selection menu.
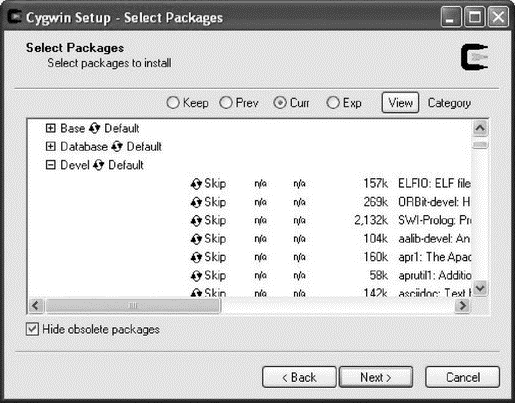
Sadly, this is not the most intuitive or user-friendly menu. Expand the Devel category by clicking on the +. The result is shown in Figure 2.4. Most of the packages are designated as “Skip,” meaning they won’t be installed. Scroll down to the gcc-core package and click on the word “Skip” in the New column. Skip changes to a version number and the Bin? column changes to a check box. This package, in its binary form, is now selected for installation. The Src? column is an open box giving you the option of downloading the source code as well. You might want to select this if you need to build a target version of gcc.
Scroll down and select gdb: The GNU Debugger as well. Again, you might want to check the Src? box if you will need to build a version for your target architecture. That should be all we need for C development. Now expand the net category and select the nfs-server and xinetd. Clicking Next starts the download. This is a lengthy process because we are, after all, building a fairly complete Linux environment. It’s much more than the few packages we selected here.

Figure 2.4: Cygwin package selection.
Following the download, you have the option of creating icons on the desktop or in the Start Menu. You’re done. You’ll find a folder named cygwin in the folder specified for installation. It turns out to be the root directory of the Cygwin Linux environment. You’ll also find a rather oddly named folder in the download directory that has a setup.ini file reflecting your package selection and a folder containing all of the download compressed package files.
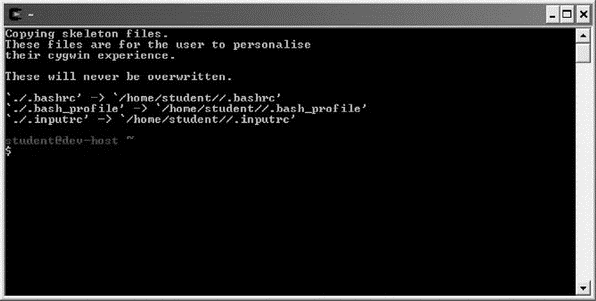
Double-click the Cygwin icon and you’ll get a bash shell as shown in Figure 2.5. Play around with some of the basic commands just to prove it really is a bash shell. Later we’ll look at how to configure Eclipse to find the gcc compiler and other tools.

Figure 2.5: Cygwin bash shell.
- Installing MinGW
- Chapter 5 Installing and Configuring VirtualCenter 2.0
- CHAPTER 1 Installing Fedora
- Installing from CD or DVD
- Installing Using a Network
- Choosing, Configuring, and Installing the Boot Loader
- Installing and Configuring OpenOffice.org
- Installing Proprietary Video Drivers
- Installing Popular Games in Fedora
- Installing Xen
- Installing the Apache Server
- Installing Through Pirut


