Книга: Embedded Linux development using Eclipse
2.3 Installation
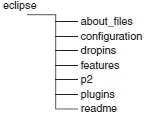
Installation itself is trivial. Simply untar the tar.gz file that you downloaded. This results in the directory structure shown in Figure 2.1. It’s not necessary to understand the content of these directories. Perhaps the most significant of them is plugins/, which contains all of the Java Archive (.jar) code. The readme directory contains a rather extensive HTML release notes file.

Figure 2.1: Eclipse directory structure.
The top-level eclipse/ directory contains several files, the most important of which is the executable, eclipse. Eclipse is started by executing this file, either by double-clicking it in a graphical file manager window or by executing /<path_to_eclipse>/eclipse in a shell window.
If you’re running a graphical desktop environment such as Gnome or KDE, you can create a custom launch button for Eclipse in the tool panel by following these instructions:
Gnome
1. Right-click on the tool panel.
2. Select Add to Panel?Custom Application Launcher.
3. Fill in the pop-up dialog box:
Name: Eclipse 3.4
Generic Name: Eclipse
Comment:
Command: /<path_to_eclipse>/eclipse
4. Select an appropriate icon.
5. Click OK.
KDE
1. Right-click on the tool panel.
2. Select Add?Special Button?Non-KDE Application.
3. Fill in the pop-up dialog box:
Executable: /<path_to_eclipse>/eclipse
Optional command line arguments:
4. Select an appropriate icon.
5. Click OK.
Then to start Eclipse, simply click on the launch button.
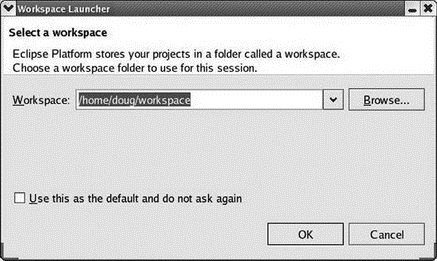
Go ahead and give it a try using any of the three mechanisms cited above. If you get to the screen shown in Figure 2.2, Eclipse is working. Click Cancel to terminate. You can skip the rest of this chapter and move on to the next, unless you want to try out Eclipse under Windows. If Eclipse failed to launch, it’s probably because the JVM is either not present or not compatible. Continue with the next section.

Figure 2.2: Workspace selection dialog.
- Installation on Red Hat 7.1
- CHAPTER 2 Installation
- Before You Begin the Installation
- Step-by-Step Installation
- Software Selection and Installation
- Using the Recovery Facility from the Installation Disc
- DHCP Software Installation
- APPENDIX B Installation Resources
- Planning the Installation
- Planning for Hard Drive Storage for Your Fedora Installation
- Partitioning Before and During Installation
- Using Fedora's kickstart Installation Method


