Книга: Fedora™ Unleashed, 2008 edition
Configuring X
Разделы на этой странице:
Configuring X
Although the Fedora installer can be used to configure X during installation, problems can arise if the PC's video card is not recognized. If you are unable to configure X during installation (refer to Chapter 1, "Installing Fedora"), do not specify booting to a graphical configuration and skip the X configuration portion of the installation. Note that some installs, such as for servers, don't require that X be configured for use to support active X sessions, but might require installation of X and related software to support remote users and clients.
You can use the following configuration tools, among others, to create a working xorg.conf file:
? system-config-display — This is Fedora's graphical configuration tool, which launches an X session to create an xorg.conf file.
? Xorg — The X server itself can create a skeletal working configuration.
The following sections discuss how to use each of these software tools to create a working xorg.conf file.
Configuring X with the system-config-display Client
You can use the system-config-display client to create or update an xorg.conf file. You can start by clicking the Display menu item found under System, Administration if you are already running X, but you can also begin, as root, by starting the client from the command line during a console session, like this:
# system-config-display
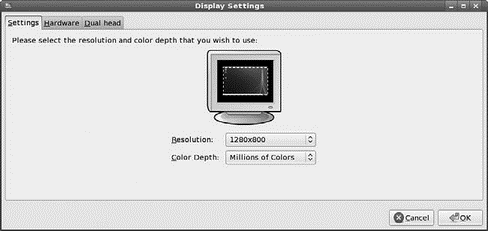
The screen clears, and system-config-display attempts to start an X session. If you start this client during an X session, its main window appears, as shown in Figure 3.4.

FIGURE 3.4 The system-config-display client provides a graphical configuration interface for creating or updating a system's xorg.conf file. Here you see the Display Settings main screen, offering resolution and color-depth settings.
The Display Settings main screen is a dialog showing the current monitor and video card settings (if configured). You can change the resolution (horizontal and vertical pixels) and color depth (number of supported colors) by clicking the specific drop-down menu that you want to alter. Click the OK or Cancel button to save or cancel any change.
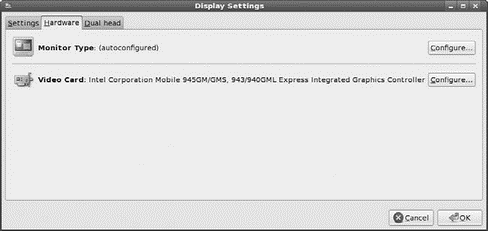
If you click the Hardware tab, other configuration options become available, as shown in Figure 3.5.

FIGURE 3.5 system-config-display's Hardware settings are used to configure a monitor and video card (and multihead video card) for X11R7.
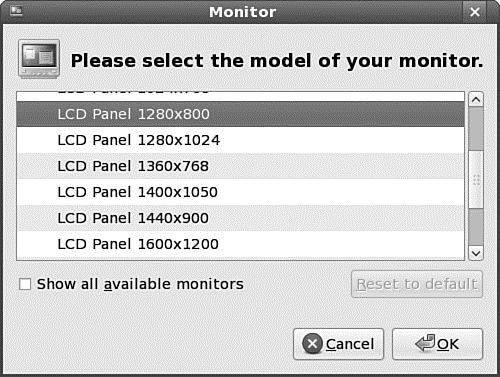
Click the Configure button in the Monitor Type area of the Hardware tab dialog to change your Monitor settings, as shown in Figure 3.6. You can use this dialog to configure a different monitor or to change current monitor settings.

FIGURE 3.6 You can scroll to select a new monitor to use for your X sessions.
First, scroll through the list of monitor brands (from the MonitorDB database), and then click the small triangle to the left of the name of the manufacturer or type. You then see a list of model names. Click to select one, and when you have finished, click the OK button to use the new settings or click the Cancel button to abort changes.
To configure a video card, you can click the Video Card area's Configure button in the Hardware tab dialog. The Video Card dialog appears, as shown in Figure 3.7.

FIGURE 3.7 Use the Hardware tab's Video Card Configure button to choose a new video card for your X sessions.
You can scroll through the list of video cards. You can click one to select it, and when you have finished, click the OK button to finalize your selection.
If your video card supports the use of two or more monitors, you can use the Dual head tab to configure multiple monitor support. Xorg supports multiple displays, using a feature named Xinerama. This feature enables multiple monitors to appear as a single display, and each display can be located in any quadrant of a screen's layout.
To use Xinerama for your desktop sessions, you must start the Xorg server with its +xinerama option. Your xorg.conf file must also have proper settings, and each display must be capable of supporting identical color depth (usually 16bpp or thousands of colors). You can find details about using Xinerama with Xorg in the Xorg man page and in the Xinerama HOWTO at http://www.tldp.org/HOWTO/Xinerama-HOWTO/.
When you have finished your changes to your X server settings, click the OK button. You will then see a dialog advising that you have to log out and then log back in (or exit your X session and restart X) to use the new settings.
The new settings are stored in a new xorg.conf file under the /etc/X11 directory. If you find that the new settings do not work, you can simply copy the backup xorg.conf file named xorg.conf.backup to xorg-conf in the same directory to revert to your original settings.
Using Xorg to Configure X
You can create the xorg.conf file manually by typing one from scratch in a text editor, but you can also create one automatically by using the Xorg server or configuration utilities (as discussed in the previous sections). As the root operator, you can use the following on the server to create a test configuration file:
# X -configure
After you press Enter, a file named xorg.conf.new is created in root's home directory, the /root directory. You can then use this file for a test session, like this:
# X -config /root/xorg.conf.new
- Chapter 5 Installing and Configuring VirtualCenter 2.0
- Chapter 14. Example scripts
- Appendix B. Common problems and questions
- IP filtering terms and expressions
- Choosing, Configuring, and Installing the Boot Loader
- Configuring Wireless Networks
- Installing and Configuring OpenOffice.org
- Configuring and Managing Print Services
- Creating and Configuring Local Printers
- Manually Configuring Quotas
- Configuring the Loopback Interface Manually
- Configuring DSL Access


