Книга: Advanced PIC Microcontroller Projects in C
Using a USB Protocol Analyzer
Using a USB Protocol Analyzer
If for any reason the project is not working, a USB protocol analyzer can be used to check the data transactions on the USB bus. There are many USB protocol analyzers on the market. Some expensive professional ones are hardware-based and require the purchase of special hardware. Most low-cost USB protocol analyzers are software-based. Two such tools are described here briefly.
UVCView
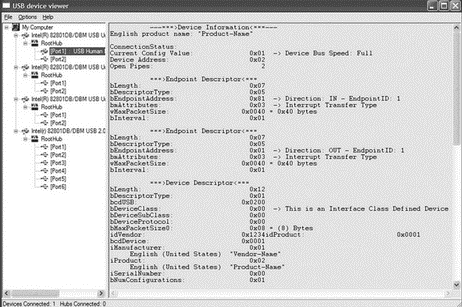
UVCView is a free Microsoft product that runs on a PC and displays the descriptors of a USB device after it is plugged in. Figure 8.27 shows the UVCView display after the microcontroller is plugged into the PC. The left side of the display shows the USB ports available in the system. Clicking on a device in this part of the display shows descriptor details of the device in the middle of the screen. In Figure 8.27 the descriptors of our device are shown. The UVCView display is useful when various fields of the device descriptors must be checked.

Figure 8.27: UVCView display of the project
USBTrace
USBTrace is a software USB protocol analyzer developed by SysNucleus (www.sysnucleus.com) and runs on a PC. The software monitors the USB ports of the PC it is running on and displays all the transactions on the bus. This software can be an invaluable tool when all the transactions on the line must be monitored and logged.
A limited-time demo version of USBTrace is available on the manufacturer’s web site. An example using the program is given in this section to show the data sent from the PC to the microcontroller:
• Start the USBTrace program.
• Connect the microcontroller to the USB port of the PC.
• Select the device from the left side of the display by checking the appropriate box.
• Start the Visual Basic program.
• Start capturing data by clicking the green arrow at the top left of the USBTrace menu. You should see the START OF LOG message in the middle part of the screen
• Enter number 3 on the Visual Basic form to turn on LEDs 0 and 1 of PORTB, and click the CLICK TO SEND button.
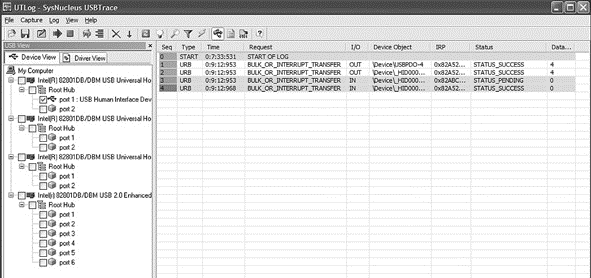
• You should see data packets in the middle of the screen as shown in Figure 8.28.

Figure 8.28: Transactions on the bus when CLICK TO SEND is clicked
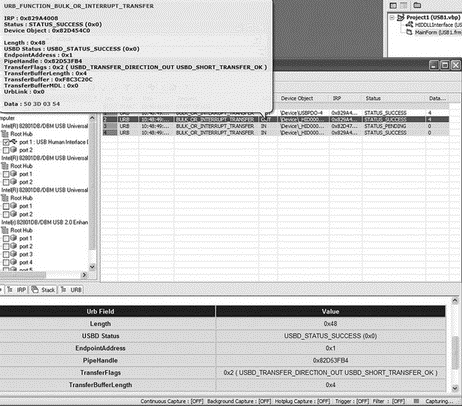
• Move the cursor over the first packet. This is the packet sent from the PC to the microcontroller (OUT packet). A pop-up window will appear, and information about this packet will be displayed, with the data sent appearing in hexadecimal at the bottom of the display, as shown in Figure 8.29. Note that the data consists of the following 4 bytes:
50 3D 03 54

P  =  3  T
which correspond to the ASCII string P=3T. This is the actual packet sent from the PC to the microcontroller.

Figure 8.29: Displaying contents of the packet
USBTrace can also display the device descriptors in detail, as shown in the lower part of the screen in Figure 8.29.
- Caveats using NAT
- Using Double Quotes to Resolve Variables in Strings with Embedded Spaces
- Complex protocols and connection tracking
- Data Binding Using the GridView Control
- Using the kill Command to Control Processes
- Как переносить данные через USB-брелок («флэшку»)?
- Наносится ли какой-нибудь вред USB-брелоку, когда его извлекают из разъема без использования функции безопасного отключе...
- Установка устройств с интерфейсом USB
- Installing Using a Network
- Using X
- Using a Display Manager
- Starting X from the Console by Using startx


