Книга: Advanced PIC Microcontroller Projects in C
PROJECT 8.2 — USB-Based Microcontroller Input/Output
This project is very similar to Project 8.1, except that it includes two-way communication, while in Project 8.1 data to be output on PORTB was sent to the microcontroller. In addition, PORTB data is received from the microcontroller and displayed on the PC.
The PC sends two commands to the microcontroller:
• Command P=nT requests the microcontroller to send data byte n to PORTB.
• Command P=?? requests the microcontroller to read its PORTB data and send it as a byte to the PC. The PC then displays this data on the screen. The microcontroller sends its data in the familiar format P=nT.
The hardware of this project is the same as the hardware for the previous project, shown in Figure 8.11, where eight LEDs are connected to PORTB of a PIC18F4550 microcontroller which is operated from a 8MHz crystal.
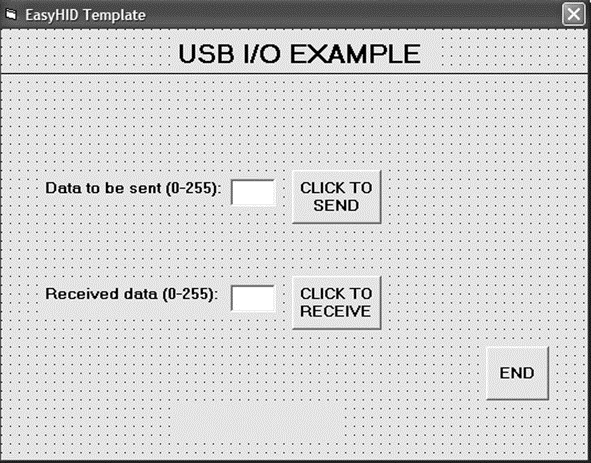
A single form is used in this project, and Figure 8.31 shows the format of this form. The upper part of the form is the same as in Project 8.1, i.e., sending data to PORTB of the microcontroller. A text box and a command button named CLICK TO RECEIVE are also placed on the form. When the button is pressed, the PC sends command P=?? to the microcontroller. The microcontroller reads its PORTB data and sends it in the format P=nT to the PC where it is displayed in the text box.

Figure 8.31: Visual Basic form of the project
Figure 8.32 shows the mikroC program of the project. The program is named USB2.C and is very similar to the one for the previous project. But here, in addition, when the command P=?? is received from the PC, the microcontroller reads PORTB data and sends it to the PC in the format using the mikroC function Hid_Write.
/***********************************************************************

            USB BASED MICROCONTROLLER INPUT/OUTPUT PORT

          ==============================================

In this project a PIC18F4550 type microcontroller is connected

to a PC through the USB link.

A Visual Basic program runs on the PC where the user enters the

bits to be set or cleared on PORTB of the microcontroller. The

PC sends a command to the microcontroller requesting it to set

or reset the required bits of the microcontroller PORTB. In addition,

the PORTB data can be requested from the microcontroller and displayed

on the PC.

The microcontroller is operated from a 8MHz crystal, but the CPU

clock frequency is increased to 48MHz. Also, the USB module operates

with 48MHz.

The commands are:

From PC to microcontroller: P=nT (Send data byte n to PORTB)

                            P=?? (Give me PORTB data)

From microcontroller to PC: P=nT (Here is my PORTB data)

Author: Dogan Ibrahim

Date:   September 2007

File:   USB2.C

*************************************************************************/

#include "C:Program FilesMikroelektronikamikroCExamplesEasyPic4extra_examplesHIDlibraryUSBdsc.c"

unsigned char Read_buffer[64];

unsigned char Write_buffer[64];

unsigned char num,i;

//

// Timer interrupt service routine

//

void interrupt() {

 HID_InterruptProc(); // Keep alive

 TMR0L = 100;         // Reload TMR0L

 INTCON.TMR0IF = 0;   // Re-enable TMR0 interrupts

}

//

// Start of MAIN program

//

void main() {

 ADCON1 = 0xFF; // Set PORTB to digital I/O

 TRISB = 0;     // Set PORTB to outputs

 PORTB = 0;     // PORTB all 0s to start with

 //

 // Set interrupt registers to power-on defaults

 // Disable all interrupts

 //

 INTCON=0;

 INTCON2=0xF5;

 INTCON3=0xC0;

 RCON.IPEN=0;

 PIE1=0;

 PIE2=0;

 PIR1=0;

 PIR2=0;

 //

 // Configure TIMER 0 for 20ms interrupts. Set prescaler to 256

 // and load TMR0L to 156 so that the time interval for timer

 // interrupts at 8MHz is 256*156*0.5 = 20ms

 //

 // The timer is in 8-bit mode by default

 //

 T0CON = 0x47;      // Prescaler = 256

 TMR0L = 100;       // Timer count is 256-156 = 100

 INTCON.TMR0IE = 1; // Enable T0IE

 T0CON.TMR0ON = 1;  // Turn Timer 0 ON

 INTCON = 0xE0;     // Enable interrupts

 //

 // Enable USB port

 //

 Hid_Enable(&Read_buffer, &Write_buffer);

 Delay_ms(1000);

 Delay_ms(1000);

 //

 // Read from the USB port. Number of bytes read is in num

 //

 for(;;) // do forever

 {

  num=0;

  while (num != 4) {

   num = Hid_Read();

  }

  if (Read_buffer[0] == 'P' && Read_buffer[1] == '=' &&

   Read_buffer[2] == '?' && Read_Buffer[3] == '?') {

   TRISB = 0xFF;

   Write_buffer[0] = 'P';

   Write_buffer[1] = '=';

   Write_buffer[2] = PORTB;

   Write_buffer[3] = 'T';

   Hid_Write(&Write_buffer, 4);

  } else {

   if (Read_buffer[0] == 'P' && Read_buffer[1] == '=' &&

    Read_buffer[3] == 'T') {

    TRISB = 0;

    PORTB = Read_buffer[2];

   }

  }

 }

 Hid_Disable();

}

Figure 8.32: mikroC program listing of the project
The program checks the format of the received command. For P=?? type commands, PORTB is configured as inputs, PORTB data is read into Write_buffer[2], and Write_buffer is sent to the PC, where Write_buffer[0]=“P,” Write_buffer[1]=“=”, and Write_buffer[3]=“T” as follows:
if (Read_buffer[0] == 'P' && Read_buffer[1] == '=' &&

 Read_buffer[2] == '?' && Read_Buffer[3] == '?') {

 TRISB = 0xFF;

 Write_buffer[0] = 'P';

 Write_buffer[1] = '=';

 Write_buffer[2] = PORTB;

 Write_buffer[3] = 'T';

 Hid_Write(&Write_buffer, 4);

}
For P=nT type commands, PORTB is configured as outputs and Read_buffer[2] is sent to PORTB as follows:
if (Read_buffer[0] == 'P' && Read_buffer[1] == '=' &&

 Read_buffer[3] == 'T') {

 TRISB = 0;

 PORTB = Read_buffer[2];

}
The microcontroller clock should be set as in Project 8.1 (i.e., both the CPU and the USB module should have 48MHz clocks). The other configurations bits should also be set as described in the previous problem.
- CHAPTER 8 Advanced PIC18 Projects — USB Bus Projects
- 1.3 Microcontroller Features
- 1.4 Microcontroller Architectures
- 1.3.5 Reset Input
- PROJECT 8.2 — USB-Based Microcontroller Input
- PROJECT 8.3 — USB-Based Ambient Pressure Display on the PC
- Introduction to Microprocessors and Microcontrollers
- Chapter 16. Commercial products based on Linux, iptables and netfilter
- Project PDL
- INPUT chain
- Глава 5. Разработка и анализ бизнес-планов в системе Project Expert
- Turtle Firewall Project


