Книга: Fedora™ Unleashed, 2008 edition
Partitioning Your Hard Drive
Разделы на этой странице:
Partitioning Your Hard Drive
For the moment, select Create Custom Layout and click Next to move to the screen shown in Figure 1.12. You could, however, opt to delete all partitions (including Windows partitions) on the drive, remove only Linux partitions on the drive, or use only unallocated space.
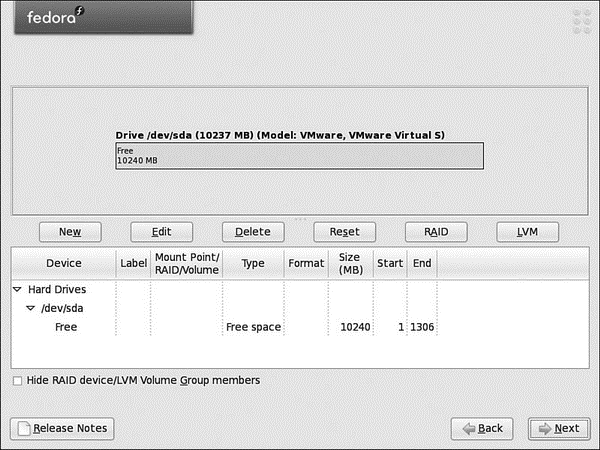
FIGURE 1.12 Fedora's powerful partitioning tool enables you to create a partition scheme unique to your requirements.
NOTE
If you followed the earlier partitioning instructions, choose to Use Free Space on Selected Drives and Create Default Layout.
If you choose one of these three, you get a default layout that uses logical volume management. This is a special type of partitioning that makes disk partitions much easier to work with.
Logical Volume Management for Beginners
Logical volume management sounds a lot more difficult than it is. In effect, what it does is allow you to produce single logical partitions that can be made up of multiple physical drives. Logical volumes can also be resized as required, something that is usually difficult when dealing with ext3 partitions (Fedora's native partition type). There is one thing that you need to remember: Create a separate /boot partition independent of the logical volumes; otherwise, your system will not boot!
This example looks at creating a partition table on one hard drive. To get started, click the New button to bring up the screen shown in Figure 1.13. First of all, you need to create a small partition that has the mount point /boot. This is to enable Fedora to actually boot and needs to be a maximum of only about 100MB in size. Make sure that only the first disk is checked (sda in the example) and select /boot from the drop-down mount point menu. Finally, change the size of the partition to 100MB and click the OK button to create the first partition.
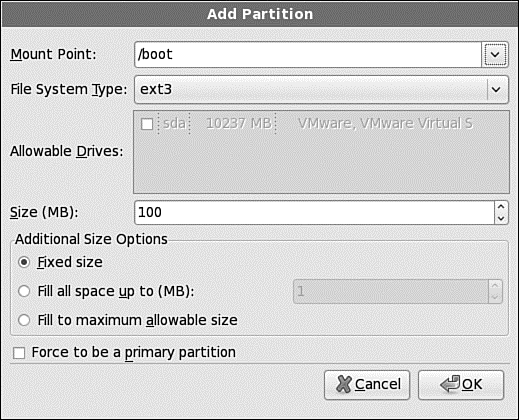
FIGURE 1.13 Make sure to create your boot partition; otherwise, all your good work will be in vain!
Now we need to create physical volumes that will allow Fedora to combine them into a logical volume. Click the New button again to bring up the same window as Figure 1.13, but this time you want to change the File System Type to physical volume (LVM). Make sure that only one drive is checked, and finally select the option Fill to Maximum Allowable Size to instruct Fedora to use all available space.
When you have created the physical volumes, you now need to bind them together through a logical volume. Click the LVM button in the partitioner's main window to bring up the LVM options (see Figure 1.14). You can give your logical volume group a more meaningful name than VolGroup00, but you must ensure that there are no spaces in the name. Next you can choose a physical extent size for your volumes, or rather the size of chunks that the disks will be "cut up into." Unless you really have a specific need to change this setting, you should leave it at 32.
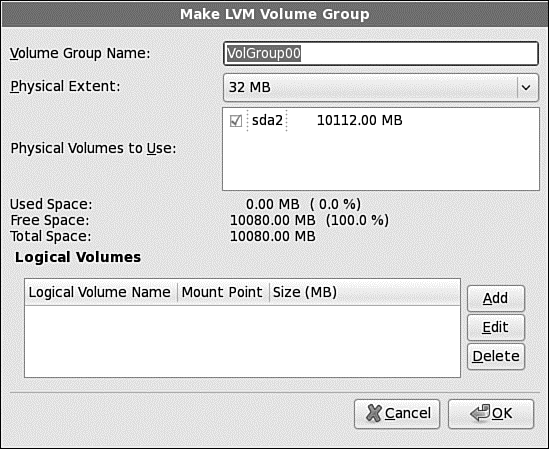
FIGURE 1.14 Harness the flexibility of logical volumes through Fedora's easy-to-use utility.
Now you need to create your partitions within your logical volume group, and you do this as you would any other Linux distribution, making sure that you at least have a / partition and a swap partition. In the example, click the Add button to be taken to the Make Logical Volume screen (see Figure 1.15) where you can specify a mount point, file system type, volume name (again no spaces), and finally the size of the partition.
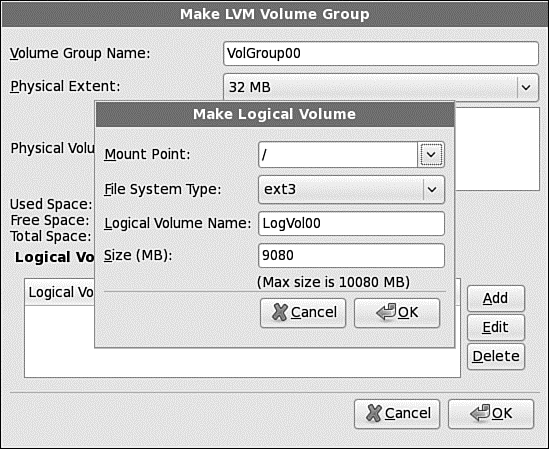
FIGURE 1.15 Use this screen to define the logical volumes that make up your logical group.
You have to create at least two partitions: the / partition and the swap partition. However, you can add several mount points, depending on your specific requirements. Some users find it helpful to create a separate /home partition, which we do in the example. As you add each logical volume, it appears in the main LVM Group options screen (refer to Figure 1.14). When you are finished, click the OK button to return to the main partition screen, which should look similar to Figure 1.16.
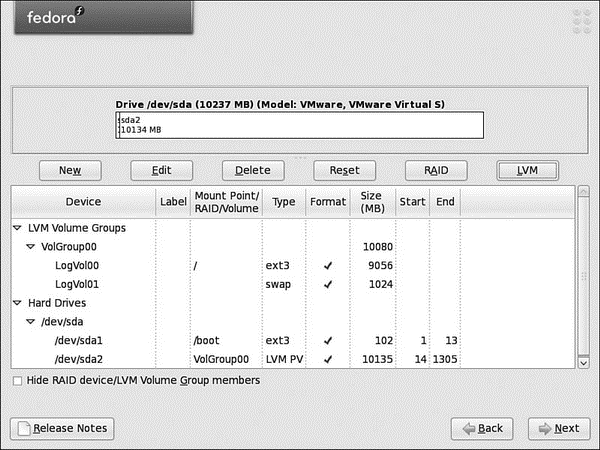
FIGURE 1.16 The completed masterpiece. It is worthwhile spending extra time to get the best partition layout for your requirements.
Now you are ready to proceed to the next screen by clicking the Next button.
- Choosing a Partitioning Scheme
- Hard Disk
- JDBC Туре 4 DRIVER
- Chapter 12. Debugging your scripts
- Listing your active rule-set
- Updating and flushing your tables
- How to use this License for your documents
- 2. How to Apply These Terms to Your New Programs
- Test Driver Code
- Scaling makes your object darker?
- Keeping Your Software Up-to-Date
- TV and Video Hardware
