Книга: Mastering VMware® Infrastructure3
Network Attached Storage and Network File System
Разделы на этой странице:
Network Attached Storage and Network File System
Although Network Attached Storage (NAS) devices do not hold up to the performance and efficiency of fibre channel and iSCSI networks, they most certainly have a place on some networks. Virtual machines stored on NAS devices are still capable of the advanced VirtualCenter features of VMotion, DRS, and HA. With a significantly lower cost and simplified implementation, NAS devices can prove valuable in providing network storage in a VI3 environment.
Understanding NAS and NFS
Unlike the block-level transfer of data performed by fibre channel and iSCSI networks, access to a NAS device happens at the file system level. You can access a NAS device by using Network File System (NFS) or Server Message Block (SMB), also referred to as Common Internet File System (CIFS). Windows administrators will be most familiar with SMB traffic, which occurs each time a user accesses a shared resource using a universal naming convention (UNC) like servernamesharename. Whereas Windows uses the SMB protocol for file transfer, Linux-based systems use NFS to accomplish the same thing.
Although you can configure the Service Console with a Samba client to allow communication with Windows-based computers, the VMkernel does not support using SMB and therefore lacks the ability to retrieve files from a computer running Windows. The VMkernel only supports NFS version 3 over TCP/IP.
Like the deployment of an iSCSI storage network, a NAS/NFS deployment can benefit greatly from being located on a dedicated IP network where traffic is isolated. Figure 4.30 shows a NAS/NFS deployment on a dedicated network.
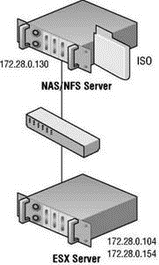
Figure 4.30 An NAS Server deployed for shared storage among ESX Server hosts should be located on a dedicated network separated from the common intranet traffic.
Without competition from other types of network traffic (e-mail, Internet, instant messaging, etc.), the transfer of virtual machine data will be much more efficient and provide better performance.
NFS Security
NFS is unique because it does not force the user to enter a password when connecting to the shared directory. In the case of ESX, the connection to the NFS server happens under the context of root, thus making NFS a seamless process for the connecting client. However, you might be wondering about the inherent security. Security for NFS access is maintained by limiting access to only the specified or trusted hosts. In addition, the NFS server employs standard Linux file system permissions based on user and group IDs. The user IDs (UIDs) and group IDs (GIDs) of users on a client system are mapped from the server to the client. If a user or a client has the same UID and GID as a user on the server, they are both granted access to files in the NFS share owned by that same UID and GID. As you have seen, ESX Server accesses the NFS server under the context of the root user and therefore has all the permissions assigned to the root user on the NFS server.
When creating an NFS share on a Linux system, you must supply three pieces of information:
? The path to the share (i.e., /nfs/ISOs).
? The hosts that are allowed to connect to the share, which can include:
? A single host identified by name or IP address.
? Network Information Service (NIS) groups.
? Wildcard characters such as * and ? (i.e., *.vdc.local).
? An entire IP network (i.e., 172.30.0.0/24).
? Options for the share configuration, which can include:
? root_squash, which maps the root user to the nobody user and thus prevents root access to the NFS share.
? no_root_squash, which does not map the root user to the nobody user and thus provides the root user on the client system with full root privileges on the NFS server.
? all_squash, which maps all UIDs and GIDs to the nobody user for enabling a simple anonymous access NFS share.
? ro, for read-only access.
? rw, for read-write access.
? sync, which forces all data to be written to disk before servicing another request.
The configuration of the shared directories on an NFS server is managed through the /etc/exports file on the server. The following example shows a /etc/exports file configured to allow all hosts on the 172.30.0.0/24 network access to a shared directory named NFSShare:
root: # cat /etc/exports/mnt/NFSShare 172.30.0.0/24 (rw,no_root_squash,sync)
The next section explores the configuration requirements for connecting an ESX Server host to a shared directory on an NFS server.
Configuring ESX to Use NAS/NFS Datastores
Before an ESX Server host can be connected to an NFS share, the NFS server must be configured properly to allow the host. Creating an NFS share on a Linux system that allows an ESX Server host to connect requires that you configure the share with the following three parameters:
? rw (read-write)
? no root squash
? sync
To connect an ESX Server to an NAS/NFS datastore, you must create a virtual switch with a VMkernel port that has network access to the NFS server. As mentioned in the previous section, it would be ideal for the VMkernel port to be connected to the same physical network (the same IP subnet) as the NAS device. Unlike the iSCSI configuration, creating an NFS datastore does not require that the Service Console also have access to the NFS server. Figure 4.31 details the configuration of an ESX Server host connecting to a NAS device on a dedicated storage network.

Figure 4.31 Connecting an ESX Server to a NAS device with an NFS share requires the creation and configuration of a virtual switch with a VMkernel port.
To create a VMkernel port for connecting an ESX Server to a NAS device, perform these steps:
1. Use the VI Client to connect to VirtualCenter or an ESX Server host.
2. Select the hostname in the inventory panel and then click the Configuration tab.
3. Select Networking from the Hardware menu.
4. Select the virtual switch that is bound to a network adapter that connects to a physical network with access to the NAS device. (Create a new virtual switch if necessary.)
5. Click the Properties link of the virtual switch.
6. In the vSwitch# Properties box, click the Add button.
7. Select the radio button labeled VMkernel, as shown in Figure 4.32, and then click Next.
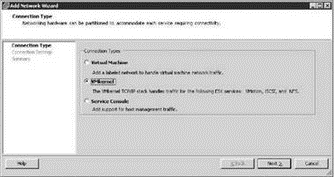
Figure 4.32 A VMkernel port is used for performing VMotion or communicating with an iSCSI or NFS storage device.
8. As shown in Figure 4.33, type a name for the port in the Network Label text box. Then provide an IP address and subnet mask appropriate for the physical network the virtual switch is bound to.
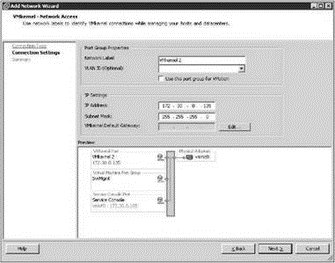
Figure 4.33 Connecting an ESX Host to an NFS server requires a VMkernel port with a valid IP address and subnet mask for the network on which the virtual switch is configured to communicate.
9. Click Next, review the configuration, and then click Finish.
VMkernel Default Gateway
If you are prompted to enter a default gateway, choose No if one has already been assigned to a Service Console port on the same switch or if the VMkernel port is configured with an IP address on the same subnet as the NAS device. Select the Yes option if the VMkernel port is not on the same subnet as the NAS device.
Unlike fibre channel and iSCSI storage, an NFS datastore cannot be formatted as VMFS. For this reason it is recommended that NFS datastores not be used for the storage of virtual machines in large enterprise environments. In non-business-critical situations such as test environments and small branch offices, or for storing ISO files and templates, NFS datastores are an excellent solution.
Once you've configured the VMkernel port, the next step is to create a new NFS datastore. To create an NFS datastore on an ESX Server host, perform the following steps:
1. Use the VI Client to connect to a VirtualCenter or an ESX Server host.
2. Select the hostname in the inventory panel and then select the Configuration tab.
3. Select Storage (SCSI, SAN, and NFS) from the Hardware menu.
4. Click the Add Storage link.
5. Select the radio button labeled Network File System, as shown in Figure 4.34.
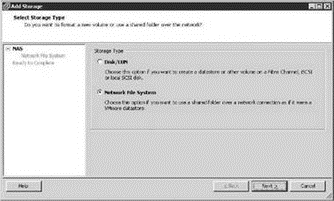
Figure 4.34 The option to create an NFS datastore is separated from the disk or LUN option that can be formatted as VMFS.
6. Type the name or IP address of the NFS server in the Server text box.
7. Type the name of the shared directory on the NFS server in the Folder text box. Ensure that the folder listed here matches the entry of the /etc/hosts file on the NFS server. If the folder in /etc/hosts is listed as /ISOShare, then enter /ISOShare in this text box. If the folder is listed as /mnt/NFSShare then enter /mnt/NFSShare in the Folder text box of the Add Storage wizard.
8. Type a unique datastore name in the Datastore Name text box and click Next, as shown in Figure 4.35.
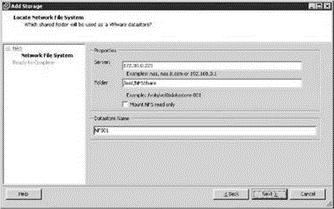
Figure 4.35 To create an NFS datastore, you must enter the name or IP address of the NFS server, the name of the directory that has been shared, and a unique datastore name.
9. Click Finish to view the NFS datastore in the list of Storage locations for the ESX Server host.
- ESX Network Storage Architectures: Fibre Channel, iSCSI, and NAS
- Shared Cache file
- Безопасность внешних таблиц. Параметр EXTERNAL FILE DIRECTORY
- Разработка приложений баз данных InterBase на Borland Delphi
- Open Source Insight and Discussion
- Introduction to Microprocessors and Microcontrollers
- Chapter 6. Traversing of tables and chains
- Chapter 8. Saving and restoring large rule-sets
- Chapter 11. Iptables targets and jumps
- Chapter 5 Installing and Configuring VirtualCenter 2.0
- Chapter 13. rc.firewall file
- Chapter 16. Commercial products based on Linux, iptables and netfilter
