Книга: Windows Server 2012 R2 Storage, Security, & Networking Pocket Consultant
Configuring scheduled backups
Разделы на этой странице:
Configuring scheduled backups
With Windows Server Backup, you can schedule automated backups for a server by following these steps:
1. In Windows Server Backup, tap or click Backup Schedule on the Action menu or in the Actions pane to start the Backup Schedule Wizard. Tap or click Next.
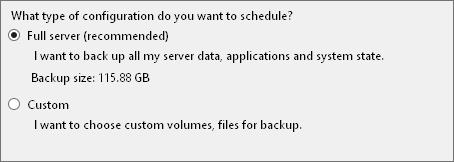
2. On the Select Backup Configuration page, note the backup size listed under the Full Server option, as shown in Figure 11-3. This is the storage space required to back up the server data, applications, and the system state. To back up all volumes on the server, select the Full Server option, and then tap or click Next. To back up selected volumes on the server, select the Custom option, and then tap or click Next.

FIGURE 11-3 Note the backup size before you continue.
NOTE Volumes that contain operating system files or applications are included in the backup by default and cannot be excluded. Unfortunately, this means that on a server on which you installed Windows Server 2012 R2 on the D drive, you must also back up the entire C drive because the C drive in this case includes the boot manager and other boot files.
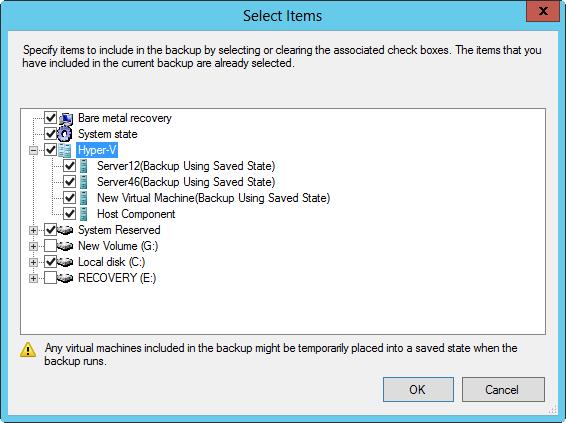
3. If you select Custom, the Select Items For Backup page is displayed. Tap or click Add Items. As shown in Figure 11-4, you can select the check boxes for the volumes you want to back up and clear the check boxes for the volumes you want to exclude. Select the Bare Metal Recovery option if you want to be able to fully recover the operating system. Select the System State option if you want to back up the system state. If the server is a Hyper-V host, you’ll have a Hyper-V option and can expand the Hyper-V node to select individual virtual servers to back up by using their saved state and the host component. Tap or click OK, and then tap or click Next.
TIP After you select items, you might want to tap or click Advanced Settings before continuing. You can then use the options on the exclusions tab to identify locations and file types that should not be backed up. You also can then use the options on the VSS Settings tab to specify whether you want to create a full backup or a copy backup. Keep in mind that when you select anything less than a full volume for backup, the backup is performed file by file rather than as an image.

FIGURE 11-4 Select the items to include in the backup.
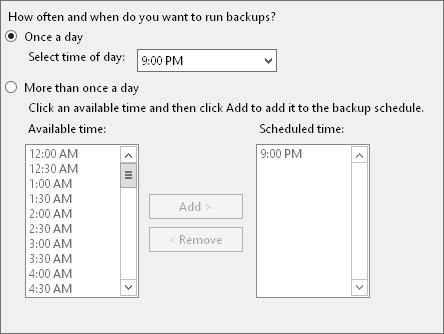
4. On the Specify Backup Time page, shown in Figure 11-5, you can specify how often and when you want to run backups. To perform backups daily at a specific time, choose Once A Day, and then select the time to start running the daily backup. To perform backups multiple times each day, choose More Than Once A Day. Next, tap or click a start time under Available Time, and then tap or click Add to move the time under Scheduled Time. Repeat this process for each start time you want to add. Tap or click Next when you are ready to continue.

FIGURE 11-5 Select the time to start running the backup.
5. On the Specify Destination Type page, you have these options:
? Back Up To A Hard Disk That Is Dedicated For Backups Enables you to specify a dedicated hard disk for backups. Although you can use multiple disks for backups, any disk you select will be formatted, and then dedicated only to backups. This option is recommended because you’ll get the best performance. If you select this option, tap or click Next, select the disk or disks to use, and then tap or click Next again.
? Back Up To A Volume Enables you to write backups to individual volumes on a hard disk. Because any volume you select is not dedicated to backups, it can be used for other purposes. However, the performance of any of the selected volumes is reduced while backups are being written. If you select this option, tap or click Next, use the Add and Remove options to select the volumes to use, and then tap or click Next again.
? Back Up To A Shared Network Folder Enables you to specify a shared network folder for backups. With this option, you can have only one backup at a time because each new backup overwrites the previous backup. If you select this option, tap or click Next. When prompted, tap or click OK. Enter the UNC path to the network share, such as FileServer25BackupsExchange. If you want the backup to be accessible to everyone who has access to the shared folder, select Inherit under Access Control. If you want to restrict access to the shared folder to the current user and members of the Administrators and Backup Operators groups, select Do Not Inherit under Access Control. Tap or click Next. When prompted to provide access credentials, enter the user name and password for an account authorized to access and write to the shared folder.
6. On the Confirmation page, review the details, and then tap or click Finish. The wizard formats the disk. The formatting process might take several minutes or considerably longer depending on the size of the disk.
7. On the Summary page, tap or click Close. Your backups are now scheduled for the selected server.
With Wbadmin, you can schedule backups by using the ENABLE BACKUP command. ENABLE BACKUP accepts the following parameters:
? —addTarget Sets the storage location for backups according to the GUID of the disk you want to use. The GUID of a disk is listed as the disk identifier in the output of the Wbadmin GET DISKS command.
? —removeTarget Sets the storage location to remove from the backup schedule according to the GUID of the disk you want to use. The GUID of a disk is listed as the disk identifier in the output of the Wbadmin GET DISKS command.
? —include Sets a comma-delimited list of volume drive letters, volume mount points, and GUID volume names to back up.
? —allCritical Includes all operating system volumes in the backup automatically.
? —quiet Specifies that you want to run the command with no prompts to the user.
To understand how ENABLE BACKUP is used, consider the following examples:
Schedule a backup for C and D at 9:00 P.M. daily
wbadmin enable backup -addTarget:{06d88776-0000-0000-0000-000000000000}
-schedule:18:00 -include: c:,d:
Schedule a backup for all operating system volumes at 6:00 A.M. and 9:00 P.M. daily
wbadmin enable backup -ddTarget:{06d88776-0000-0000-0000-000000000000}
-schedule:06:00,18:00 -allCritical
- Configuring scheduled backups
- Modifying or stopping scheduled backups
- Creating and scheduling backups with Wbadmin
- Running manual backups
- Recovering your server from hardware or startup failure
- Recovering from a failed start
- Starting a server in safe mode
- Backing up and restoring the system state
- Restoring Active Directory
- Restoring the operating system and the full system
- Restoring applications, nonsystem volumes, and files and folders
- Running manual backups
- Chapter 5 Installing and Configuring VirtualCenter 2.0
- Choosing, Configuring, and Installing the Boot Loader
- Configuring Wireless Networks
- Configuring X
- Installing and Configuring OpenOffice.org
- Configuring and Managing Print Services
- Creating and Configuring Local Printers
- Manually Configuring Quotas
- Configuring the Loopback Interface Manually
- Configuring DSL Access
- Configuring a PPPoE Connection Manually


