Книга: Mastering VMware® Infrastructure3
Performing Hot Migrations
Performing Hot Migrations
Hot migration, or migration of a running physical computer, is ideal for those systems that cannot afford to be taken offline and do not perform consistent changes to local data. Systems like domain controllers, web servers, and print servers are excellent candidates for hot migrations because they generally have a static set of data. Hot migration allows administrators to convert the physical system to a virtual machine and then to cut over to the virtual machine and decommission the physical machine without losing data.
Perform the following steps to conduct a hot migration of a running computer:
1. Use the VI Client to connect to a VirtualCenter 2.5 server.
2. Right-click on a cluster or ESX Server host object in the VirtualCenter inventory and select the Import Machine option.
3. Click the Next button on the Source page of the Import Wizard.
4. As shown in Figure 7.12, select the radio button labeled Physical Computer and click the Next button.
5. Enter the target computer information, including name or IP address and the appropriate user account information, as shown in Figure 7.13, then click the Next button. The user account must have administrative privileges on the target computer being converted to a virtual machine.
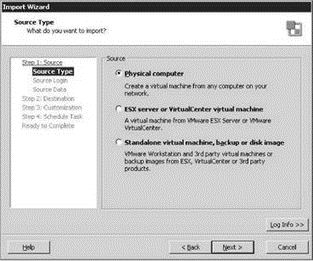
Figure 7.12 The VMware Converter Enterprise converts physical computers into virtual machines.
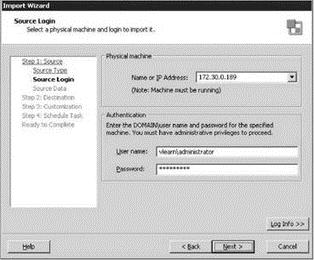
Figure 7.13 In addition to identifying the target computer by name or IP address, you must supply administrative credentials to perform a hot migration.
6. Select to uninstall the VMware Converter Agent automatically or manually in the Remote Installation Required warning dialog box shown in Figure 7.14, then click the Yes button to continue.
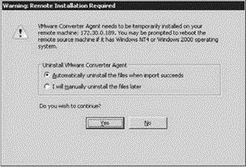
Figure 7.14 The VMware Converter Agent can be uninstalled automatically or manually once the conversion is complete.
7. On the Source Data page, shown in Figure 7.15, select the volumes that should be converted as part of the physical-to-virtual migration process. Volumes can be ignored by deselecting the respective check box.
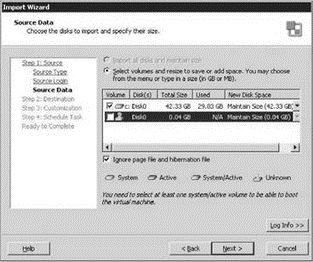
Figure 7.15 The VMware Converter can migrate all, some, or only one of the volumes that exist on the physical server.
As part of the migration process, volumes can be resized. Notice in Figure 7.15 that the total size of volume C: on Disk0 is 42.33GB with 29.03GB used. The default value in the New Disk Space column is equal to the existing total size. Figure 7.16 shows the New Disk Space value has been increased by 10GB to give more space to the volume.
8. Click Next once the Source Data page is configured appropriately for the migration.
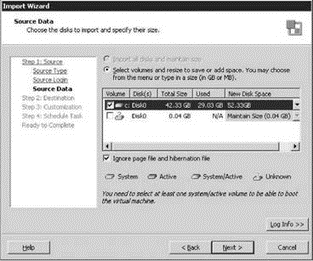
Figure 7.16 The VMware Converter allows volumes to be resized (increased or decreased) as part of the migration process.
9. Click Next to begin configuration of the destination details of the migration process.
10. As shown in Figure 7.17, provide a virtual machine name and the location in the inventory where the virtual machine will reside, and then click Next.
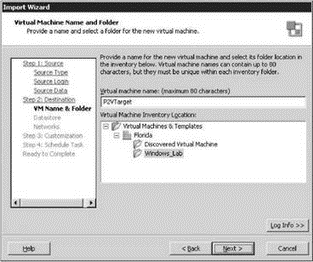
Figure 7.17 The new virtual machine can be placed anywhere throughout the Virtual Machines & Templates inventory.
11. As shown in Figure 7.18, select a datastore with ample storage for the new virtual machine disk files, and then click Next.
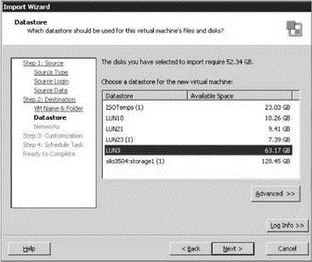
Figure 7.18 The conversion process details the storage location for the new virtual machine disk files.
Clicking the Advanced button lets you place each new virtual machine disk file in different datastores, as shown in Figure 7.19.
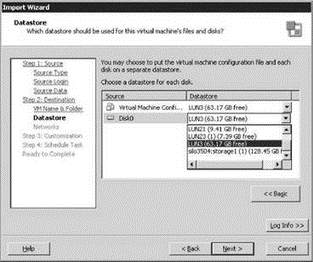
Figure 7.19 The Advanced configuration allows virtual machine files to be spread across different datastores.
12. On the Networks page, shown in Figure 7.20, select the number of network adapters for the new virtual machine and then select the network that each network adapter should be connected to. Then click Next.
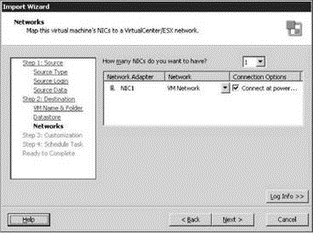
Figure 7.20 The new virtual machine can be configured with up to four network adapters on any of the available virtual machine networks.
13. On the Customization page, shown in Figure 7.21, select the check box labeled Install VMware tools, and then click Next.
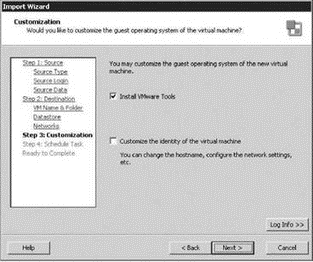
Figure 7.21 The new virtual machine can be customized by installing VMware tools or by changing the entire identity of the virtual machine.
In the option labeled Customize, the identity of the virtual machine should only be selected if the physical machine and virtual machine will both remain part of the production network. Leave the box unchecked to maintain all existing settings of the physical computer. Selecting the option to customize the wizard includes the following additional pages:
? Computer Info
? Windows License
? Time Zone
? Network Settings
? Workgroup/Domain
14. On the Schedule Task page, select to perform the migration immediately or schedule it to take place at a later time, and then click Next.
15. To power on the virtual machine after the migration is complete, select the Power check box on the new virtual machine after creation. If you want to wait until the physical box is powered off before using the virtual machine, then leave this check box unselected. Click the Finish button to begin the conversion.
16. The Recent Tasks pane of VirtualCenter will detail the progress of the conversion process, as shown in Figure 7.22.
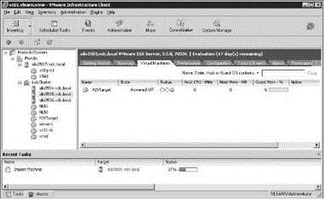
Figure 7.22 VirtualCenter's Recent Tasks pane will monitor the progress of the physical-to-virtual migration.
Eliminating Excess in a P2V
Often times physical servers are purchased with more hardware than is required simply because the budget is there to support it. For example, it is not uncommon to find simple domain controllers or print servers with hundreds of gigabytes of empty space. While this is not a huge administrative concern in a physical server environment, it is a red flag in the physical-to-virtual migration process. The process of converting a physical machine to a virtual machine should involve an inspection of the resources assigned to the physical server as it is migrated. In this case, when converting a domain controller or print server with hundreds of gigabytes of free storage, it is best to adjust the disk size as part of the conversion process. This ensures that expensive SAN storage is not aimlessly consumed by virtual machines that will never utilize the resource to its full capacity.
The same can be said for memory and CPU resource allocation. As part of the migration, RAM and CPU allocations should be revisited and adjusted to better suit the demands of the virtual machine. For example, a domain controller with two dual-core processors and 4GB of RAM is severely overallocated. While the conversion process does not directly allow these two resources to be adjusted as part of the conversion wizard, they can easily be adjusted after the virtual machine has been created, prior to the first power-on.
- Oldest active и Oldest snapshot
- 10.3.4. Performing an RPC
- Performing server backups
- Uploading Photos
- Deleting a Photo
- 4.7.5. Извлечение готовых работ из программы Photo Booth
- Свойство HotKey
- Часть II Приемы работы в Photoshop
- 4.7. Рабатаем со встроенной камерой с помощью приложения Photo Booth
- Photojojo: атака услужливых кукол
- Gansevoort Hotel: история любви
- Игра как первый шаг к привлечению соискателей: примеры Marriott Hotels и Domino’s Pizza
