Книга: Mastering VMware® Infrastructure3
Creating and Managing VLANs
Creating and Managing VLANs
To vLAN or not to vLAN? That is the question. As defined in the first section, a virtual LAN (vLAN) is a logical LAN configured on a virtual or physical switch port that provides efficient traffic segmentation, security, and efficient bandwidth utilization by providing traffic only to the ports configured for a respective vLAN. In addition to the security and segmentation advantages, vLANs allow network administrators to exceed the physical distance limitations of standard cabling. Using vLANs is advantageous when an ESX Server host has a limited number of physical network adapters.
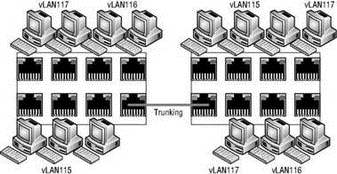
Figure 3.32 shows a typical vLAN configuration across physical switches.

Figure 3.32 Virtual LANs provide secure traffic segmentation without the cost of additional hardware.
No vLAN Needed
Virtual switches in the VMkernel do not need vLANs if an ESX Server host has enough physical network adapters to connect to each of the vLAN subnets.
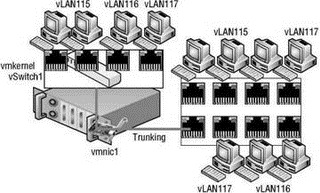
Blade servers provide an excellent example of when vLANs offer tremendous benefit, because the blade servers offer limited expansion slots for physical network adapters due to the small form factor of the blade casing. Figure 3.33 shows a vSwitch architecture with vLANs as it integrates with a physical architecture also using vLANs. For a vSwitch to successfully send and receive packets tagged as one vLAN or another, a trunk port must be configured on the physical switch port to which the physical network adapter assigned to the vSwitch is connected.

Figure 3.33 The physical switch port to which a vSwitch's assigned physical network adapter is connected must be configured as a trunk port for vLAN tagging to work between virtual and physical switches.
Follow these steps to configure a vSwitch with a virtual machine port group with a vLAN using an ID of VLAN 117:
1. Use the VI Client to establish a connection to a VirtualCenter server or an ESX Server host.
2. Click the hostname in the inventory panel on the left, select the Configuration tab from the details pane on the right, and then select Networking from the Hardware menu list.
3. Click the Properties link for the vSwitch where the new vLAN should be created.
4. Click the Add button, select the Virtual Machine radio button option, and then click Next.
5. Type the name of the virtual machine port group in the Network Label text box. In this case, vLAN117 would be appropriate.
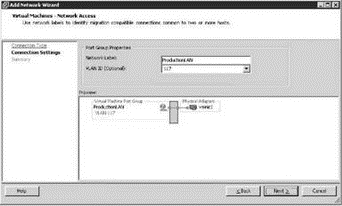
6. Type 117 in the VLAN ID (Optional) text box, as shown in Figure 3.34.

Figure 3.34 The vLAN tagging support of vSwitches simplifies integration with existing physical hardware configured with vLANs.
7. Click Next to review the vSwitch configuration and then click Finish.
Although vLANs reduce the costs of constructing multiple logical subnets, keep in mind that the contention through physical switches and network adapters is still present. For bandwidth-intensive network operations, the disadvantage of the shared physical network might outweigh the scalability and cost savings of the vLAN.
- Chapter 3 Creating and Managing Virtual Networks
- Разработка приложений баз данных InterBase на Borland Delphi
- Open Source Insight and Discussion
- Introduction to Microprocessors and Microcontrollers
- Chapter 6. Traversing of tables and chains
- Chapter 8. Saving and restoring large rule-sets
- Chapter 11. Iptables targets and jumps
- Chapter 5 Installing and Configuring VirtualCenter 2.0
- Chapter 16. Commercial products based on Linux, iptables and netfilter
- Appendix A. Detailed explanations of special commands
- Appendix B. Common problems and questions
- Appendix E. Other resources and links


