Книга: Mastering VMware® Infrastructure3
Time Synchronization
Time Synchronization
Time synchronization in ESX Server is an important configuration because the ramifications of incorrect time run deep. Time synchronization issues can affect things like performance charting, SSH key expirations, NFS access, backup jobs, authentication, and more. After the installation of ESX Server (or in a kickstart script), the host should be configured to perform time synchronization with a reliable time source. This source could be another server on your network or an Internet time source. For the sake of managing time synchronization, it is easiest to synchronize all your servers against one reliable internal time server and then synchronize the internal time server with a reliable Internet time server.
Configuring time synchronization for an ESX Server requires several steps, including Service Console firewall configuration and edits to several configuration files.
Perform the following steps to enable the NTP Client in the Service Console firewall:
1. Use the VI Client to connect directly to the ESX Server host or to a VirtualCenter installation.
2. Select the hostname from the inventory tree on the left and then click the Configuration tab in the details pane on the right.
3. Select Security Profile from the Software menu.
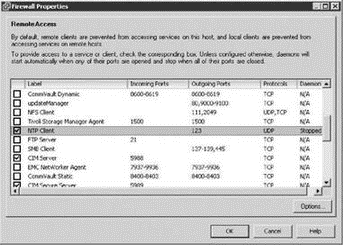
4. As shown in Figure 2.38, enable the NTP Client option in the Firewall Properties dialog box.
5. Alternatively the NTP client could be enabled using the following command:
esxcfg-firewall -e ntpClient
Type the following command to apply the changes made to the Service Console Firewall: service mgmt-vmware restart
Perform the following steps to configure the ntp.conf and step-tickers files for NTP time synchronization on an ESX Server host:
1. Log in to a console or SSH session with root privileges. If SSH has not been enabled for the host, log in with a standard user account and use the su - command to elevate to the root user privileges and environment.

Figure 2.38 The NTP Client can be enabled through the Security Profile of an ESX Server host configuration.
2. Create a copy of the ntp.conf file by typing the following command:
cp /etc/ntp.conf /etc/old.ntpconf
3. Type the following command to use the nano editor to open the ntp.conf file:
nano -w /etc/ntp.conf
4. Replace the following line:
restrict default ignore
with this line:
restrict default kod nomodify notrap noquery nopeer
5. Uncomment the following line:
#restrict mytrustedtimeserverip mask 255.255.255.255 nomodify notrap noquery
Edit the line to include the IP address of the new time server. For example, if the time server's IP address is 172.30.0.111, the line would read:
restrict 172.30.0.111 mask 255.255.255.255 nomodify notrap noquery
6. Uncomment the following line:
#server mytrustedtimeserverip
Edit the line to include the IP address of the new time server. For example, if the time server's IP address is 172.30.0.111, the line would read:
server 172.30.0.111
Save the file by pressing Ctrl+X. Click Y to accept.
7. Create a backup of the step-tickers file by typing the following command:
cp /etc/ntp/step-tickers /etc/ntp/backup.step-tickers
8. Type the following command to open the step-tickers file:
nano -w /etc/ntp/step-tickers
9. Type the IP address of the new time server. For example, if the time server's IP address is 172.30.0.111, the single entry in the step-tickers would read:
172.30.0.111
Save the file by pressing Ctrl+X. Click Y to accept.
Windows as a Reliable Time Server
An existing Windows Server can be configured as a reliable time server by performing these steps:
1. Use the Group Policy Object editor to navigate to Administrative Templates?System?Windows Time Service?Time Providers.
2. Enable the Enable Windows NTP Server Group Policy option.
3. Navigate to Administrative Templates?System?Windows Time Service.
4. Double-click on the Global Configuration Settings option and select the Enabled radio button.
5. Set the AnnounceFlags option to 4.
6. Click the OK button.
- 15.4 Resource Synchronization Methods
- 15.6.1 Synchronous Activity Synchronization
- CHAPTER 10 Multi-Tasking and Real-Time Operating Systems
- 10.2 The Real-Time Operating System (RTOS)
- 10.4 Synchronization and Messaging Tools
- 3.1. CLOCK SYNCHRONIZATION
- 3.1.3. Clock Synchronization Algorithms
- Ограничение времени ожидания для транзакций (Lock timeout)
- DEADLOCK TIMEOUT
- CONNECTION TIMEOUT
- Timestamp request
- Chapter 2 Building and Deploying a Run-Time Image


