Книга: Mastering VMware® Infrastructure3
Service Console NIC
Service Console NIC
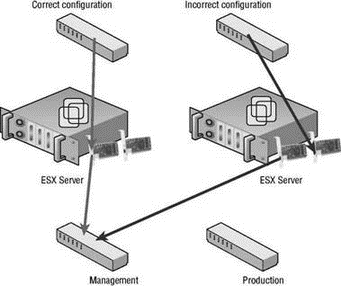
During the installation of ESX Server, the NIC selection screen creates a virtual switch bound to the selected physical NIC. The tricky part, as noted earlier, is choosing the correct PCI address that corresponds to the physical NIC connected to the physical switch that makes up the logical IP subnet from which the ESX Server will be managed. The problem often arises when the wrong PCI address is selected, resulting in the inability to access the Service Console. Figure 2.32 shows the structure of the virtual networking when the wrong NIC is selected and when the correct NIC is selected.

Figure 2.32 The virtual switch used by the Service Console must be associated with the physical switch that makes up the logical subnet from which the Service Console will be managed.
Should the incorrect PCI address be selected, the result is an inability to reach the ESX Server Web Access page after the installation is complete. The simplest fix for this problem is to unplug the network cable from the current Ethernet port and continue trying the remaining ports until the web page is accessible. The problem with this solution is that it puts a quick end to any type of documented standard that dictates the physical connectivity of the ESX Server hosts in a virtual environment.
So what then is the better fix? Is a reinstallation in order? If you like installations, go for it, but there is something much better. A quick visit to the command line and this problem is solved:
Sometimes It's All About the Case
Remember that ESX Server holds its roots in Linux and therefore any type of command-line management or configuration will always be case sensitive.
1. Log in to the console of the ESX Server using the root user account.
2. Review the PCI addresses of the physical NICs in the server by typing the following command:
esxcfg-nics -l
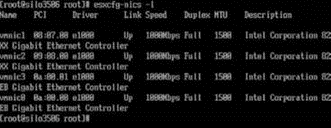
3. The results, as shown in Figure 2.33, will list identifying information for each NIC. Note the PCI addresses and names of each adapter.

Figure 2.33 The esxcfg-nics command provides detailed information about each adapter in an ESX Server host.
4. Review the existing Service Console configuration by typing the following command:
esxcfg-vswitch -l
5. The results, as shown in Figure 2.34, will display the current configuration of the Service Console port association.

Figure 2.34 The esxcfg-vswitch command provides information about the current Service Console configuration.
6. To change the NIC association, the existing NIC must be unlinked by typing the following command:
esxcfg-vswitch -U vmnic# vSwitch#
In this example the appropriate command would be:
esxcfg-vswitch -U vmnic0 vSwitch0
7. Use the following command to associate a new NIC with the vSwitch0 used by the Service Console:
esxcfg-vswitch -L vmnic# vSwitch#
If still unsure of the correct NIC, try each NIC listed in the output from step 2. For this example, to associate vmnic1 with a PCI address of 08:07:00, the appropriate command would be:
esxcfg-vswitch -L vmnic1 vSwitch0
8. Repeat steps 6 and 7 until a successful connection is made to the Web Access page of the ESX Server host.
- Integrated Secure Communications System
- Internet Service Providers who use assigned IP addresses
- Получение помощи по Windows SharePoint Services 3.0
- Чтобы установить Service Pack 2, надо ли предварительно устанавливать Service Pack 1?
- Я установил Service Pack 2 для Windows XP, но с ним не хотят работать некоторые программы. Как его удалить из системы?
- Можно ли интегрировать в пакет установки Windows Service Pack и другие обновления, чтобы потом не приходилось их устанав...
- Система просит вставить диск Windows XP и Windows XP Service Pack 2 CD. Но ведь диск с дистрибутивом Windows у меня один...
- 1.1.6. Denial of Service
- Distributed Denial of Service
- Phone Services
- C.1.3 Азиатско-Тихоокеанский NIC
- 3. Hexadecimal – the way we communicate with micros


