Книга: Windows Server 2012 R2 Storage, Security, & Networking Pocket Consultant
Using the autoinstall feature of Print Management
Using the autoinstall feature of Print Management
Print Management can automatically detect all network printers located on the same subnet as the computer on which the console is running. After detection, Print Management can automatically install the appropriate printer drivers, set up print queues, and share the printers. To automatically install network printers and configure a print server, follow these steps:
1. Start Print Management by tapping or clicking Tools in Server Manager, and then tapping or clicking Print Management.
2. In Print Management, expand the Print Servers node by double-tapping or double-clicking it.
3. Press and hold or right-click the entry for the local or remote server with which you want to work, and then tap or click Add Printer to start the Network Printer Installation Wizard.
4. On the Print Installation page, select Search The Network For Printers, and then tap or click Next.
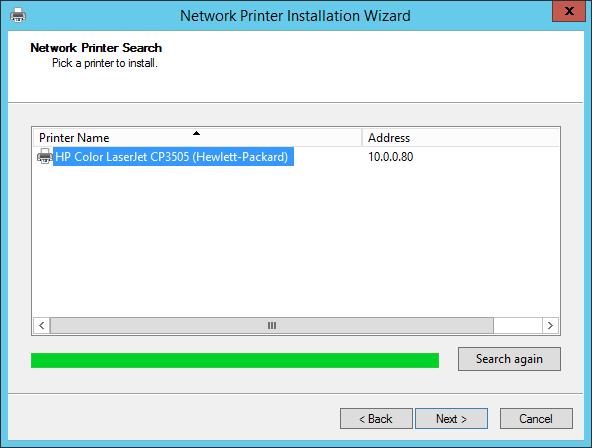
5. The wizard searches the local subnet for network printers. If printers are found, you’ll get a list of printers by name and IP address (see Figure 10-3). Tap or click a printer to install, tap or click Next, and then continue this procedure to install the automatically detected printer.
If a printer you want to use is not listed, you should ensure that the printer is powered on and is online and then repeat this procedure. If a printer you want to use is powered on and online but is not listed, see “Installing networkattached print devices” to complete the installation.

FIGURE 10-3 Printers located by the wizard are listed by name and IP address.
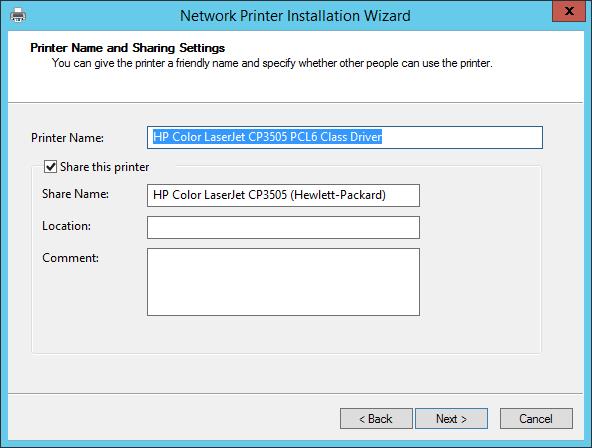
6. The wizard automatically detects the TCP/IP port configuration of the selected printer and then communicates with the printer to obtain the information required to configure the printer. Afterward, the wizard sets the default name and share name of the printer as shown in Figure 10-4. The printer is configured as a shared resource as well.
The printer name is the name you use when you work with the printer in Print Management. The share name is the name users use when they work with the printer.
Optionally, enter information in the Location and Comment text boxes that will help users locate and identify the printer. For example, you might want to specify the printer location as: Room 314 in Building 7.
NOTE The printer name and share name can be up to 256 characters and can include spaces. In a large organization, you’ll want the share name to be logical and helpful in locating the printer. For example, you might want to give the name Twelfth Floor Ne to the printer that points to a print device in the northeast corner of the twelfth floor.

FIGURE 10-4 Set the printer name and share name.
7. The next page lets you review the settings. When you’re ready to complete the installation, tap or click Next.
8. When you share a printer, Windows Server automatically makes drivers available so that users can download them when they first connect to the printer. The status page should confirm that printer driver and printer installation were successful. If there was a problem with the installation, note the errors provided. For example, someone might have powered off the printer while you were trying to configure it. If so, you’ll need to power the printer back on and repeat this procedure.
9. If you’d like to print a test page on the printer, select the Print Test Page check box, and then tap or click Finish. Otherwise, just tap or click Finish.
10. By default, the printer share is not listed in Active Directory. Listing the printer share in Active Directory enables users to search for and find the printer more easily. If you want the printer share to be listed in Active Directory, select the Printers node in the left pane, press and hold or right-click the printer in the main window, and then select List In Directory.
11. By default, print jobs are sent to the print server where they are rendered and then sent to the printer. You can change this behavior by using Branch Office Direct Printing. With Branch Office Direct Printing, print jobs are rendered on client computers and then sent directly to the printer. If you want to enable direct printing, select the Printers node in the left pane, press and hold or right-click the printer in the main window, and then select Enable Branch Office Direct Printing.
- Using the autoinstall feature of Print Management
- Installing and configuring physically attached print devices
- Installing network-attached print devices
- Connecting to printers created on the network
- Deploying printer connections
- Configuring point and print restrictions
- Moving printers to a new print server
- Monitoring printers and printer queues automatically
- Solving spooling problems
- 4.4.4 The Dispatcher
- About the author
- Chapter 7. The state machine
- Appendix E. Other resources and links
- Caveats using NAT
- Example NAT machine in theory
- Using Double Quotes to Resolve Variables in Strings with Embedded Spaces
- The final stage of our NAT machine
- Compiling the user-land applications
- The conntrack entries
- Untracked connections and the raw table
- Basics of the iptables command


