Книга: Windows Server 2012 R2 Storage, Security, & Networking Pocket Consultant
Getting started with Print Management

Print Management should be your tool of choice for working with printers and print servers. After you install the Print and Document Services role, Print Management is available on the Tools menu in Server Manager as a stand-alone console. You can also add Print Management as a snap-in to any custom console you create.
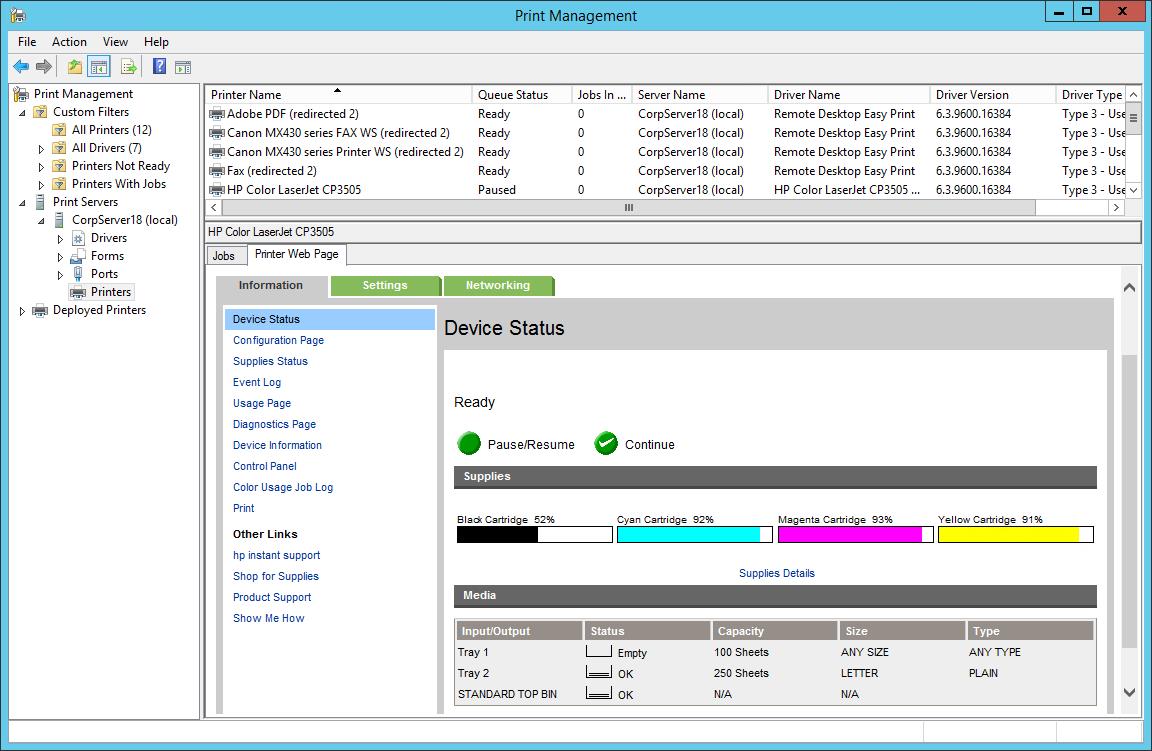
By using Print Management, shown in Figure 10-1, you can install, view, and manage the printers and Windows print servers in your organization. Print Management also displays the status of printers and print servers. When you expand a server-level node and select the Printers node, you get a list of printers the server is hosting. If you are accessing the selected print server by using a Remote Desktop connection, you might also find entries for printers being redirected from your logon computer. Redirected printers are listed clearly as such with a (redirected) suffix.

FIGURE 10-1 Use Print Management to work with print servers and printers throughout your organization.
By default, Print Management enables you to manage local print servers. You can manage and monitor other print servers in the organization by adding them to the console. Additionally, to manage a remote print server, you must be a member of the local Administrators group on the print server or a member of the Domain Admins group in the domain of which the print server is a member.
When you select a print server’s Printers node, the main pane lists the associated printer queues by printer name, queue status, number of jobs in a queue, and server name. If you press and hold or right-click Printers, and then tap or click Show Extended View, you can turn on Extended view. Extended view makes it easy to track the status of both printers and print jobs by displaying information about the status of a print job, its owner, the number of pages, the size of the job, when it was submitted, its port, and its priority.
In addition, when a printer has a webpage, Extended view displays a Printer Web Page tab that lets you directly access the printer’s webpage. This webpage provides details about the printer’s status, its physical properties, and its configuration, and it sometimes allows remote administration.
You can add print servers to Print Management by following these steps:
1. In Print Management, press and hold or right-click the Print Servers node in the left pane, and then tap or click Add/Remove Servers.
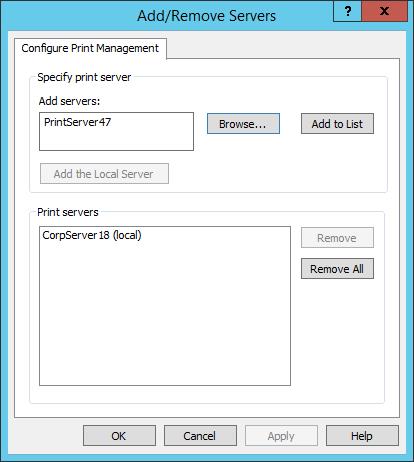
2. In the Add/Remove Servers dialog box, shown in Figure 10-2, you’ll find a list of the print servers you previously added.

FIGURE 10-2 Add print servers to Print Management so that you can manage and monitor them.
Do one of the following, and then tap or click Add To List:
? In the Add Servers list, enter or paste the names of the print servers you want to add. Use commas to separate computer names.
? Tap or click Browse to display the Select Print Server dialog box. Tap or click the print server you want to use, and then tap or click Select Server.
3. Repeat the previous step as necessary, and then tap or click OK.
You can remove print servers from Print Management by following these steps:
1. In Print Management, press and hold or right-click the Print Servers node in the left pane, and then tap or click Add/Remove Servers.
2. In the Add/Remove Servers dialog box, you’ll find a list of the print servers that are being monitored. Under Print Servers, select one or more servers, and then tap or click Remove.
- CHAPTER 10: Administering network printers and print services
- 9.4.2 Getting Started
- Using Double Quotes to Resolve Variables in Strings with Embedded Spaces
- Drawbacks with restore
- 7. AGGREGATION WITH INDEPENDENT WORKS
- Конструкция with-do
- Модификаторы спецификации преобразования, используемые в функции printf( )
- CHAPTER 3 Getting Started
- 3. Hexadecimal – the way we communicate with micros
- DirectX Tutorial 1: Getting Started
- CHAPTER 3 Working with GNOME
- CHAPTER 8 Printing with Fedora


