Книга: Microsoft Windows Embedded CE 6.0 Exam Preparation Kit
? Create a Run-Time Image
? Create a Run-Time Image
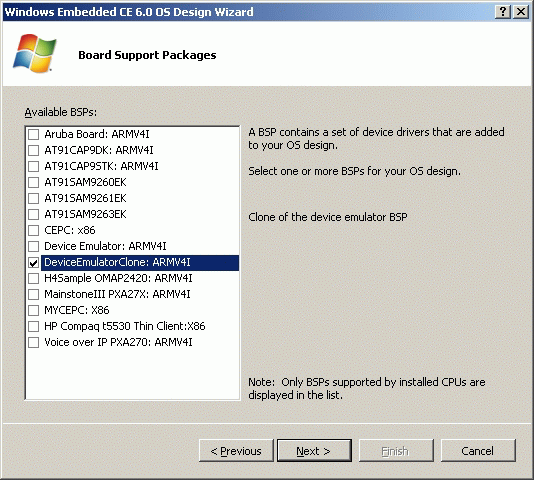
1. In order to validate our cloned BSP, create a new OS design based on the DeviceEmulatorClone BSP. Call the OS design DeviceEmulatorCloneTest, as illustrated in Figure 5-11 (see also Lab 1 in Chapter 1 for details on how to accomplish this step).
2. Choose Industrial Device in the Design Templates and Industrial Controller in the Design Template Variants. Accept the default options in the subsequent steps of the wizard.
3. After Platform Builder generates the DeviceEmulatorCloneTest project, verify the OS design by examining the catalog items in Catalog Items View.
4. Verify that the Debug build configuration is enabled by opening Configuration Manager on the Build menu and seeing if the Active Solution Configuration list box displays DeviceEmulatorClone ARMV4I Debug.
5. On the Build menu, click Build Solution.
6. After the build is completed, configure the Connectivity Options to use the Device Emulator.
7. Open the Target menu and click Attach Device to download the run-time image to the Device Emulator and start Windows Embedded CE. Notice the debug messages in the Output window of Visual Studio 2005. Wait until the device has started up completely.

Figure 5-11 A new OS design based on the DeviceEmulatorClone BSP
NOTE
BSP adaptation
Device Emulator emulates the same hardware platform for both the reference BSP and the cloned BSP. For this reason, the new run-time image runs on Device Emulator without further adaption. In practice, however, the underlying hardware is different in most cases, requiring BSP adaptations to start CE successfully.
- Creating an Initial RAM Disk Image
- ? Clone a BSP
- Lesson Summary
- ? Enable Kiosk Mode
- Chapter Review
- Configuring a Subproject
- Errors during the Make Run-Time Image Phase
- ? Enable Power Management Notification Messages
- 3.4.7 Run Menu
- Ограничение времени ожидания для транзакций (Lock timeout)
- DEADLOCK TIMEOUT
- CONNECTION TIMEOUT


