Êíèãà: Mastering VMware® Infrastructure3
Installing VirtualCenter 2.5
Ðàçäåëû íà ýòîé ñòðàíèöå:
Installing VirtualCenter 2.5
With the database in place and a solid understanding of the licensing options, you can now install and properly configure VirtualCenter. Once you've done that, you can add servers and continue the configuration of your virtual infrastructure.
VirtualCenter 2.5
Remember that the latest version of VirtualCenter is available for download from the http://www.vmware.com/download website. It is often best to install the latest version of the software to ensure the highest levels of compatibility, security, and simplicity. VirtualCenter 2.5 was the latest update available at the time of this writing and was used as the source of the images for this section.
The VirtualCenter 2.5 installation takes only a few minutes and is not administratively intensive, assuming all of the pre-installation tasks have been completed. The VirtualCenter 2.5 installation can be started by double-clicking autorun.exe inside the VirtualCenter installation directory.
After a brief overview of the benefits of VirtualCenter the installation will continue through the acceptance of a license agreement and the provision of the organization information. At this point, you must select the role to be played by the server. As shown in Figure 5.16, the installation procedure offers the following installation types:
? VMware Infrastructure Client
? VMware VirtualCenter Server (default)
? Custom
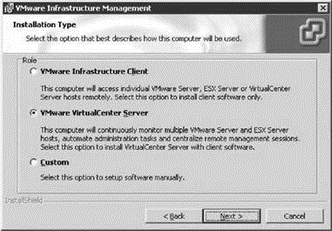
Figure 5.16 VirtualCenter Server installation types provided during the installation wizard.
Selecting the Custom option leads to a components selection screen shown in Figure 5.17. This page of the installation wizard offers the following component selections which are all selected by default:
? VMware Infrastructure Client
? VMware VirtualCenter Server
? VMware Update Manager
? VMware Converter Enterprise for VirtualCenter
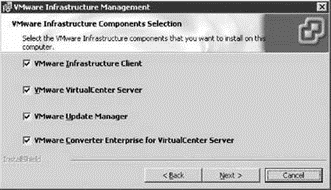
Figure 5.17 Custom options are available during the VirtualCenter installation wizard to allow for selection of individual components.
The latter two options in the list are new features of VirtualCenter 2.5. Chapter 12, “Securing and Managing a VMware Virtual Infrastructure” and Chapter 7, “Migrating and Importing Virtual Machines” will provide more detail on the VMware Update Manager and VMware Converter Enterprise features respectively.
The next step in the installation process is to identify the location of the back-end database. Figure 5.18 shows the two options of installing a local database on SQL Server 2005 Express Edition or using an existing (separate or local) database server. The Use existing database server option should be selected for remote back-end SQL Server 2000/2005 or Oracle databases.
ODBC to DB
An ODBC connection must be defined and the name must match in order to move past the database configuration page of the installation wizard. Remember to set the appropriate authentication strategy and user permissions for an existing database server. If you receive an error at this point in the installation revisit the database configuration steps. Remember to set the appropriate database ownership and database roles.
After successfully connecting to a pre-configured VirtualCenter database running on SQL Server 2005, you will receive a warning message regarding the database being set to the Full recovery model. The warning message continues on identifying that this model runs the risk of growing large transaction logs for the VirtualCenter database. The knowledge base article identified in the warning message suggests reconfiguring the VirtualCenter database into the Simple recovery model. What the warning does not tell you is that doing this means that you will lose the ability to backup transaction logs for the VirtualCenter database. If you leave the database set to Full recovery, be sure to work with the database administrator to routinely backup and truncate the transaction logs. By having transaction log backups from a database in Full recovery you will have the option to restore to an exact point in time should any type of data corruption occur. If you alter the recovery model as suggested be sure you are taking consistent full backups of the database, but understand that you will only be able to recover to the point of the last full backup as transaction logs will be unavailable.
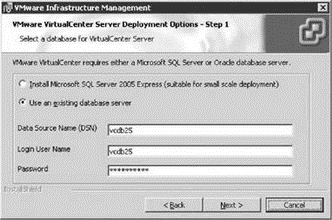
Figure 5.18 The VirtualCenter installation wizard provides options for installing a local SQL Server 2005 Express Edition instance or using an existing database server running SQL Server 2000/2005 or Oracle.
The next step in the VirtualCenter installation wizard is to select the VirtualCenter License Server configuration. The default setting on this page is a new option that allows a 60-day evaluation mode, shown in Figure 5.19. This new option allows administrators that are interested in virtualization to deploy test or proof-of-concept environments that support all of the features of VI3. The Virtual Infrastructure client will reflect the number of days remaining in the evaluation period. Once the evaluation period has expired, you can purchase license to install, thereby allowing you to maintain all of the work performed to assemble the evaluation environment.
Opting out of the evaluation mode by deselecting the option opens up the ability to choose between using and existing licensing server, shown in Figure 5.20, or to install a new licensing server as shown in Figure 5.21. An existing licensing server is references by 27000@<servername> to indicate the licensing port of 27000 and the host functioning as the licensing server. If the local system is also the licensing server then the name localhost can be used in place of the actual host name. By not selecting the Use an Existing License Server option, you will need to browse to find a license file that has been obtained from the VMware Web site. In either case you must also select the appropriate edition of VirtualCenter from the Management Server and Foundation Management Server options.
By default VirtualCenter is setup to use a set of default ports for the various types of communication it engages in, as shown in Figure 5.22. These default ports include:
? Port 80 for the HTTP Web Service
? Port 443 for the HTTPS Web Service
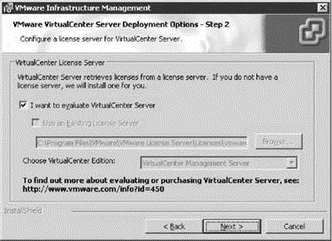
Figure 5.19 A new 60-day evaluation mode is available for VirtualCenter.
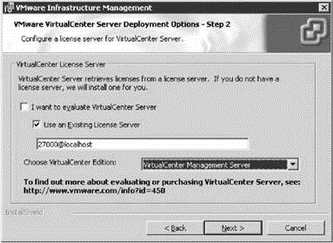
Figure 5.20 An existing license server is referenced by using <licensingport> @hostname syntax.
? Port 902 (UDP) for the Heartbeat
? Port 8086 for the Web Server management (running on Apache Tomcat)
Although these ports can be altered but it is not recommended to do as it would incur additional administrative overhead in ensuring that all other application accessing VirtualCenter were aware of the port alterations.
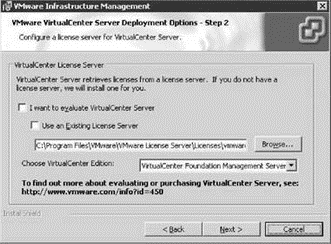
Figure 5.21 The system where VirtualCenter is being installed can be configured as the licensing server by browsing for the appropriate downloaded .LIC file.
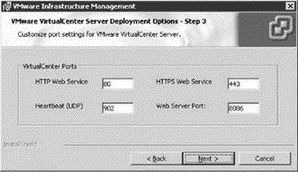
Figure 5.22 VirtualCenter ports are defined for the various types of management communication.
VirtualCenter extensions add new functionality in the areas of ESX Server updates management and consolidation assistance. Figure 5.x shows the configuration of administrative credentials in support of the installation of the VMware Converter Enterprise for VirtualCenter Server and VMware Update Manager extensions. Later in this chapter we will discuss enabling and configuring these new extensions.
The VMware Update Manager maintains data in its own back-end database. The next page of the installation wizard identifies a local or remote database to be used by the VMware Update Manager. Similar to the VirtualCenter database, there is an option for installing SQL Server 2005 Express Edition or for using an existing remote database. If you wish, you can even use the same database used for VirtualCenter.
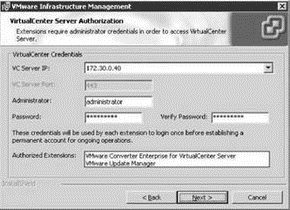
Figure 5.23 New extensions available in VirtualCenter 2.5 allow for VMware Update Manager and VMware Converter Enterprise to be integrated into VirtualCenter.
VMware Update Manager Database
If you choose to use a different database for VMware Update Manager data, you must create a second ODBC connection to the new database. The user account used in the ODBC connection must be a member of the db_owner database role for the database.
The VMware Update Manager installation includes some additional configuration for the SOAP and Web ports to be used for the downloading of updates. As shown in Figure 5.24, you can also enable and configure a proxy server for use by the VMware Update Manager.
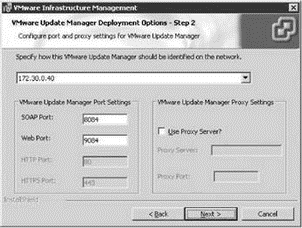
Figure 5.24 VMware Update Manager ports are used to download ESX Server updates directly from the VMware Web site.
After the configuration of the VMware Update Manager the next page in the wizard, shown in Figure 5.25, allows for the ports configuration for the VMware Converter Enterprise that is now built into VirtualCenter.
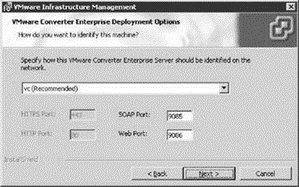
Figure 5.25 VMware Converter Enterprise is now built into VirtualCenter for facilitating consolidation of physical serves into virtual machines.
Missing Pieces
If the VirtualCenter installation procedure identifies any missing Windows components, for example .NET updates, you will be prompted to allow VirtualCenter to install the necessary pieces. If you select the option to use SQL Server 2005 Express Edition you will also witness its installation as part of the VirtualCenter installation process.
Upon completion of the VirtualCenter installation, browsing to VirtualCenter's URL (http://<server name> or http://<server ip address>) will turnup a page that allows for the installation of the VI Client, or the use of a web-based tool for managing the individual virtual machines hosted by the ESX Server 3.0 hosts within the VirtualCenter inventory. Figure 5.26 shows a sample home page for VirtualCenter.
VirtualCenter and IIS
Despite the fact that VirtualCenter is accessible via a Web browser, it is not necessary to install Internet Information Services on the VirtualCenter server. VirtualCenter access via a browser relies on the Apache Tomcat Web Service which is installed as part of the VirtualCenter installation. IIS should be uninstalled as it can cause conflicts with Apache Tomcat.
The VI Client connected to VirtualCenter should be the primary management tool for managing ESX Server 3.5 hosts and their respective virtual machines. The VI Client can connect directly to ESX Server 3.5 hosts under the context of a user account defined in the Service Console, or it can connect to a VirtualCenter server under the context of a Windows user account defined in Active Directory or the local security accounts manager (SAM) of the VirtualCenter computer.
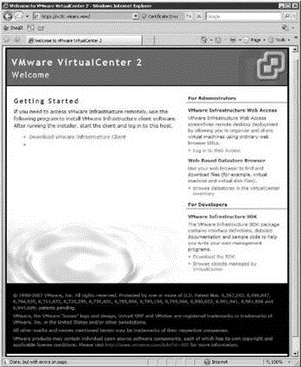
Figure 5.26 The home page of an ESX Server host or a VirtualCenter both offer a download of the VI Client and a web access login.
VirtualCenter is a critical application for the management of your virtual infrastructure. Its implementation should be carefully designed and executed to ensure availability and data protection.
Managing VirtualCenter Services
After the installation of VirtualCenter, having included licensing and the extensions, there will be ten new services installed to facilitate the operation of VirtualCenter and all its features. These services include:
? VMware Capacity Planner Service-used by the Guided Consolidation feature to gather performance data about target systems.
? VMware Converter Enterprise Service-used by the built in VMware Converter Enterprise tool for migrating physical and virtual machines into VirtualCenter.
? VMware Descheduled Time Accounting Service-used to facilitate the management of time within a virtual machine.
? VMware Infrastructure Web Access-used to allow browser-based access to the VirtualCenter Server application.
? VMware License Server-used to manage VI3 server based product licensing.
? VMware Mount Service for Virtual Center-used to support VirtualCenter integration with VMware Consolidated Backup (VCB).
? VMware Physical Disk Helper Service-used to support running a virtual machine from a physical disk partition.
? VMware Tools Service-used to support the synchronization of objects between the virtualization host and the guest operating systems running in virtual machines.
? VMware Update Manager Service-used to provide update or patch management capability.
? VMware VirtualCenter Server-used to provide centralized management of ESX Server hosts and virtual machines.
The following graphic displays the default status and configuration of all the VirtualCenter Server services.

As a virtual infrastructure administrator, you should be familiar with the default states of these services. In times of troubleshooting, check the status of the services to see if they have changed. Keep in mind the dependencies that exist between VirtualCenter and other services on the network. For example, if the VirtualCenter Server service is failing to start, be sure to check that the system has access to the SQL Server (or Oracle) database. If VirtualCenter cannot access the database due to lack of connectivity or the database service not running, then it will not start. Perform the following steps to install VirtualCenter 2.5 and all of the additional licensing and extension components:
1. Ensure that the appropriate ODBC connections have been created for connectivity to the VirtualCenter database and the VMware Update Manager Database.
2. Initiate the VirtualCenter 2.5 installation from a CD-ROM or a downloaded set of files. If the files have been downloaded from the http://www.vmware.com/download site the installation can be initiated by double-clicking the autorun.exe file in the Vmware-VIMSetup-2.5.0-xxxxx folder.
3. Once the VMware Infrastructure Management installation wizard appears click the Next button.
4. Click the Next button after reviewing the introduction page that highlights the features of VirtualCenter.
5. Select the I accept the terms in the license agreement radio button and then click the Next button.
6. Provide a User Name and Organization in the appropriate text boxes and then click the Next button.
7. Select the VMware Infrastructure Client radio button to install only the management client, select the VMware VirtualCenter Server radio to accept the defaults of all options, or select the Custom radio button to choose which options to be installed. Choosing the custom option allows for choosing between the following:
? VMware Infrastructure Client
? VMware VirtualCenter Server
? VMware Update Manager
? VMware Converter Enterprise for VirtualCenter Server
8. On the VMware VirtualCenter Server Deployment Options-Step 1 page select the appropriate database option. Choose SQL Server 2005 Express for small deployments or demo installation. Choose use an existing database server for enterprise deployments that will use SQL Server 2005 or Oracle.
9. If using SQL Server 2005 or Oracle provide the ODBC data source name and the appropriate user account information. For SQL Server 2005 this is the SQL user account that has been granted ownership of the VirtualCenter database and db_owner database role for the MSDB database. It is also the use account used for the creation of the ODBC connection to the SQL Server 2005 computer.
Database Permissions Error
At this stage in the installation you might receive the following error:
The DB user entered does not have the required permissions needed to install and configure VMware VirtualCenter Server with the selected DB. Please see the installation documentation for detailed DB permission requirements.
This is most commonly due to not providing the SQL user account with ownership of the VirtualCenter database or not providing db_owner database role membership for the MSDB database. It might be a bit of a struggle to convince database administrators to allow the db_owner membership for MSDB, but remember that the permission assignment can be removed once the installation is complete.
If you have the luxury of making the SQL user account a sysadmin the installation will also run fine, however, if this is done it should be immediately undone after the installation. If you are using an existing SQL server managed by other database administrators chances are that they are not going to allow even temporary sysadmin membership.
10. Click the OK button if your receive the following warning message:
11. Please make sure SQL Server Agent service is running on the database server.
12. If the SQL Server 2005 database has been left with the default configuration it will be set to Full Recovery model and a warning message will appear, click the OK button. The warning will suggest a VMware knowledge base article that will direct you to change the recovery model to Simple. If you are unsure of the ramifications of doing this please revisit an earlier section of this chapter where we discussed the Full versus Simple recovery model. Or ask your friendly neighborhood database administrator.
13. On the VMware VirtualCenter Server Deployment Options-Step 2 page select the appropriate licensing strategy. The default selection will allow a 60 day evaluation. It is also possible to select the use of an existing licensing server or to configure the local server as a licensing server by using the Browse button to find a valid server-based licensing license file. If you choose to use and existing license server or configure the local server as a licensing server select the VirtualCenter edition from the drop down list. It is important to select the version that matches the license you have purchased else you will have to reconfigure VirtualCenter after installation. You can revisit the earlier section of this chapter that discussed the differences in licensing.
14. If the installation is being installed to use the 60 day trial you will receive an information box regarding the trial period. Click the OK button to continue.
15. On the VMware VirtualCenter Server Deployment Options-Step 3 page click the OK button to accept the default VirtualCenter port configuration. The ports can be edited if conflicts might occur with existing applications using similar ports. You should avoid altering the default port settings.
16. On the VirtualCenter Server Authorization page provide the administrative credentials necessary for VirtualCenter to install the VirtualCenter extensions. Click the Next button to continue.
17. On the VMware Update Manager Deployment Options-Step1 page, select the appropriate back-end database option for use by the VMware Update Manager. Provide the appropriate ODBC connection name and corresponding username and password. Once again a warning regarding the database recovery model might be presented. Click the OK button to proceed past the warning, then click the Next button to continue.
18. On the VMware Update Manager Deployment Options-Step 2 page configure the appropriate name and port setting for the VMware Update Manager to use. You should avoid altering the default port settings. Click the Next button to continue.
19. On the VMware Converter Enterprise Deployment Options page configure the appropriate name and port setting for use by the VMware Converter built into VirtualCenter. You should avoid altering the default port settings. Click the Next button to continue.
20. On the Destination Folder selection page configure the installation directory for VirtualCenter and its components and the directory for storing updates downloaded by VMware Update Manager. Click the Next button to continue.
21. Click the Install button to initiate the installation.
22. After the installation is complete use the VMware Virtual Infrastructure Client to connection to the VirtualCenter Server installation.
- Introducing VirtualCenter 2.5
- Installing the VirtualCenter Back-end Database
- ESX 3.5 and VirtualCenter 2.5 Licensing Strategies
- Installing VirtualCenter 2.5
- Creating and Managing a VirtualCenter Inventory
- Using VirtualCenter Topology Maps
- Planning a VirtualCenter Deployment
- Managing VirtualCenter Settings
- The Bottom Line
- Chapter 5 Installing and Configuring VirtualCenter 2.0
- Installing Popular Games in Fedora
- Installing the VirtualCenter Back-end Database
- Chapter 5: Installing and Configuring VirtualCenter 2.0
- Chapter 5. Preparations
- Chapter 10. Iptables matches
- Chapter 12. Debugging your scripts
- Chapter 14. Example scripts
- Initialization and association
- DirectX Tutorial 4: Full Screen and Depth Buffers
- CHAPTER 11 Automating Tasks
- CHAPTER 15 Remote Access with SSH
