Книга: Embedded Linux development using Eclipse
4.5 Building the Project
4.5 Building the Project
Once you’ve completed and saved the record_sort.c file, the next step is to build the project. All files that are created in, or imported into, a project automatically become a part of it and are built and linked into the final executable.
In the Project Explorer view, select the top-level record_sort entry. Then execute Project?Build Project or right-click and select Build Configurations?Build All. In the former case, the Active Configuration will be built. By default this is the Debug configuration. The Active Configuration can be changed by executing Project?Build Configurations?Set Active.
In the latter case, both the Debug and Release configurations will be built. In either case one or two new entries will show up under record_sort in the Project Explorer view. These entries represent subdirectories called Debug/ and Release/ that hold, respectively, the object and executable files for the corresponding build configurations. Each also contains a makefile and some Eclipse-specific files.
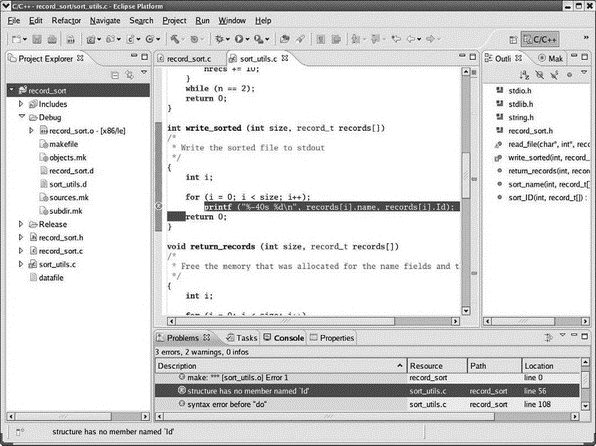
Initially the build will fail because some compile-time errors and warnings have been built into sort_utils.c. Open the Problems view, expand the Errors entry, find the item that says “structure has no member named ‘Id’” and right-click on it. Select Go To to open sort_utils.c, if it isn’t already open, and highlight the line that has the error (Figure 4.4). The correction should be fairly obvious.

Figure 4.4: Identifying build problems.
Eclipse CDT identifies build problems several different ways. In the Project Explorer view, any project and source files that have problems are flagged with a red “?” icon for errors or a yellow shield icon with a “!” to indicate a warning. When a source file with errors or warnings is opened in the Editor, the tab shows the same symbol. The Outline view then uses the same icons to show which functions in the file have either errors or warnings.
The Editor window uses the same icons to identify the line on which each error or warning occurs. You can scroll through a source file and click on a line displaying either a warning or error icon and the Problems view will jump to the corresponding entry. If you roll the cursor over a line that’s identified as an error or warning, the corresponding error message pops up.
Correct the problems and build the project again. This time the build should succeed and you’ll see an executable file show up in the Debug tree in the Package Explorer view.
- Using the C Programming Project Management Tools Provided with Fedora Linux
- Building Programs with make
- The Glade Client for Developing in GNOME
- Practical Advice for the Practicing Embedded Developer
- Testing the Project
- The Project
- 4.4.4 The Dispatcher
- About the author
- Chapter 7. The state machine
- Appendix E. Other resources and links
- Project PDL
- Example NAT machine in theory


