Книга: Embedded Linux development using Eclipse
8.2.3 Setting Up a CVS server
8.2.3 Setting Up a CVS server
To continue our exploration of CVS, you’ll need write access to a CVS server. If you don’t have one, there’s a nice server called CVSNT that runs both on Windows and Linux, that’s available from http://www.cvsnt.org/. CVSNT was originally developed to provide CVS server functionality under Windows and was later ported to Linux. The download for Linux is in the form of a gzipped RPM.
There’s a fairly complete installation guide for Linux at the cvsnt.org wiki at http://www.cvsnt.org/wiki/InstallationLinux, so I won’t bother going into a lot of detail here. You only need to install the required package, cvsnt2.5.03.2382-1.i386.rpm. None of the optional database or protocol packages are necessary for our purposes.
There are a couple of incompatibilities between Eclipse and CVSNT that need to be dealt with. RPM created a cvsnt/ directory under etc/ with files Pserver.example and Plugins.example. Copy Pserver.example to Pserver and open it in an editor. Find a line that says #Compat0_OldVersion=0 and uncomment it by deleting the #. Then uncomment the line #Compat0_OldCheckout=0 a little farther down.
You’ll need to create an initial CVS repository. Create a directory in a suitable place, /usr/local/cvsroot is what I chose, and then as root user execute:
cvs –d /usr/local/cvsroot init
Back in the CVS Repositories view, right-click and select New?Repository Location…. This brings up the Add Repository dialog we saw in Figure 8.19. This time the entries are:
Host: localhost
Repository path: <your_repository_path>(/usr/local/cvsroot)
User: <your_user_name>
Password: <your_password>
Connection type: extssh
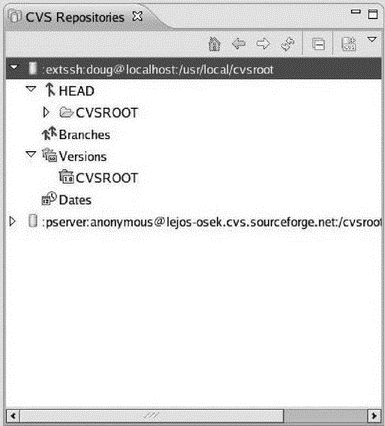
The new repository looks something like Figure 8.23. The HEAD and Versions nodes have the requisite CVSROOT entries, but are otherwise empty, as is the Branches node. Our next task then is to add a project to the repository that we can share with other members of our team.

Figure 8.23: New local CVS repository.
Let’s use the thermostat project as an example. Go to the C/C++ perspective and right-click thermostat in the Project Explorer view. Select Team?Share Project…. The first dialog box gives you the choice of using an existing repository or creating a new one. Highlight your local repository and click Next. Here you have a choice of module naming options. Keep the default, Use project name as module name. Click Next.[13]
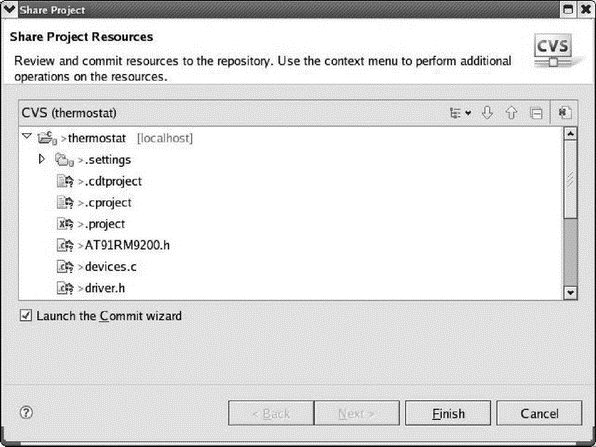
The next dialog lets you select which of the project’s resources to share (Figure 8.24). Typically you want to share all of them. Click Finish to launch the Commit wizard.

Figure 8.24: Share Project Resources dialog.
Interestingly, the Commit wizard finds a couple of files with “unknown names or extensions” and asks you whether they are binary or ASCII. .cdtproject is in fact ASCII. thermostat_s is binary. Finally, you can enter a comment for the commit operation. Something like “Adding new project” might be appropriate.
The thermostat project is now identified as being under CVS control on the localhost and all the resource files have version numbers. Back in the CVS Repository Exploring perspective, thermostat now shows up as an entry under HEAD in your local repository.
- Тестирование Web-сервиса XML с помощью WebDev.WebServer.exe
- InterBase Super Server для Windows
- Каталог BIN в SuperServer
- Минимальный состав сервера InterBase SuperServer
- InterBase Classic Server под Linux
- Каталог BIN в InterBase Classic Server для Linux
- SuperServer
- Classic vs SuperServer
- Рекомендации по выбору архитектуры: Classic или SuperServer?
- Улучшенное время отклика для версии SuperServer
- Эффективное взаимодействие процессов архитектуры Classic Server
- Yaffil Classic Server - замена InterBase Classic 4.0


