Книга: Embedded Linux development using Eclipse
7.3.2 Plug-In Content
7.3.2 Plug-In Content
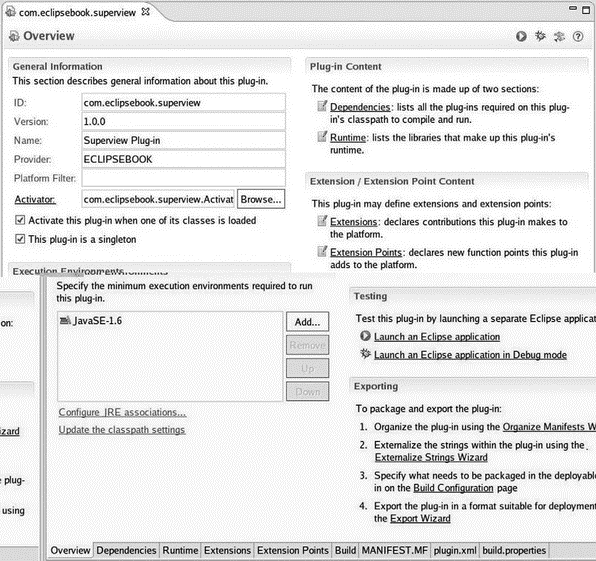
The Manifest Editor initially shows an overview as seen in Figure 7.4. This essentially duplicates the information entered in the Plug-in Content dialog and also includes links to several other tabs in the Manifest Editor and related functionality. Our plug-in will create a new extension that contributes to the Eclipse toolbar and also adds an item to the main menu.

Figure 7.4: Manifest Editor overview tab.
The Dependencies tab specifies what plug-ins and packages this plug-in depends on. Initially the Required Plug-ins list has two entries: org.eclipse.ui and org.eclipse.core.runtime. Just about everything is dependent on these two.
The Imported Packages list lets you specify packages that your plug-in depends on without identifying the plug-in that contains the package.
Packages are a useful way to specify implementation-independent behavior. Suppose, for example, that your plug-in is dependent on an XML parser. We can implement that parser as a package called com.company.xml.parser. You could then create two plug-ins, say, com.company.xml.parser.mobile and com.company.xml.parser.desktop, each of which implements the same parser package — that is, the same extension points, but for a different environment.
Click the Runtime tab in the Manifest Editor, or click Runtime under Plug-in Content in the Overview form. This lets us specify which packages contained in the plug-in will be made visible to other plug-ins. Any packages not explicitly exported will not be visible externally. Click Add… to see that our plug-in has one package available for export. We don’t really need to export the package, but it doesn’t hurt, so go ahead and select it, and click OK. Now click on the package in the Exported Packages list. The Properties… button lets you set a version for that package.
Normally, exported packages are visible to all “downstream” plug-ins. Nevertheless, you can declare packages to be internal, meaning they’re not necessarily intended for use by downstream plug-ins, but are still visible. Such internal packages can be hidden when Eclipse is started in “strict” mode by selecting the hidden option under package visibility. Internal packages can also have “friend” plug-ins that have access to the package even in strict mode.
The Classpath section lists all locations the runtime will search when loading classes from a plug-in. This is an artifact of earlier Eclipse releases and should normally be left blank. Starting with Eclipse 3.1, plug-ins are packaged as Java archives (.jar) and don’t require an extended classpath.
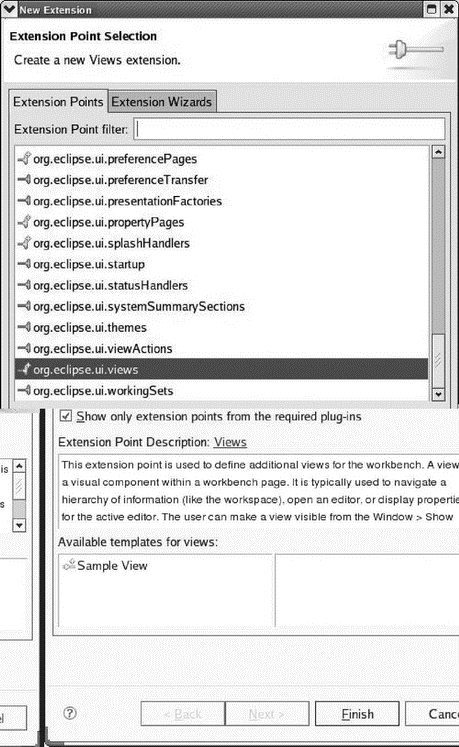
Click the Extensions tab or click Extensions in the Extension/Extension Point Content section of the Overview tab. This is where the real functionality of our plug-in is defined. Clicking Add… brings up a list of extension points defined in the plug-ins listed in the Dependencies tab. Here we select the extension points for which our plug-in will provide extensions. Find and select org.eclipse.ui.views. A description of the extension point appears (Figure 7.5). Many extension points also offer one or more templates to provide additional help in structuring the plug-in’s Java code. In this case, we won’t use the template. Click Finish.

Figure 7.5: Selecting extension points.
Back in the Extensions list, right-click on the new entry and select New?category (Figure 7.6). Leave the id as is, and change the name to EclipseBook.

Figure 7.6: Adding a category.
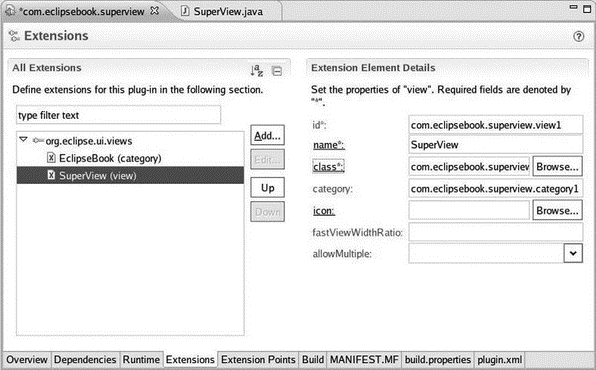
Right-click the extension point entry again and select New?view (Figure 7.7). Change the name to SuperView and add com.eclipsebook.superview.category1 to the category to match the id in the category entry. Click the class link, enter SuperView as the name, and click Finish.

Figure 7.7: Adding a view.
The PDE creates a new class implementing the required interface and opens it in the Java editor. We’ll come back to that in a moment, but for now let’s finish up our tour of the Manifest Editor.
The final product of the Manifest Editor is the two files that constitute the plug-in’s manifest, MANIFEST.MF and plugin.xml. The content of these files is available in tabs of the same names. Have a look. MANIFEST.MF basically describes the plug-in with the information from the Overview and Dependencies forms. plugin.xml defines the extensions and extension points that this plug-in provides. In this case, we haven’t defined any extension points.
You can, of course, edit MANIFEST.MF and plugin.xml manually, but why? The beauty of PDE is that you don’t need to understand XML or the syntax of MANIFEST.MF, in order to create a plug-in. Some developers even suggest that it is bad practice to manually edit an XML file as this can lead to hard-to-diagnose configuration problems.
Now go back to the Editor tab displaying SuperView.java. Not much here. Just templates for the class constructor and two other functions that are the minimum necessary to extend the view. To get something that works, import the file SuperView.java from EclipseSamples/plug-in/ to com.eclipsebook.superview in the Package Explorer. Eclipse asks if you want to overwrite the existing file. Yes, you do.
- 6.1.1 Installing Features in External Directories
- 7.3 Our First Plug-In
- 7.3.1 Creating a Plug-In Project
- 7.4 Building and Exporting a Plug-In
- 7.4.2 Configure Build Content
- Protect the Contents of User Directories —
- Use the Contents of the
- Printing the Contents of a File with cat
- Lost Creations viplugins
- 7.4 Message Queue Content
- Examining the Content of an Assembly
- Plug and Play


