Книга: Embedded Linux development using Eclipse
5.4.5 Creating a Target Eclipse Project
5.4.5 Creating a Target Eclipse Project
Even though our thermostat project included a make target for the target version of the thermostat, we’ll create a new project to illustrate some additional features of Eclipse. Create a new C executable project and call it “target.” From the thermostat project, select the following files using the Shift and Ctrl keys in the same way you do when selecting multiple files in Windows or graphical Linux environments:
• AT91RM9200.h
• driver.h
• thermostat.h
• monitor.c
• thermostat.c
• trgdrive.c
Right-click and select Copy. Click on the new target project, right-click and select Paste. We now have all the files we need for the project. But remember that we don’t want to build this project for the host, but rather for the target. This requires configuring the project to use a different GNU tool chain.
The file trgdrive.c provides a set of device driver functions for the Intellimetrix ARM9 board. This is not a real Linux “device driver,” but rather accesses memory mapped I/O directly from user space. If you’re using some other target board, you’ll need to modify the functions in trgdrive.c accordingly.
If your target is a PC, you can skip to the next section on debugging on the target. You don’t need to select a different compiler.
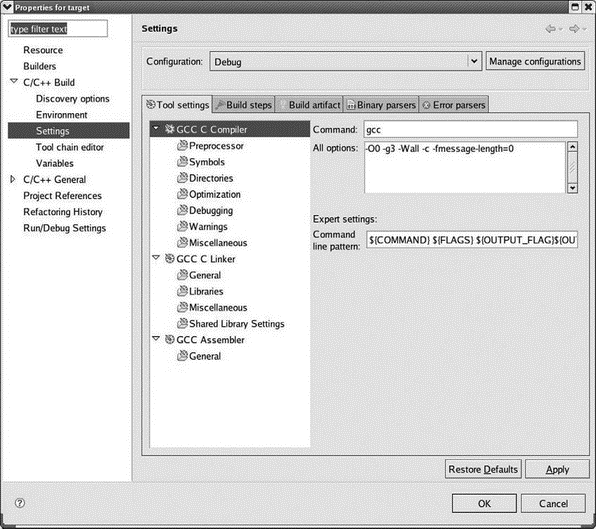
Right-click on the project name and select Properties. Expand the C/C++ Build entry and select Settings. This brings up the dialog shown in Figure 5.11. The first tab, Tool settings, lets you specify which C compiler, C linker, and assembler to use. By default, the compiler and linker are just gcc. This is the standard name for a host GNU C compiler.

Figure 5.11: Project build settings.
By convention, cross compilers are given a prefix that identifies the architecture and the operating system on which the compiled program will run. On my system, the ARM cross compiler is called arm-linux-gcc and I’ve added the path to it to my PATH environment variable. So change the Command name to match your cross compiler. All of the items under GCC C Compiler represent categories of compiler options. Take a look through them to see what’s there.
Likewise, change the GCC C Linker command to match your cross compiler. Here we also have to add a library to the linker command. Select Libraries, click the Add button, and enter “pthread.” This is the library of Posix threads functions. Take a quick look at the categories of linker options.
Finally, change the GCC Assembler to match your cross assembler.
Note that we’ve done all this for the Debug configuration. Click the Configuration drop-down menu at the top, select Release, and make the same changes.
Click OK to exit the Properties dialog. Make sure the active build configuration is Debug and build the project. You’ll find two new entries under the target project in the Project Explorer view: Binaries and Debug. Debug lists all of the built objects including an executable named “target”. Expanding any of the built object entries produces a list of every source file used to build that object. It’s not clear to me what purpose that serves.


