Книга: Embedded Linux development using Eclipse
Configure Networking
Configure Networking
Your workstation is probably configured to get a network address via DHCP (Dynamic Host Configuration Protocol). But in this case, to keep things simple, we’re going to specify fixed IP addresses for both ends. This is particularly useful if you choose to directly connect the workstation to the target using an Ethernet crossover cable.
If you’re using KDE, there’s a nice graphical menu for changing network parameters. How you get to that menu from the Start menu varies depending on the distribution. The two variants I’ve seen so far are System?Network Configuration and System Settings?Network. You’ll be asked for the root password.
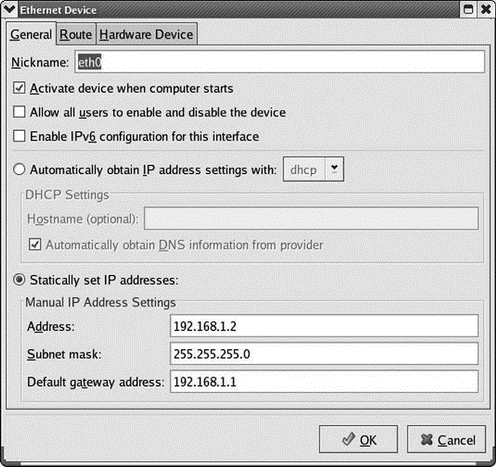
The actual layout of the dialog boxes will vary by distribution. You should find a Devices tab and then be able to edit the entry for your Ethernet device, which is probably eth0. The edit dialog allows you to select between “Automatically obtain IP address settings” and “Statically set IP addresses.” Select the latter and assign an address. I usually assign 192.168.1.2 to the workstation. The dialog from Red Hat Enterprise Linux 4 is shown in Figure 5.10.

Figure 5.10: Ethernet configuration dialog.
Alternatively, you can just go in and directly edit the network device parameters file. Network configuration parameters are found in /etc/sysconfig/network-scripts/ where you should find a file named something like ifcfg-eth0 that contains the parameters for network adapter 0. You might want to make a copy of this file and name it dhcp-ifcfg-eth0. That way you’ll have a DHCP configuration file for future use if needed. Now open the original file with an editor (as root user of course). It should look something like Box 5.1a. Delete the line BOOTPROTO=dhcp and add the four new lines shown in Box 5.1b.
Box 5.1a ifcfg-eth0
DEVICE=eth0

ONBOOT=yes

BOOTPROTO=dhcp
Box 5.1b revised ifcfg-eth0
DEVICE=eth0

ONBOOT=yes

IPADDR=192.168.1.2

NETMASK=255.255.255.0

GATEWAY=192.168.1.1

BROADCAST=192.168.1.255
We’ll use NFS (Network File System) to download executable images to the target. That means we have to “export” one or more directories on the workstation that the target can mount on its file system. Exported directories are specified in the file /etc/exports. Initially this file is present but empty. As root user, open it with an editor and insert the following on a single line:
/home/<your_home_name>/workspace *(rw,no_root_squash,no_all_squash,sync,nosubtree_check)
This makes the Eclipse workspace/ directory visible to other computers on the network.
Be sure the NFS server is running. In most cases it will be automatically started at boot time. Use the command:
/etc/rc.d/init.d/nfs status
to check this. If it isn’t started automatically, execute the command /etc/rc.d/init.d/nfs start.[5] You can execute this command from a shell window or, better yet, add it near the end of /etc/rc.d/rc.local. This is the last script executed at boot up.
- Kernel Configured with IP Firewall
- Configure Access Control
- CHAPTER 14 Networking
- Networking with TCP
- Advanced Wireless Networking
- Support for Wireless Networking in Fedora
- Using DHCP to Configure Network Hosts
- Using Commands in the ftpaccess File to Configure wu-ftpd
- Configure User Information
- Configure System Logging
- Configure Permission Control
- Configure Commands Directed Toward the cdpath


