Книга: Windows Server 2012 R2 Storage, Security, & Networking Pocket Consultant
Analyzing and optimizing disks
Analyzing and optimizing disks
Any time you add files to or remove files from a drive, the data on the drive can become fragmented. When a drive is fragmented, large files can’t be written to a single continuous area on the disk. As a result, the operating system must write the file to several smaller areas on the disk, which means more time is spent reading the file from the disk. To reduce fragmentation, Windows Server 2012 R2 can manually or automatically analyze and optimize disks by using the Optimize Drives utility.
With manual optimization, Optimize Drives performs an online analysis of volumes, and then reports the percentage of fragmentation. If defragmentation is needed, you can then elect to perform online defragmentation. System and boot volumes can be defragmented online as well, and Optimize Drives can be used with FAT, FAT32, exFAT, NTFS, and ReFS volumes.
You can manually analyze and optimize a disk by following these steps:
1. In Computer Management, select the Storage node and then the Disk Management node. Press and hold or right-click a drive, and then tap or click Properties.
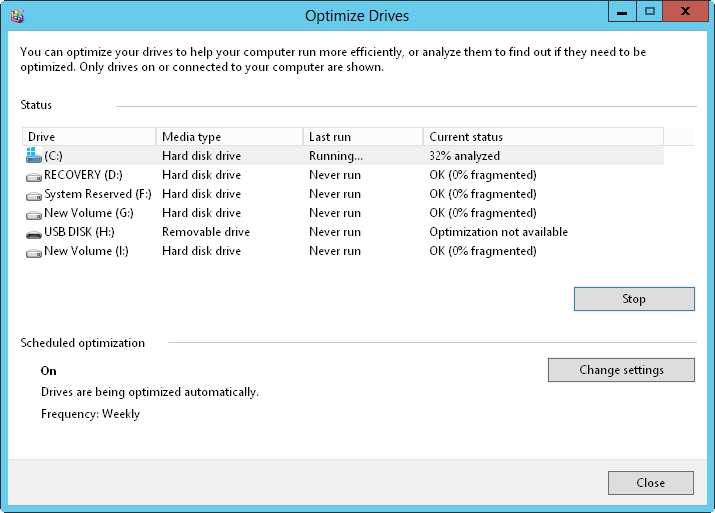
2. On the Tools tab, tap or click Optimize. In the Optimize Drives dialog box, select a disk, and then tap or click Analyze. Optimize Drives then analyzes the disk, as shown in Figure 2-11, to determine whether it needs to be defragmented. If so, it recommends that you defragment at this point.
3. If a disk needs to be defragmented, select the disk, and then tap or click Optimize.
NOTE Depending on the size of the disk, defragmentation can take several hours. You can tap or click Stop Operation at any time to stop defragmentation.

FIGURE 2-11 Optimize Drives analyzes and defragments disks efficiently.
Automatic analysis and optimization of disks can occur while the disks are online, so long as the computer is on AC power and the operating system is running but otherwise idle. By default, disk optimization is a weekly task rather than a daily task-and there’s a good reason for this. Normally, you need only to periodically optimize a server’s disks, and optimization once a week is sufficient in most cases. Note, however, that although nonsystem disks can be rapidly analyzed and optimized, it can take significantly longer to optimize system disks online.
You can control the approximate start time for the analysis and optimization of disks by changing the automated maintenance start time. Windows Server also notifies you if three consecutive runs are missed. All internal drives and certain external drives are optimized automatically as part of the regular schedule, as are new drives you connect to the server.
NOTE Windows Server 2012 R2 automatically performs cyclic pickup defragmentation. With this feature, when a scheduled defragmentation pass is stopped and rerun, the computer automatically picks up where it left off or starts with the next unfinished volume in line to be defragmented.
You can configure and manage automated defragmentation by following these steps:
1. In Computer Management, select the Storage node and then the Disk Management node. Press and hold or right-click a drive, and then tap or click Properties.
2. On the Tools tab, tap or click Optimize. This displays the Optimize Drives dialog box.
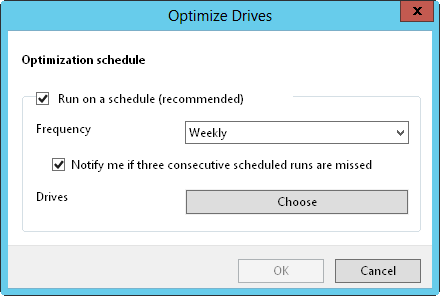
3. If you want to change how optimization works, tap or click Change Settings. This displays the dialog box shown in Figure 2-12. To cancel automated defragmentation, clear the Run On A Schedule check box. To enable automated defragmentation, select Run On A Schedule.

FIGURE 2-12 Set the run schedule for automated defragmentation.
4. The default run frequency is set as shown. In the Frequency list, you can choose Daily, Weekly, or Monthly as the run schedule. If you don’t want to be notified about missed runs, clear the Notify Me check box.
5. If you want to manage which disks are defragmented, tap or click Choose, and then select the volumes to defragment. By default, all disks installed within or connected to the computer are defragmented, and any new disks are defragmented automatically as well. Select the check boxes for disks that should be defragmented automatically, and clear the check boxes for disks that should not be defragmented automatically. Tap or click OK to save your settings.
6. Tap or click OK, and then tap or click Close.

- Разработка приложений баз данных InterBase на Borland Delphi
- Open Source Insight and Discussion
- Introduction to Microprocessors and Microcontrollers
- Chapter 6. Traversing of tables and chains
- Chapter 8. Saving and restoring large rule-sets
- Chapter 11. Iptables targets and jumps
- Chapter 5 Installing and Configuring VirtualCenter 2.0
- Chapter 16. Commercial products based on Linux, iptables and netfilter
- Appendix A. Detailed explanations of special commands
- Appendix B. Common problems and questions
- Appendix E. Other resources and links
- IP filtering terms and expressions


