Книга: Windows Server 2012 R2 Storage, Security, & Networking Pocket Consultant
Resizing partitions and volumes
Resizing partitions and volumes
Windows Server 2012 R2 doesn’t use Ntldr and Boot.ini to load the operating system. Instead, Windows Server 2012 R2 has a preboot environment in which Windows Boot Manager is used to control startup and load the boot application you selected. Windows Boot Manager also finally frees the Windows operating system from its reliance on MS-DOS so that you can use drives in new ways. With Windows Server 2012 R2, you can extend and shrink both basic and dynamic disks. You can use Disk Management, DiskPart, or Windows PowerShell to extend and shrink volumes. You cannot shrink or extend striped, mirrored, or striped-with-parity volumes.
In extending a volume, you convert areas of unallocated space and add them to the existing volume. For spanned volumes on dynamic disks, the space can come from any available dynamic disk, not only from those on which the volume was originally created. Thus, you can combine areas of free space on multiple dynamic disks and use those areas to increase the size of an existing volume.
CAUTION Before you try to extend a volume, be aware of several limitations. First, you can extend simple and spanned volumes only if they are formatted and the file system is NTFS. You can’t extend striped volumes, volumes that aren’t formatted, or volumes that are formatted with FAT. Additionally, you can’t extend a system or boot volume, regardless of its configuration.
You can shrink a simple volume or a spanned volume by following these steps:
1. In Disk Management, press and hold or right-click the volume you want to shrink, and then tap or click Shrink Volume. This option is available only if the volume meets the previously discussed criteria.
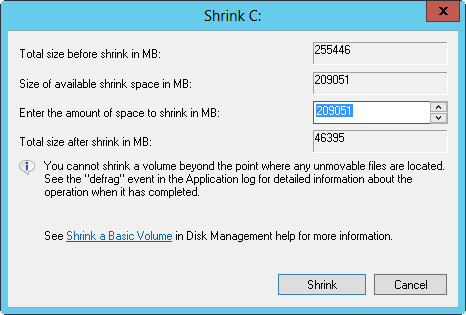
2. In the box provided in the Shrink dialog box, shown in Figure 2–9, enter the amount of space to shrink.

FIGURE 2–9 Specify the amount of space to shrink from the volume.
The Shrink dialog box provides the following information:
? Total Size Before Shrink In MB Lists the total capacity of the volume in megabytes. This is the formatted size of the volume.
? Size Of Available Shrink Space In MB Lists the maximum amount by which the volume can be shrunk. This doesn’t represent the total amount of free space on the volume; rather, it represents the amount of space that can be removed, not including any data reserved for the master file table, volume snapshots, page files, and temporary files.
? Enter The Amount Of Space To Shrink In MB Lists the total amount of space that will be removed from the volume. The initial value defaults to the maximum amount of space that can be removed from the volume. For optimal drive performance, you’ll want to ensure that the drive has at least 10 percent of free space after the shrink operation.
? Total Size After Shrink In MB Lists what the total capacity of the volume will be (in megabytes) after the shrink. This is the new formatted size of the volume.
3. Tap or click Shrink to shrink the volume.
You can extend a simple volume or a spanned volume by following these steps:
1. In Disk Management, press and hold or right-click the volume you want to extend, and then tap or click Extend Volume. This option is available only if the volume meets the previously discussed criteria and free space is available on one or more of the system’s dynamic disks.
2. In the Extend Volume Wizard, read the introductory message, and then tap or click Next.
3. On the Select Disks page, select the disk or disks from which you want to allocate free space. Any disks currently being used by the volume are automatically selected. By default, all remaining free space on those disks is selected for use.
4. With dynamic disks, you can specify the additional space you want to use on other disks by performing the following tasks:
? Tap or click the disk, and then tap or click Add to add the disk to the Selected list.
? Select each disk in the Selected list, and then, in the Select The Amount Of Space In MB list, specify the amount of unallocated space to use on the selected disk.
5. Tap or click Next, confirm your options, and then tap or click Finish.
- Разработка приложений баз данных InterBase на Borland Delphi
- Open Source Insight and Discussion
- Introduction to Microprocessors and Microcontrollers
- Chapter 6. Traversing of tables and chains
- Chapter 8. Saving and restoring large rule-sets
- Chapter 11. Iptables targets and jumps
- Chapter 5 Installing and Configuring VirtualCenter 2.0
- Chapter 16. Commercial products based on Linux, iptables and netfilter
- Appendix A. Detailed explanations of special commands
- Appendix B. Common problems and questions
- Appendix E. Other resources and links
- IP filtering terms and expressions


