Книга: Windows Server 2012 R2 Storage, Security, & Networking Pocket Consultant
Setting NTFS disk quota policies
Setting NTFS disk quota policies
The best way to configure NTFS disk quotas is through Group Policy. When you configure disk quotas through local policy or through unit, domain, and site policy, you define general policies that are set automatically when you enable quota management on individual volumes. Thus, rather than having to configure each volume separately, you can use the same set of rules and apply them in turn to each volume you want to manage.
Policies that control NTFS disk quotas are applied at the system level. You access these policies through Computer ConfigurationAdministrative TemplatesSystemDisk Quotas. Table 4–5 summarizes the available policies.
TABLE 4–5 Policies for Setting NTFS disk quotas
| POLICY NAME | DESCRIPTION |
|---|---|
| Apply Policy To Removable Media | Determines whether quota policies apply to NTFS volumes on removable media. If you don’t enable this policy, quota limits apply only to fixed media drives. |
| Enable Disk Quotas | Turns disk quotas on or off for all NTFS volumes of the computer, and prevents users from changing the setting. |
| Enforce Disk Quota Limit | Specifies whether quota limits are enforced. If quotas are enforced, users will be denied disk space if they exceed the quota. This overrides settings on the Quota tab on the NTFS volume. |
| Log Event When Quota Limit | Exceeded Determines whether an event is logged when users reach their limit, and prevents users from changing their logging options. |
| Log Event When Quota Warning Level Exceeded | Determines whether an event is logged when users reach the warning level. |
| Specify Default Quota Limit And Warning Level | Sets a default quota limit and warning level for all users. This setting overrides other settings and affects only new users. |
Whenever you work with quota limits, you should use a standard set of policies on all systems; however, you typically, won’t want to enable all the policies. Instead, you’ll selectively enable policies and then use the standard NTFS features to control quotas on various volumes. If you want to enable quota limits, follow these steps:
1. Access Group Policy for the system (for example, a file server) with which you want to work. Access the Disk Quotas node by expanding Computer Configuration, Administrative Templates, System, and then selecting Disk Quotas.
2. Double-tap or double-click Enable Disk Quotas. Select Enabled, and then tap or click OK.
3. Double-tap or double-click Enforce Disk Quota Limit. If you want to enforce disk quotas on all NTFS volumes residing on this computer, tap or click Enabled. Otherwise, tap or click Disabled, and then set specific limits on a per-volume basis. Tap or click OK.
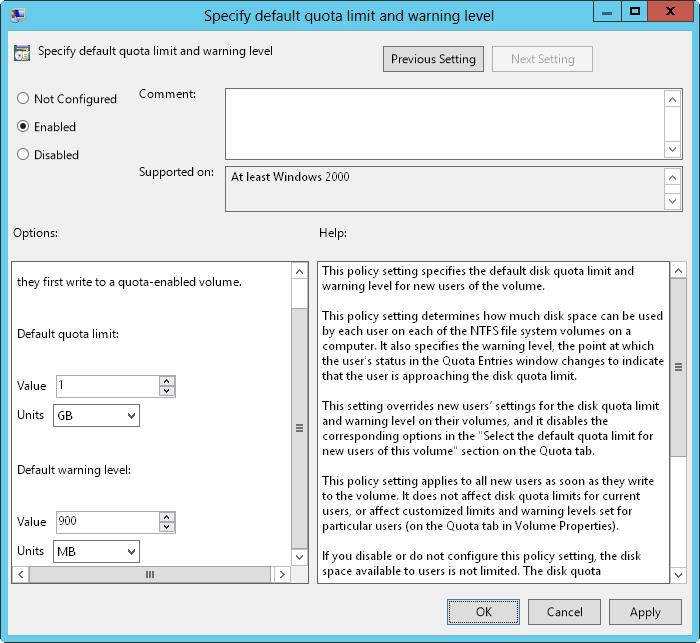
4. Double-tap or double-click Specify Default Quota Limit And Warning Level. In the dialog box shown in Figure 4–6, select Enabled.

FIGURE 4–6 Enforce disk quotas in the Specify Default Quota Limit And Warning Level dialog box.
5. Under Default Quota Limit, set a default limit that’s applied to users when they first write to the quota-enabled volume. The limit doesn’t apply to current users or affect current limits in place. On a corporate share, such as a share used by members of a project team, a good limit is between 5 and 10 GB. Of course, this depends on the size of the data files that the users routinely work with, the number of users, and the size of the disk volume. Graphic designers and data engineers might need much more disk space.
6. To set a warning limit, scroll down in the Options window. A good warning limit is about 90 percent of the default quota limit, which means that if you set the default quota limit to 10 GB, you should set the warning limit to 9 GB. Tap or click OK.
7. Double-tap or double-click Log Event When Quota Limit Exceeded. Select Enabled so that limit events are recorded in the application log, and then tap or click OK.
8. Double-tap or double-click Log Event When Quota Warning Level Exceeded. Select Enabled so that warning events are recorded in the application log, and then tap or click OK.
9. Double-tap or double-click Apply Policy To Removable Media. Select Disabled so that the quota limits apply only to fixed media volumes on the computer, and then tap or click OK.
TIP To ensure that the policies are enforced immediately, access the Computer ConfigurationAdministrative TemplatesSystemGroup Policy node, and then double-tap or double-click Configure Disk Quota Policy Processing. Select Enabled, and then select the Process even If The Group Policy Objects have Not Changed check box. Tap or click OK.
- Setting up default policies
- Disk Quotas
- quota
- Setting up user specified chains in the filter table
- 6.5 Файловая система NTFS
- DiskExplorer от Runtime Software
- Для чего нужны папки Windows, Documents and Settings, Program Files и Temp?
- В дисках используется не NTFS, а я хочу защитить свои данные. Как быть?
- Когда включаю компьютер, при загрузке пишется Insert system disk and press enter. Что нужно делать?
- Я не использую NTFS, но очень нужно запретить пользователям запуск одной программы. Это реально?
- После переустановки Windows нет доступа к папке Мои документы или нельзя удалить оставшуюся от старой системы папку Docu...
- Сжатие файлов NTFS


