Книга: DirectX 8 Programming Tutorial
Using Textures With DirectX
Using Textures With DirectX
Step 1: Modify FVF and Custom Vertex
This first thing that we need to do is change our custom vertex structure to hold the texture coordinates U and V, these are the two new FLOAT values tu and tv. We also need to modify our FVF to match by adding the D3DFVF_TEX1 flag.
//Define a FVF for our cuboids

#define CUBIOD_D3DFVF_CUSTOMVERTEX (D3DFVF_XYZ|D3DFVF_DIFFUSE|D3DFVF_TEX1)

//Define a custom vertex for our cuboids

struct CUBIOD_CUSTOMVERTEX {

 FLOAT x, y, z;

 DWORD colour;

 FLOAT tu, tv;

};
Step 2: Load Texture
We need to add a new member variable to our CCuboid class to hold a pointer to the texture once it is loaded. The new member is called m_pTexture and is of type LPDIRECT3DTEXTURE8. We then need a new method to set the texture by passing in a filename, remember that the file needs to be a .bmp.
LPDIRECT3DTEXTURE8 m_pTexture;

bool CCuboid::SetTexture(const char *szTextureFilePath) {

 if (FAILED(D3DXCreateTextureFromFile(m_pD3DDevice, szTextureFilePath, &m_pTexture))) {

  return false;

 }

 return true;

}
Step 3: Set Texture Coordinates
In our UpdateVertices method of CCudoid, we need to set the texture coordinates for each vertex. Notice that after the colour value for each vertex we have added two new values, these are the U and V values of our texture coordinates. These texture coordinates match the values from Fig 6.2.
bool CCuboid::UpdateVertices() {

 VOID* pVertices;

 //Store each point of the cube together with it's colour and texture coordinates

 //Make sure that the points of a polygon are specified in a clockwise direction,

 //this is because anti-clockwise faces will be culled

 //We will use a three triangle strips to render these polygons (Top, Sides, Bottom).

 CUBIOD_CUSTOMVERTEX cvVertices[] = {

  //Top Face

  {m_rX – (m_rWidth/2), m_rY + (m_rHeight/2), m_rZ – (m_rDepth/2), D3DCOLOR_XRGB(0, 0, 255), 0.0f, 1.0f,}, //Vertex 0 – Blue

  {m_rX – (m_rWidth/2), m_rY + (m_rHeight/2), m_rZ + (m_rDepth/2), D3DCOLOR_XRGB(255, 0, 0), 0.0f, 0.0f,}, //Vertex 1 – Red

  {m_rX + (m_rWidth/2), m_rY + (m_rHeight/2), m_rZ – (m_rDepth/2), D3DCOLOR_XRGB(255, 0, 0), 1.0f, 1.0f,}, //Vertex 2 – Red

  {m_rX + (m_rWidth/2), m_rY + (m_rHeight/2), m_rZ + (m_rDepth/2), D3DCOLOR_XRGB(0, 255, 0), 1.0f, 0.0f,}, //Vertex 3 – Green

  //Face 1

  {m_rX – (m_rWidth/2), m_rY – (m_rHeight/2), m_rZ – (m_rDepth/2), D3DCOLOR_XRGB(255, 0, 0), 0.0f, 1.0f,}, //Vertex 4 – Red

  {m_rX – (m_rWidth/2), m_rY + (m_rHeight/2), m_rZ – (m_rDepth/2), D3DCOLOR_XRGB(0, 0, 255), 0.0f, 0.0f,}, //Vertex 5 – Blue

  {m_rX + (m_rWidth/2), m_rY – (m_rHeight/2), m_rZ – (m_rDepth/2), D3DCOLOR_XRGB(0, 255, 0), 1.0f, 1.0f,}, //Vertex 6 – Green

  {m_rX + (m_rWidth/2), m_rY + (m_rHeight/2), m_rZ – (m_rDepth/2), D3DCOLOR_XRGB(255, 0, 0), 1.0f, 0.0f,}, //Vertex 7 – Red

  //Face 2

  {m_rX + (m_rWidth/2), m_rY – (m_rHeight/2), m_rZ + (m_rDepth/2), D3DCOLOR_XRGB(0, 0, 255), 0.0f, 1.0f,}, //Vertex 8 – Blue

  {m_rX + (m_rWidth/2), m_rY + (m_rHeight/2), m_rZ + (m_rDepth/2), D3DCOLOR_XRGB(0, 255, 0), 0.0f, 0.0f,}, //Vertex 9 – Green

  //Face 3

  {m_rX – (m_rWidth/2), m_rY – (m_rHeight/2), m_rZ + (m_rDepth/2), D3DCOLOR_XRGB(0, 255, 0), 1.0f, 1.0f,}, //Vertex 10 – Green

  {m_rX – (m_rWidth/2), m_rY + (m_rHeight/2), m_rZ + (m_rDepth/2), D3DCOLOR_XRGB(255, 0, 0), 1.0f, 0.0f,}, //Vertex 11 – Red

  //Face 4

  {m_rX – (m_rWidth/2), m_rY – (m_rHeight/2), m_rZ – (m_rDepth/2), D3DCOLOR_XRGB(255, 0, 0), 0.0f, 1.0f,}, //Vertex 12 – Red

  {m_rX – (m_rWidth/2), m_rY + (m_rHeight/2), m_rZ – (m_rDepth/2), D3DCOLOR_XRGB(0, 0, 255), 0.0f, 0.0f,}, //Vertex 13 – Blue

  //Bottom Face

  {m_rX + (m_rWidth/2), m_rY – (m_rHeight/2), m_rZ – (m_rDepth/2), D3DCOLOR_XRGB(0, 255, 0), 0.0f, 1.0f,}, //Vertex 14 – Green

  {m_rX + (m_rWidth/2), m_rY – (m_rHeight/2), m_rZ + (m_rDepth/2), D3DCOLOR_XRGB(0, 0, 255), 0.0f, 0.0f,}, //Vertex 15 – Blue

  {m_rX – (m_rWidth/2), m_rY – (m_rHeight/2), m_rZ – (m_rDepth/2), D3DCOLOR_XRGB(255, 0, 0), 1.0f, 1.0f,}, //Vertex 16 – Red

  {m_rX – (m_rWidth/2), m_rY – (m_rHeight/2), m_rZ + (m_rDepth/2), D3DCOLOR_XRGB(0, 255, 0), 1.0f, 0.0f,}, //Vertex 17 – Green

 };

 //Get a pointer to the vertex buffer vertices and lock the vertex buffer

 if (FAILED(m_pVertexBuffer->Lock(0, sizeof(cvVertices), (BYTE**)&pVertices, 0))) {

  return false;

 }

 //Copy our stored vertices values into the vertex buffer

 memcpy(pVertices, cvVertices, sizeof(cvVertices));

 //Unlock the vertex buffer

 m_pVertexBuffer->Unlock();

 return true;

}
Step 4: Rendering
The final code change is in the Render method of CCuboid. We need to set the texture that we want to render using SetTexture. Then we need to set how the texture should be rendered by using the SetTextureStageState method of our device. We have selected that our texture should be rendered without any blending or similar effects. You can blend your texture with other textures or the colour of the vertices depending on which flags to select.
//Set how the texture should be rendered.

if (m_pTexture != NULL) {

 //A texture has been set. We don't want to blend our texture with

 //the colours of our vertices, so use D3DTOP_SELECTARG1

 m_pD3DDevice->SetTexture(0, m_pTexture);

 m_pD3DDevice->SetTextureStageState(0, D3DTSS_COLOROP, D3DTOP_SELECTARG1);

} else {

 //No texture has been set. So we will disable texture rendering.

 m_pD3DDevice->SetTextureStageState(0, D3DTSS_COLOROP, D3DTOP_DISABLE);

}
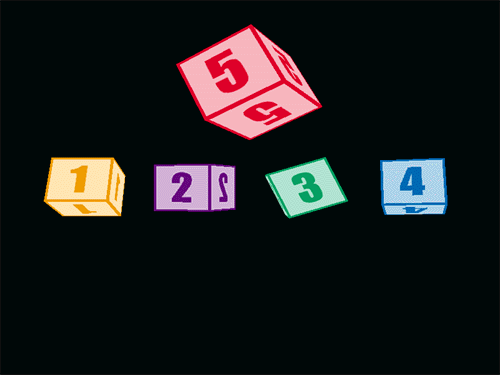
Once you have made these changes, you should finish up with five rotating cubes, each with a different texture (shown below).

- DirectX Tutorial 6: Textures
- DirectX 8 Programming Tutorial
- Caveats using NAT
- Using Double Quotes to Resolve Variables in Strings with Embedded Spaces
- Drawbacks with restore
- 7. AGGREGATION WITH INDEPENDENT WORKS
- Data Binding Using the GridView Control
- Using the kill Command to Control Processes
- Конструкция with-do
- 3. Hexadecimal – the way we communicate with micros
- DirectX Tutorial 1: Getting Started
- DirectX Tutorial 2: Drawing a Polygon


