Книга: Mastering VMware® Infrastructure3
Installing the VMware Tools
Разделы на этой странице:
Installing the VMware Tools
Although the VMware Tools are not installed by default, they are an important part of a virtual machine. The VMware Tools offer several great benefits without any detriments. In other words, installing the VMware Tools should be a standard practice and not a debatable step in the deployment of a virtual machine. The VMware Tools provide for:
? Optimized SCSI driver
? Enhanced video and mouse performance
? Virtual machine heartbeat
? Virtual machine quiescing for snapshots and backups
? Enhanced memory management
The VMware Tools are available for both Windows and Linux guest operating systems; however, the installation methods vary due to the differences in the operating systems. In either case, after you select the option to install the VMware Tools, the guest operating system will reflect a mounted CD-ROM that has the VMware Tools install bits. The VMware Tools ISO images are located in the /vmimages directory in the root file system on the ESX. They do not have to be downloaded or obtained from the installation CD-ROM.
Follow these steps to install the VMware Tools in virtual machines with a Windows guest operating system:
1. Use the VI Client to connect to a VirtualCenter server or an individual ESX Server host.
2. Right-click the virtual machine in the inventory tree and select the Install VMware Tools option.
3. If a warning message is displayed, click OK.
4. If the VMware Tools installation process does not begin automatically, open Windows Explorer, navigate to the CD/DVD drive, and double-click the file named setup.exe.
5. Click Next on the VMware Tools installation wizard welcome page.
6. Select the appropriate setup type for the VMware Tools installation and click Next. The Typical radio button will suffice for most situations. The Complete installation option installs more features than are used by the current product, while the Custom installation option allows for the greatest level of feature customization.
7. Click Install.
8. Once the installation is complete, click Finish.
9. Click Yes to restart the virtual machine immediately or click No to manually restart the virtual machine at a later time.
Once the VMware Tools installation is complete and the virtual machine is rebooted, the system tray will display an icon of the VMware logo. The logo in the system tray, shown in Figure 6.18, indicates a successful VMware Tools installation.
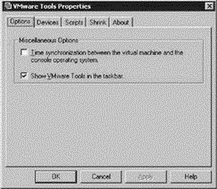
By double-clicking on the VMware logo in the system tray, you open the VMware Tools Properties, shown in Figure 6.19. Here you can configure time synchronization, hide the VMware Tools from the taskbar, and create scripts to suspend, resume, shut down or turn on a virtual machine.
Use caution when enabling time synchronization between the guest operating system and the console operating system host since Windows domain members rely on Kerberos for authentication and Kerberos is very sensitive to time differences between computers. A Windows-based guest operating system that belongs to an Active Directory domain is already configured with a native time synchronization process against the domain controller of its domain that functions as the PDC Emulator operations master. If the Service Console time is different from the PDC Emulator operations master domain controller, the guest operating system could end up moving outside the five-minute window that Kerberos will allow. Once the five-minute window is exceeded, Kerberos begins to experience errors with authentication and replication.

Figure 6.18 Once the VMware Tools are installed on a Windows-based virtual machine, an icon of the VMware logo will be displayed in the system tray.

Figure 6.19 Use the VMware Tools to configure time synchronization with the Service Console.
There are a few different approaches you can take to manage time synchronizations in a virtual environment. The first approach involves not using the VMware Tools time synchronization and relying instead on the W32Time service and a PDC Emulator with a registry edit that configures a synchronization with an external time server. Another approach involves disabling the native time synchronization across the Windows domain and then relying on the VMware Tools feature.
A third approach might be to synchronize the ESX Server hosts and the PDC Emulator operations master with the same external time server and then to enable the VMware Tools option for synchronization. In this case both the native W32Time service and the VMware Tools should be adjusting the time to the same value.
Configuring NTP on ESX Server
By tweaking the Service Console firewall and editing a few files, you can configure an ESX Server to consistently synchronize with an external time server. Perform the following steps to synchronize an ESX host with a set of external time servers:
1. From a console with root permission, enter the following command to open the required ports
for allowing the NTP daemon to communicate with an external time server:
# esxcfg-firewall --enableService ntpClient
or
# esxcfg-firewall -e ntpClient
where -e is shorthand for -enableService).
2. Once the firewall port has been opened, you must edit the /etc/ntp.conf file to include
the address or addresses of the external time server(s). Edit ntp.conf to include the following
uncommented lines:
Restrict 127.0.0.1

Restrict default kod nomodify notrap

server name.of.time.server.1

server name.of.time.server.2

driftfile /var/lib/ntp/drift
3. Edit the /etc/ntp/step-kickers file to include all of the names of the time servers that were configured in the ntp.conf file.
4. Edit the /etc/hosts file to define name to IP addresses for the time servers. If an existing DNS server is capable of providing the name resolution, the last step does not have to be performed.
Use the following steps to install the VMware Tools on a Linux host:
1. Use the VI Client to connect to a VirtualCenter or an individual ESX Server host.
2. Right-click the virtual machine in the inventory tree and select the Install VMware Tools option.
3. If a warning message is displayed, click OK.
4. Open a terminal window and change directories to the location of the VMware Tools mount point using the following commands:
[root@rhel5-1 /]# cd /media/"VMware Tools"
5. Copy the gzip tar file to a temporary directory and then change to the temporary directory using the following commands:
[root@rhel5-1 VMware Tools]# cp VMwareTools-3.0.x-nnnn.tar.gz /tmp

[root@silo104 VMware Tools]# cd /tmp
6. Extract the contents of the tar file. By default, the file will extract to a directory named vmware-tools-distrib.
7. Change to the vmware-tools-distrib directory and run the vmware-install.pl Perl script using the following commands:
[root@rhel5-1 tmp]#cd vmware-tools-distrib

[root@rhel5-1 vmware-tools-distrib]# ./vmware-install.pl
Figure 6.20 shows the commands for steps 4 through 7.

Figure 6.20 Installing the VMware Tools for Linux from the command line involves extracting the tools and running the install file.
8. After the Perl script completes, restart the X session using startx.
9. Start the VMware Tools running in the background of an X server session using the following command:
[root@silo104~]# /usr/bin/vmware-toolbox &
10. Remove the tar file copy and the extracted directory using these commands:
[root@silo104~]# rm /tmp/VMwareTools-3.0.x-nnnn.tar.gz

[root@silo104~]# rm -rf /tmp/vmware-tools-distrib
VMware Tools for Linux
When installing the VMware Tools to a Linux guest operating system, the path to the tar file and the numbers in the tar filename will vary.
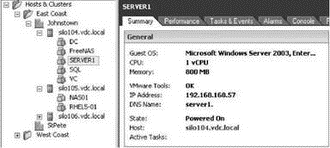
You can determine the existence of VMware Tools by checking for the icon displayed on the notification bar inside the guest operating system or by using the VI client. As shown in Figure 6.21, the Summary tab of a virtual machine object identifies the status of the VMware Tools as well as other information such as operating system, CPU, memory, DNS (host) name, IP address, and current host.

Figure 6.21 You can view details about VMware Tools, DNS name, IP address, and so forth from the Summary tab of a virtual machine object.
- The Bottom Line
- 4.4.4 The Dispatcher
- About the author
- Chapter 7. The state machine
- Chapter 5 Installing and Configuring VirtualCenter 2.0
- Appendix E. Other resources and links
- Example NAT machine in theory
- The final stage of our NAT machine
- Compiling the user-land applications
- The conntrack entries
- Untracked connections and the raw table
- Basics of the iptables command


