Êíèãà: Beginning Android
Making a List…
Making a List…
Lists with pretty icons next to them are all fine and well. But can we create ListView widgets whose rows contain interactive child widgets instead of just passive widgets like TextView and ImageView? For example, could we combine the RatingBar with text in order to allow people to scroll a list of, say, songs and rate them right inside the list?
There is good news and bad news.
The good news is that interactive widgets in rows work just fine. The bad news is that it is a little tricky, specifically when it comes to taking action when the interactive widget’s state changes (e.g., a value is typed into a field). We need to store that state somewhere, since our RatingBar widget will be recycled when the ListView is scrolled. We need to be able to set the RatingBar state based upon the actual word we are viewing as the RatingBar is recycled, and we need to save the state when it changes so it can be restored when this particular row is scrolled back into view.
What makes this interesting is that, by default, the RatingBar has absolutely no idea what model in the ArrayAdapter it is looking at. After all, the RatingBar is just a widget, used in a row of a ListView. We need to teach the rows which model they are currently displaying, so when their checkbox is checked they know which model’s state to modify.
So, let’s see how this is done, using the activity in the FancyLists/RateList sample project at http://apress.com/. We’ll use the same basic classes as our previous demo—we’re showing a list of nonsense words, which you can then rate. In addition, words given a top rating will appear in all caps.
public class RateListDemo extends ListActivity {

 TextView selection;

 String[] items={"lorem", "ipsum", "dolor", "sit", "amet",

  "consectetuer", "adipiscing", "elit", "morbi", "vel",

  "ligula", "vitae", "arcu", "aliquet", "mollis",

  "etiam", "vel", "erat", "placerat", "ante",

  "porttitor", "sodales", "pellentesque", "augue",

  "purus"};

 @Override

 public void onCreate(Bundle icicle) {

  super.onCreate(icicle);

  setContentView(R.layout.main);

  ArrayList<RowModel> list = new ArrayList<RowModel>();

  for (String s : items) {

   list.add(new RowModel(s));

  }

  setListAdapter(new CheckAdapter(this, list));

  selection = (TextView)findViewById(R.id.selection);

 }

 private RowModel getModel(int position) {

  return(((CheckAdapter)getListAdapter()).getItem(position));

 }

 public void onListItemClick(ListView parent, View v,

  int position, long id) {

  selection.setText(getModel(position).toString());

 }

 class CheckAdapter extends ArrayAdapter<RowModel> {

  Activity context;

  CheckAdapter(Activity context, ArrayList<RowModel> list) {

   super(context, R.layout.row, list);

   this.context = context;

  }

  public View getView(int position, View convertView,

   ViewGroup parent) {

   View row = convertView;

   ViewWrapper wrapper;

   RatingBar rate;

   if (row==null) {

    LayoutInflater inflater = context.getLayoutInflater();

    row = inflater.inflate(R.layout.row, null);

    wrapper = new ViewWrapper(row);

    row.setTag(wrapper);

    rate = wrapper.getRatingBar();

    RatingBar.OnRatingBarChangeListener l =

     new RatingBar.OnRatingBarChangeListener() {

     public void onRatingChanged(RatingBar ratingBar,

      float rating, boolean fromTouch) {

      Integer myPosition = (Integer)ratingBar.getTag();

      RowModel model = getModel(myPosition);

      model.rating = rating;

      LinearLayout parent = (LinearLayout)ratingBar.getParent();

      TextView label = (TextView)parent.findViewById(R.id.label);

      label.setText(model.toString());

     }

    };

    rate.setOnRatingBarChangeListener(l);

   } else {

    wrapper = (ViewWrapper)row.getTag();

    rate = wrapper.getRatingBar();

   }

   RowModel model = getModel(position);

   wrapper.getLabel().setText(model.toString());

   rate.setTag(new Integer(position));

   rate.setRating(model.rating);

   return(row);

  }

 }

 class RowModel {

  String label;

  float rating = 2.0f;

  RowModel(String label) {

   this.label = label;

  }

  public String toString() {

   if (rating>=3.0) {

    return (label.toUpperCase());

   }

   return(label);

  }

 }

}
Here is what is different between our earlier code and this activity and getView() implementation:
• While we are still using String[] items as the list of nonsense words, but rather than pouring that String array straight into an ArrayAdapter, we turn it into a list of RowModel objects. RowModel is this demo’s poor excuse for a mutable model; it holds the nonsense word plus the current checked state. In a real system, these might be objects populated from a Cursor, and the properties would have more business meaning.
• Utility methods like onListItemClick() had to be updated to reflect the change from a pure String model to use a RowModel.
• The ArrayAdapter subclass (CheckAdapter) in getView() looks to see if convertView is null. If so, we create a new row by inflating a simple layout (see the following code) and also attach a ViewWrapper (also in the following code). For the row’s RatingBar, we add an anonymous onRatingChanged() listener that looks at the row’s tag (getTag()) and converts that into an Integer, representing the position within the ArrayAdapter that this row is displaying. Using that, the checkbox can get the actual RowModel for the row and update the model based upon the new state of the rating bar. It also updates the text adjacent to the RatingBar when checked to match the rating-bar state.
• We always make sure that the RatingBar has the proper contents and has a tag (via setTag()) pointing to the position in the adapter the row is displaying.
The row layout is very simple: just a RatingBar and a TextView inside a LinearLayout:
<?xml version="1.0" encoding="utf-8"?>

<LinearLayout xmlns:android="http://schemas.android.com/apk/res/android"

 android:layout_width="fill_parent"

 android:layout_height="wrap_content"

 android:orientation="horizontal"

>

 <RatingBar

  android:id="@+id/rate"

  android:layout_width="wrap_content"

  android:layout_height="wrap_content"

  android:numStars="3"

  android:stepSize="1"

  android:rating="2" />

 <TextView

  android:id="@+id/label"

  android:paddingLeft="2px"

  android:paddingRight="2px"

  android:paddingTop="2px"

  android:textSize="40sp"

  android:layout_width="fill_parent"

  android:layout_height="wrap_content"/>

</LinearLayout>
The ViewWrapper is similarly simple, just extracting the RatingBar and the TextView out of the row View:
class ViewWrapper {

 View base;

 RatingBar rate = null;

 TextView label = null;

 ViewWrapper (View base) {

  this.base = base;

 }

 RatingBar getRatingBar() {

  if (rate==null) {

   rate = (RatingBar)base.findViewById(R.id.rate);

  }

  return(rate);

 }

 TextView getLabel() {

  if (label==null) {

   label = (TextView)base.findViewById(R.id.label);

  }

  return(label);

 }

}
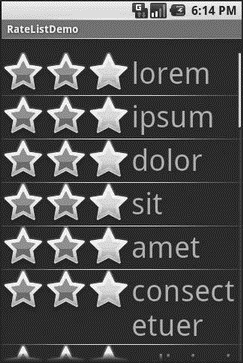
And the result (Figure 9-3) is what you would expect, visually.

Figure 9-3. The RateListDemo application, as initially launched
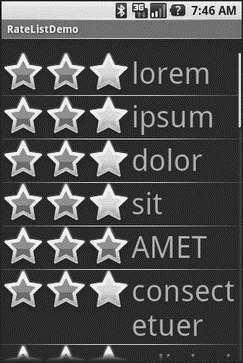
This includes the toggled checkboxes turning their words into all caps (Figure 9-4).

Figure 9-4. The same application, showing a top-rated word
- CHAPTER 9 Getting Fancy with Lists
- Making the Choice
- Making the Switch
- 7.6.1 Making It a Product
- Making Directories with mkdir
- Making Good Use of Chains
- Making the Shared Assembly Visible in Visual Studio
- Making the Publisher Field Editable
- Making Progress
- Making Your Own Cursors
- Making Sense of it All
- Making Queries


