Книга: Beginning Android
Getting to First Base
Getting to First Base
The classic Android ListView is a plain list of text — solid but uninspiring. This is because all we hand to the ListView is a bunch of words in an array, and we tell Android to use a simple built-in layout for pouring those words into a list.
However, you can have a list whose rows are made up of icons, or icons and text, or checkboxes and text, or whatever you want. It is merely a matter of supplying enough data to the adapter and helping the adapter to create a richer set of View objects for each row.
For example, suppose you want a ListView whose entries are made up of an icon, followed by some text. You could construct a layout for the row that looks like this, found in the FancyLists/Static sample project available in the Source Code section of the Apress Web site:
<?xml version="1.0" encoding="utf-8"?>

<LinearLayout xmlns:android="http://schemas.android.com/apk/res/android"

 android:layout_width="fill_parent"

 android:layout_height="wrap_content"

 android:orientation="horizontal">

 <ImageView

  android:id="@+id/icon"

  android:layout_width="22px"

  android:paddingLeft="2px"

  android:paddingRight="2px"

  android:paddingTop="2px"

  android:layout_height="wrap_content"

  android:src="@drawable/ok"

 />

 <TextView

  android:id="@+id/label"

  android:layout_width="wrap_content"

  android:layout_height="wrap_content"

  android:textSize="44sp"

 />

</LinearLayout>
This layout uses a LinearLayout to set up a row, with the icon on the left and the text (in a nice big font) on the right.
By default, though, Android has no idea that you want to use this layout with your ListView. To make the connection, you need to supply your Adapter with the resource ID of the custom layout shown in the preceding code:
public class StaticDemo extends ListActivity {

 TextView selection;

 String[] items={"lorem", "ipsum", "dolor", "sit", "amet",

  "consectetuer", "adipiscing", "elit", "morbi", "vel",

  "ligula", "vitae", "arcu", "aliquet", "mollis",

  "etiam", "vel", "erat", "placerat", "ante",

  "porttitor", "sodales", "pellentesque", "augue",

  "purus"};

 @Override

 public void onCreate(Bundle icicle) {

  super.onCreate(icicle);

  setContentView(R.layout.main);

  setListAdapter(new ArrayAdapterString(this,

   R.layout.row, R.id.label, items));

  selection = (TextView)findViewById(R.id.selection);

 }

 public void onListItemClick(ListView parent, View v,

  int position, long id) {

  selection.setText(items[position]);

 }

}
This follows the general structure for the previous ListView sample.
The key in this example is that you have told ArrayAdapter that you want to use your custom layout (R.layout.row) and that the TextView where the word should go is known as R.id.label within that custom layout. Remember: to reference a layout (row.xml), use R.layout as a prefix on the base name of the layout XML file (R.layout.row).
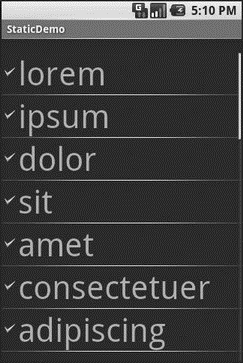
The result is a ListView with icons down the left side. In particular, all the icons are the same, as Figure 9-1 shows.

Figure 9-1. The StaticDemo application
- CHAPTER 9 Getting Fancy with Lists
- Запуск InterBase-сервера
- Расширенная установка InterBase-сервера
- Резервное копирование базы данных InterBase
- Резервное копирование при работе InterBase в режиме 24x7
- Миграция между различными версиями InterBase
- Перевод базы данных InterBase 6.x на 3-й диалект
- Профилактика повреждений баз данных InterBase
- Восстановление "безнадежных" баз данных. InterBase Surgeon
- Статистика базы данных InterBase
- Информация заголовочной страницы (Database header)
- Database dialect


