Êíèãà: C# 2008 Programmer
Creating a Setup Application
Ðàçäåëû íà ýòîé ñòðàíèöå:
Creating a Setup Application
Although you can deploy CAB files directly to your users, you might want to use a more user-friendly way using the traditional setup application that most Windows users are familiar with — users simply connect their devices to their computers and then run a setup application, which then installs the application automatically on their devices through ActiveSync.
Creating a setup application for a Windows Mobile application is more involved than for a conventional Windows application because you have to activate ActiveSync to install it. Figure 18-34 shows the steps in the installation process.

Figure 18-34
First, the application containing the CAB files (and other relevant files) must be installed on the user's computer. Then ActiveSync needs to install the application onto the user's device.
The following sections detail how to create an MSI file to install the application onto the user's computer and then onto the device.
Creating the Custom Installer
The first component you will build is the custom installer that will invoke ActiveSync to install the application onto the user's device. For this, you will use a Class Library project.
Add a new project to your current solution by going to File?Add?New Project. Select the Windows project type and select the Class Library template. Name the project RSSReaderInstaller (see Figure 18-35). Click OK.
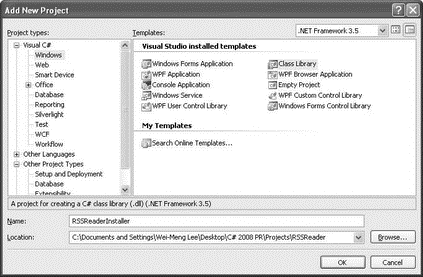
Figure 18-35
Delete the default Class1.cs file and add a new item to the project. In the Add New Item dialog, select the Installer Class template, and name the file RSSReaderInstaller.cs (see Figure 18-36).
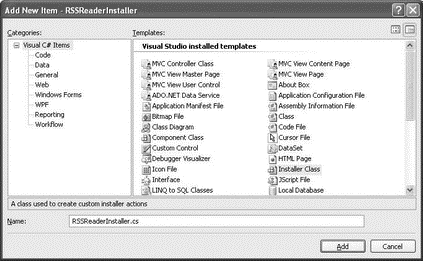
Figure 18-36
Add two references to the project: System.Configuration.Install and System.Windows.Forms (see Figure 18-37).
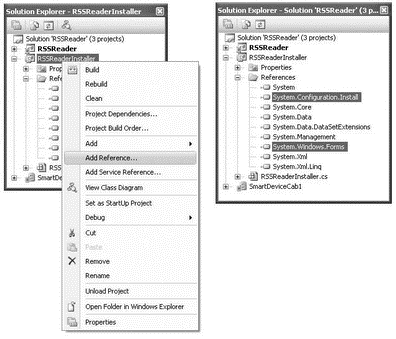
Figure 18-37
Switch to the code view of the RSSReaderInstaller.cs file and import the following namespaces:
using Microsoft.Win32;

using System.IO;

using System.Diagnostics;

using System.Windows.Forms;
Within the RSSReaderInstaller class, define the INI_FILE constant. This constant holds the name of the .ini file that will be used by ActiveSync for installing the CAB file onto the target device.
namespace RSSReaderInstaller {

 [RunInstaller(true)]

 public partial class RSSReaderInstaller : Installer {

  const string INI_FILE = @"setup.ini";
In the constructor of the RSSReaderInstaller class, wire the AfterInstall and Uninstall events to their corresponding event handlers:
public RSSReaderInstaller() {

 InitializeComponent();

 this.AfterInstall += new

  InstallEventHandler(RSSReaderInstaller_AfterInstall);

 this.AfterUninstall += new

  InstallEventHandler(RSSReaderInstaller_AfterUninstall);

}

void RSSReaderInstaller_AfterInstall(object sender, InstallEventArgs e) {

}

void RSSReaderInstaller_AfterUninstall(object sender, InstallEventArgs e) {

}
The AfterInstall event is fired when the application (CAB file) has been installed onto the user's computer. Similarly, the AfterUninstall event fires when the application has been uninstalled from the user's computer.
When the application is installed on the user's computer, you use Windows CE Application Manager (CEAPPMGR.EXE) to install the application onto the user's device.
The Windows CE Application Manager is installed automatically when you install ActiveSync on your computer.
To locate the Windows CE Application Manager, define the following function named GetWindowsCeApplicationManager():
private string GetWindowsCeApplicationManager() {

 //---check if the Windows CE Application Manager is installed---

 string ceAppPath = KeyExists();

 if (ceAppPath == String.Empty) {

  MessageBox.Show("Windows CE App Manager not installed",

   "Setup", MessageBoxButtons.OK,

   MessageBoxIcon.Error);

  return String.Empty;

 } else return ceAppPath;

}
This function locates the Windows CE Application Manager by checking the registry of the computer using the KeyExists() function, which is defined as follows:
private string KeyExists() {

 //---get the path to the Windows CE App Manager from the registry---

 RegistryKey key =

  Registry.LocalMachine.OpenSubKey(

   @"SOFTWAREMicrosoftWindowsCurrentVersionApp PathsCEAPPMGR.EXE");

 if (key == null) return String.Empty;

 else

  return key.GetValue(String.Empty, String.Empty).ToString();

}
The location of the Windows CE Application Manager can be obtained via the registry key: "SOFTWAREMicrosoftWindowsCurrentVersionApp PathsCEAPPMGR.EXE", so querying the value of this key provides the location of this application.
The next function to define is GetIniPath(), which returns the location of the .ini file that is needed by the Windows CE Application Manager:
private string GetIniPath() {

 //---get the path of the .ini file---

 return """ +

  Path.Combine(Path.GetDirectoryName(

   System.Reflection.Assembly.GetExecutingAssembly().Location),

   INI_FILE) + """;

}
By default, the .ini file is saved in the same location as the application (you will learn how to accomplish this in the next section). The GetIniPath() function uses reflection to find the location of the custom installer, and then return the path of the .ini file as a string, enclosed by a pair of double quotation marks (the Windows CE Application requires the path of the .ini file to be enclosed by a pair of double quotation marks).
Finally, you can now code the AfterInstall event handler, like this:
void RSSReaderInstaller_AfterInstall(object sender, InstallEventArgs e) {

 //---to be executed when the application is installed---

 string ceAppPath = GetWindowsCeApplicationManager();

 if (ceAppPath == String.Empty) return;

 Process.Start(ceAppPath, GetIniPath());

}
Here, you get the location of the Windows CE Application Manager and then use the Process.Start() method to invoke the Windows CE Application Manager, passing it the path of the .ini file.
Likewise, when the application has been uninstalled, you simply invoke the Windows CE Application Manager and let the user choose the application to remove from the device. This is done in the AfterUninstall event handler:
void RSSReaderInstaller_AfterUninstall(object sender, InstallEventArgs e) {

 //---to be executed when the application is uninstalled---

 string ceAppPath = GetWindowsCeApplicationManager();

 if (ceAppPath == String.Empty) return;

 Process.Start(ceAppPath, String.Empty);

}
The last step in this section is to add the setup.ini file that the Windows CE Application Manager needs to install the application onto the device. Add a text file to the project and name it setup.ini. Populate the file with the following:
[CEAppManager]

Version = 1.0

Component = RSSReader

[RSSReader]

Description = RSSReader Application

Uninstall = RSSReader

CabFiles = RSSReader.cab
For more information about the various components in an .ini file, refer to the documentation at http://msdn.microsoft.com/en-us/library/ms889558.aspx.
To build the project, right-click on RSSReaderInstaller in Solution Explorer and select Build.
Set the SmartDeviceCab1 project's properties as shown in the following table.
| Property | Value |
|---|---|
| Manufacturer | Developer Learning Solutions |
| ProductName | RSS Reader v1.0 |
Creating a MSI File
You can now create the MSI installer to install the application onto the user's computer and then invoke the custom installer built in the previous section to instruct the Windows CE Application Manager to install the application onto the device.
Using the same solution, add a new Setup Project (see Figure 18-38). Name the project RSSReaderSetup.
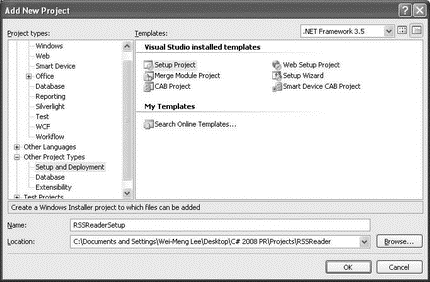
Figure 18-38
Using the newly created project, you can now add the various components and files that you have been building in the past few sections. Right-click on the RSSReaderSetup project in Solution Explorer, and select Add?File (see Figure 18-39).
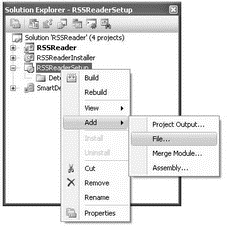
Figure 18-39
Add the following files (see Figure 18-40):
? SmartDeviceCab1ReleaseRSSReader.CAB
? RSSReaderInstallerbinReleaseRSSReaderInstaller.dll
? RSSReaderInstallersetup.ini
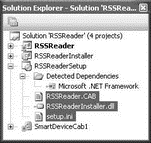
Figure 18-40
These three files will be copied to the user's computer during the installation.
The next step is to configure the MSI installer to perform some custom actions during the installation stage. Right-click the RSSReaderSetup project in Solution Explorer, and select View?Custom Actions (see Figure 18-41).
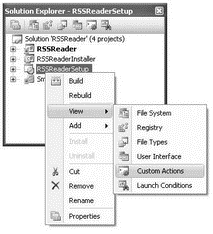
Figure 18-41
The Custom Actions tab displays. Right-click on Custom Actions, and select Add Custom Action (see Figure 18-42).

Figure 18-42
Select Application Folder, select the RSSReaderInstall.dll file (see Figure 18-43), and click OK.
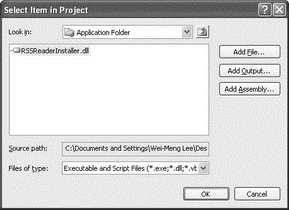
Figure 18-43
The Custom Actions tab should now look like Figure 18-44.
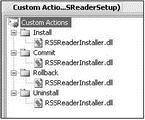
Figure 18-44
Set the various properties of the RSSReaderSetup project as shown in the following table (see Figure 18-45).
| Property | Value |
|---|---|
| Author | Wei-Meng Lee |
| Manufacturer | Developer Learning Solutions |
| ProductName | RSSReader |
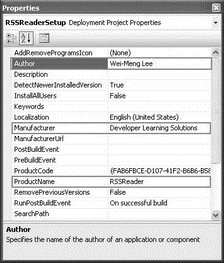
Figure 18-45
The last step is to build the project. Right-click on the RSSReaderSetup project in Solution Explorer, and select Build.
The MSI installer is now in the Release subfolder of the folder containing the RSSReaderSetup project (see Figure 18-46).
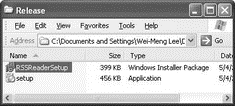
Figure 18-46
Testing the Setup
To test the MSI installer, ensure that your emulator (or real device) is connected to ActiveSync. Doubleclick the RSSReaderSetup.msi application, and the installation process begins (see Figure 18-47).
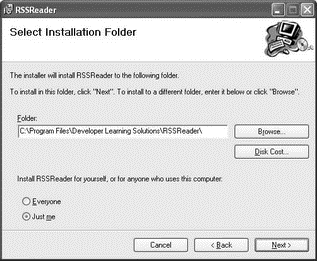
Figure 18-47
Follow the instructions on the dialog. At the end, an Application Downloading Complete message displays (see Figure 18-48).
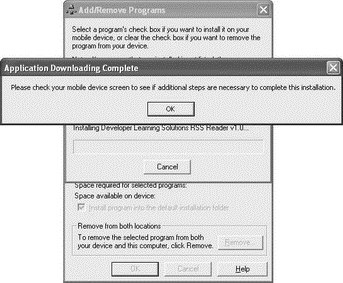
Figure 18-48
Check your emulator (or real device) to verify that the application is successfully installed (see Figure 18-49).
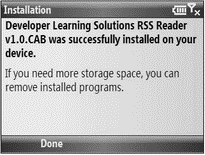
Figure 18-49
To uninstall the application, double-click the RSSReaderSetup.msi application again. This time, you see the dialog shown in Figure 18-50.
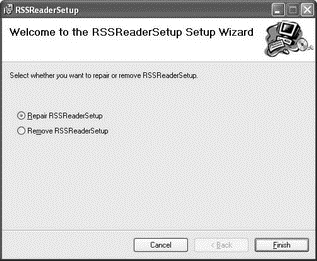
Figure 18-50
If you choose to remove the application, the Windows CE Application Manager displays the list of programs that you have installed through ActiveSync (see Figure 18-51). To uninstall the RSS Reader application, uncheck the application and click OK. The application is removed.
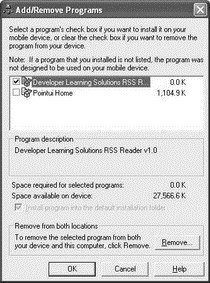
Figure 18-51
Installing the Prerequisites — .NET Compact Framework 3.5
One problem you will likely face when deploying your application to real devices is that the target device does not have the required version of the .NET Compact Framework (version 3.5 is needed). Hence, you need to ensure that the user has a means to install the right version of the .NET Compact Framework. There are two ways of doing this:
? Distribute a copy of the .NET Compact Framework 3.5 Redistributable to your client. You can download a copy from http://microsoft.com/downloads. Users can install the .NET Compact Framework before or after installing your application. This is the easiest approach, but requires the user to perform the extra step of installing the .NET Compact Framework.
? Programmatically install the .NET Compact Framework during installation, using the custom installer. Earlier, you saw how you can invoke the Windows CE Application Manager from within the custom installer class by using the .ini file. In this case, you simply need to create another .ini file, this time to install the CAB file containing the .NET Compact Framework. The various CAB files for the .NET Compact Framework 3.5 can be found on your local drive in the following directory: C:Program FilesMicrosoft.NETSDKCompactFrameworkv3.5WindowsCE. Figure 18-52 shows the various CAB files for each processor type (ARM, MIPS, SH4, X86, and so on). To install the .NET Compact Framework 3.5 on Windows Mobile 6 Standard devices, you just need to add the NETCFv35.wm.armv4i.cab file to the RSSReaderInstaller project, together with its associated .ini file.
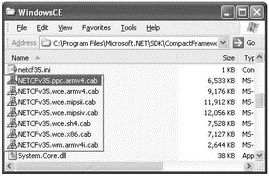
Figure 18-52


