Êíèãà: C# 2008 Programmer
Displaying a Modal Dialog Using the ModalPopupExtender Control
Displaying a Modal Dialog Using the ModalPopupExtender Control
One problem with the current example is that when the user clicks the Delete link, the record in the GridView control is deleted straightaway. When you delete a record in the real world, it is always good to confirm the action with the user. In the Windows world, you can easily display a message box to let the user confirm the action. However, in a web application, it is slightly tricky.
The solution to this problem is to use the ModalPopupExtender control available in the AJAX Control Toolkit. The ModalPopupExtender control uses a popup to display content to the user in a modal fashion and prevents users from interacting with the rest of the page.
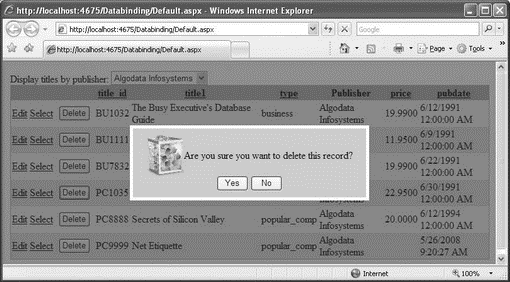
Let's modify the application to show a modal popup whenever the user tries to delete a record. Figure 17-28 shows the end result.

Figure 17-28
First, define the following CSS styles in the source view of the Default.aspx page:
<head runat="server">

 <title></title>

 <style type="text/css">

  .modalBackground {

   background-color:Blue;

   filter:alpha(opacity=50);

   opacity:0.5;

  }

  .dialog {

   border-left:5px solid #fff;

   border-right:5px solid #fff;

   border-top:5px solid #fff;

   border-bottom:5px solid #fff;

   background:#ccc;

   padding: 10px;

   width: 350px;

  }

  </style>

  ...
The .modalBackground style defines the background color of the modal popup. In this case, it is used to block off the rest of the page and prevent the user from interacting with that content. The .dialog style defines the shape and color of the popup itself. Here it has a rectangular border of 5px and a width of 350px.
Next, add a <asp:Template> control to the GridView control to display a Delete button:
<asp:GridView runat="server"

 AllowPaging="True" AllowSorting="True"

 AutoGenerateColumns="False"

 BackColor="LightGoldenrodYellow"

 BorderColor="Tan"

 BorderWidth="1px" CellPadding="2"

 DataKeyNames="title_id"

 DataSourceID="LinqDataSource1"

 ForeColor="Black" GridLines="None">

 <Columns>

  <asp:CommandField ShowDeleteButton="True"

   ShowEditButton="True" ShowSelectButton="True"/>

  <asp:TemplateField ControlStyle-Width="50px"

   HeaderStyle-Width="60px"

   ItemStyle-HorizontalAlign="Center">

   <ItemTemplate>

    <asp:Button runat="server"

     OnClick="btnDelete_Click"


     Text="Delete"/>

   </ItemTemplate>

  </asp:TemplateField>

  <asp:BoundField DataField="title_id"

   HeaderText="title_id"

   ReadOnly="True" SortExpression="title_id"/>

  <asp:BoundField DataField="title1"

   HeaderText="title1" SortExpression="title1"/>

  ...
Notice that the Delete button has two events defined: OnClick and OnClientClick. In this example, when the user clicks the button, the JavaScript function named displayPopup() (which you will define shortly) is called. You insert the return false; statement to prevent a postback from occurring while the dialog is being displayed.
You also need to disable the Delete link in the GridView control because you now have the Delete button. Set the ShowDeleteButton attribute in the <asp:CommandField> element to False:
<asp:CommandField

 ShowDeleteButton="False"

 ShowEditButton="True"

 ShowSelectButton="True"/>
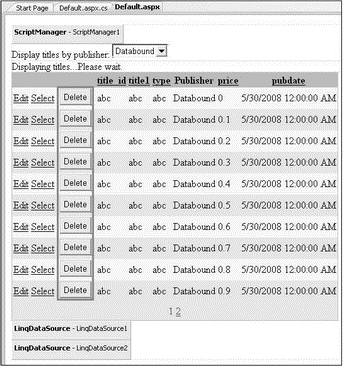
The Default.aspx page now looks like Figure 17-29.

Figure 17-29
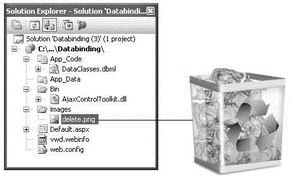
Create a new folder in the project and name it images. Add an image called delete.png into the images folder (see Figure 17-30).

Figure 17-30
You will now use a <div> element to define the content of the popup that you want to display:
   <div runat="server"

    class="dialog">

    <center>

     <img

      src="images/delete.png" width="60"/>

     Are you sure you want to delete this record?<br/>

     <asp:Button runat="server"

      Text="Yes" Width="50px"/>

     <asp:Button runat="server"

      Text="No" Width="50px"/>

    </center>

   </div>

  </form>

 </body>

</html>
This block of code defines the popup shown in Figure 17-31.

Figure 17-31
To display the <div> element as a modal popup, use the ModalPopupExtender control:
   <cc1:ModalPopupExtender runat="server"

    TargetControlID="divDialog" PopupControlID="divDialog"

    OkControlID="btnOK" CancelControlID="btnNO"


    BackgroundCssClass="modalBackground">

   </cc1:ModalPopupExtender>

  </form>

 </body>

</html>
The ModalPopupExtender control has the attributes described in the following table.
| Attribute | Description |
|---|---|
ID |
Identifies the ModalPopupExtender control |
TargetControlID |
Specifies the control that activates the ModalPopupExtender control |
PopupControlID |
Specifies the control to display as a modal popup |
OkControlID |
Specifies the control that dismisses the modal popup |
CancelControlID |
Specifies the control that cancels the modal popup |
OnOkScript |
Specifies the script to run when the modal popup is dismissed with the OkControlID |
OnCancelScript |
Specifies the script to run when the modal popup is canceled with the CancelControlID |
BackgroundCssClass |
Specifies the CSS class to apply to the background when the modal popup is displayed |
Finally, insert the JavaScript functions into the source view of Default.aspx:
  <script type="text/javascript">

   var _source;

   var _popup;

   function displayPopup(source) {

    _source = source;

    _popup = $find('popupDialog');

    //---display the popup dialog---

    _popup.show();

   }

   function OK_Click() {

    //---hides the popup dialog---

    _popup.hide();

    //---posts back to the server---

    __doPostBack(_source.name, '');

   }

   function No_Click() {

    //---hides the popup---

    _popup.hide();

    //---clears the event sources

    _source = null;

    _popup = null;

   }

  </script>

 </head>

<body>
The displayPopup() function looks for the ModalPopupExtender control in the page and displays the modal popup. The OK_Click() function is called when the user decides to proceed with the deletion. It hides the modal popup and initiates a postback to the server. The No_Click() function is called when the user cancels the deletion. It hides the modal popup.
That's it! Press F5 to test the application.
In this particular example, you will get a runtime error if you proceed with the deletion. That's because the titles table is related to the titleauthor table (also part of the pubs database), and deleting a record in the titles table violates the reference integrity of the database.
- 4.4.4 The Dispatcher
- Introduction to Microprocessors and Microcontrollers
- About the author
- Chapter 7. The state machine
- Appendix E. Other resources and links
- Caveats using NAT
- Example NAT machine in theory
- Using Double Quotes to Resolve Variables in Strings with Embedded Spaces
- Data sending and control session
- The final stage of our NAT machine
- Compiling the user-land applications
- The conntrack entries


