Книга: C# 2008 Programmer
Single and Multi-File Assemblies
Разделы на этой странице:
Single and Multi-File Assemblies
In Visual Studio, each project that you create will be compiled into an assembly (either EXE or DLL). By default, a single-file assembly is created. Imagine you are working on a large project with 10 other programmers. Each one of you is tasked with developing part of the project. But how do you test the system as a whole? You could ask every programmer in the team to send you his or her code and then you could compile and test the system as a whole. However, that really isn't feasible, because you have to wait for everyone to submit his or her source code. A much better way is to get each programmer to build his or her part of the project as a standalone library (DLL). You can then get the latest version of each library and test the application as a whole. This approach has an added benefit — when a deployed application needs updating, you only need to update the particular library that needs updating. This is extremely useful if the project is large. In addition, organizing your project into multiple assemblies ensures that only the needed libraries (DLLs) are loaded during runtime.
To see the benefit of creating multi-file assemblies, let's create a new Class Library project, using Visual Studio 2008, and name it MathUtil. In the default Class1.cs, populate it with the following code:
using System;

using System.Collections.Generic;

using System.Linq;

using System.Text;

namespace MathUtil {

 public class Utils {

  public int Fibonacci(int num) {

   if (num <= 1) return 2; //---should return 1; error on purpose---

   return Fibonacci(num - 1) + Fibonacci(num - 2);

  }

 }

}
This Utils class contains a method called Fibonacci(), which returns the nth number in the Fibonacci sequence (note that I have purposely injected an error into the code so that I can later show you how the application can be easily updated by replacing the DLL). Figure 15-5 shows the first 20 numbers in the correct Fibonacci sequence.

Figure 15-5
Build the Class Library project (right-click on the project's name in Solution Explorer, and select Build) so that it will compile into a DLL — MathUtil.dll.
Add a Windows Application project to the current solution, and name it WindowsApp-Util. This application will use the Fibonacci() method defined in MathUtil.dll. Because the MathUtil.dll assembly is created in the same solution as the Windows project, you can find it in the Projects tab of the Add Reference dialog (see Figure 15-6). Select the assembly, and click OK.
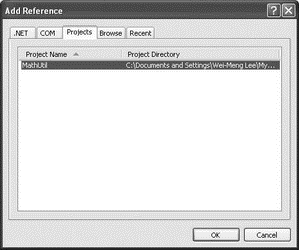
Figure 15-6
The MathUtil.dll assembly will now be added to the project. Observe that the Copy Local property for the MathUtil.dll assembly is set to True (see Figure 15-7). This means that a copy of the assembly will be placed in the project's output directory (that is, the binDebug folder).
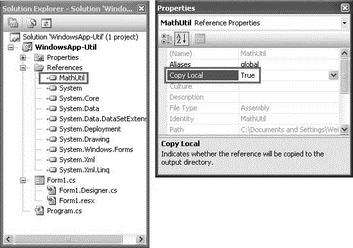
Figure 15-7
When you add a reference to one of the classes in the .NET class library, the Copy Local property for the added assembly will be set to False. That's because the .NET assembly is in the Global Assembly Cache (GAC), and all computers with the .NET Framework installed have the GAC. The GAC is discussed later in this chapter.
Switch to the code-behind of the default Form1 and code the following statements:
namespace WindowsApp_Util {

 public partial class Form1 : Form {

  public Form1() {

   InitializeComponent();

  }

  private void Form1_Load(object sender, EventArgs e) {

   CallUtil();

  }

  private void CallUtil() {

   MathUtil.Utils util = new MathUtil.Utils();

   MessageBox.Show(util.Fibonacci(7).ToString());

  }

 }

}
Set a breakpoint at the CallMathUtil() method (see Figure 15-8).
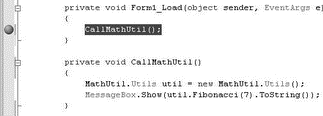
Figure 15-8
Right-click on the WindowsApp-Util project name in Solution Explorer, and select Start as Startup Project. Press F5 to debug the application. When the application stops at the breakpoint, view the modules loaded into memory by selecting Debug?Windows?Modules (see Figure 15-9).
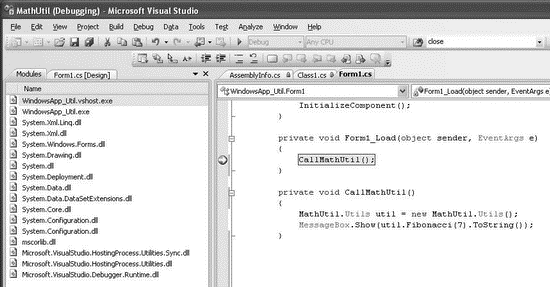
Figure 15-9
Observe that MathUtil.dll library has not been loaded yet. Press F11 to step into the CallMathUtil() function (see Figure 15-10). The MathUtil.dll library is now loaded into memory.
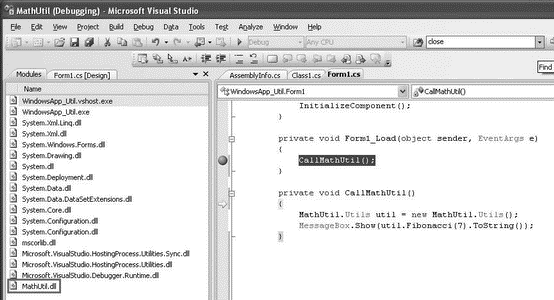
Figure 15-10
Press F5 to continue the execution. You should see a message box displaying the value 42. In the binDebug folder of the Windows application project, you will find the EXE assembly as well as the DLL assembly (see Figure 15-11).
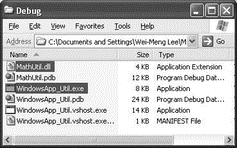
Figure 15-11
Updating the DLL
The Fibonacci() method defined in the MathUtil project contains a bug. When num is less than or equal to 1, the method should return 1 and not 2. In the real world, the application and the DLL may already been deployed to the end user's computer. To fix this bug, you simply need to modify the Utils class, recompile it, and then update the user's computer with the new DLL:
namespace MathUtil {

 public class Utils {

  public int Fibonacci(int num) {

   if (num <= 1) return 1; //---fixed!---

   return Fibonacci(num - 1) + Fibonacci(num - 2);

  }

 }

}
Copy the recompiled MathUtil.dll from the binDebug folder of the MathUtil project, and overwrite the original MathUtil.dll located in the binDebug folder of the Windows project. When the application runs again, it will display the correct value, 21 (previously it displayed 42).
Because the MathUtil.dll assembly is not digitally signed, a hacker could replace this assembly with one that contains malicious code, and the client of this assembly (which is the WindowsApp-Util application in this case) would not know that the assembly has been tampered with. Later in this chapter, you will see how to give the assembly a unique identity using a strong name.
Modules and Assemblies
An application using a library loads it only when necessary — the entire library is loaded into memory during runtime. If the library is large, your application uses up more memory and takes a longer time to load. To solve this problem, you can split an assembly into multiple modules and then compile each individually as a module. The modules can then be compiled into an assembly.
To see how you can use a module instead of an assembly, add a new Class Library project to the solution used in the previous section. Name the Class Library project StringUtil. Populate the default Class1.cs file as follows:
using System.Text.RegularExpressions;

namespace StringUtil {

 public class Utils {

  public bool ValidateEmail(string email) {

   string strRegEx = @"^([a-zA-Z0-9_-.]+)@(([[0-9]{1,3}" +

    @".[0-9]{1,3}.[0-9]{1,3}.)|(([a-zA-Z0-9-]+" +

    @".)+))([a-zA-Z]{2,4}|[0-9]{1,3})(]?)$";

   Regex regex = new Regex(strRegEx);

   if (regex.IsMatch(email)) return (true);

   else return (false);

  }

 }

}
Instead of using Visual Studio 2008 to build the project into an assembly, use the C# compiler to manually compile it into a module.
To use the C# compiler, launch the Visual Studio 2008 Command Prompt (Start?Programs?Microsoft Visual Studio 2008?Visual Studio Tools?Visual Studio 2008 Command Prompt).
Navigate to the folder containing the StringUtil project, and type in the following command to create a new module:
csc /target:module /out:StringUtil.netmodule Class1.cs
When the compilation is done, the StringUtil.netmodule file is created (see Figure 15-12).
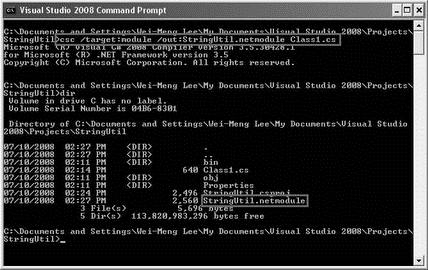
Figure 15-12
Do the same for the MathUtil class that you created earlier (see Figure 15-13):
csc /target:module /out:MathUtil.netmodule Class1.cs
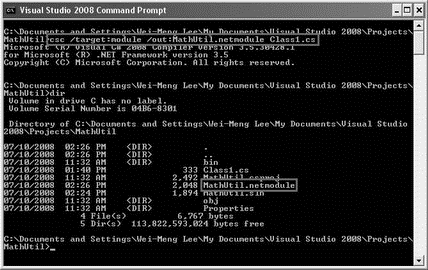
Figure 15-13
Copy the two modules that you have just created — StringUtil.netmodule and MathUtil.netmodule — into a folder, say C:Modules. Now to combine these two modules into an assembly, type the following command:
csc /target:library /addmodule:StringUtil.netmodule /addmodule:MathUtil.netmodule /out:Utils.dll
This creates the Utils.dll assembly (see Figure 15-14).
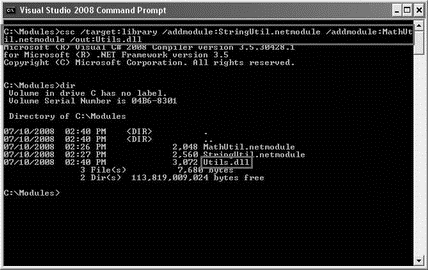
Figure 15-14
In the WindowsApp-Utils project, remove the previous versions of the MathUtil.dll assembly and add a reference to the Utils.dll assembly that you just created (see Figure 15-15). You can do so via the Browse tab of the Add Reference dialog (navigate to the directory containing the modules and assembly, C:Modules). Click OK.
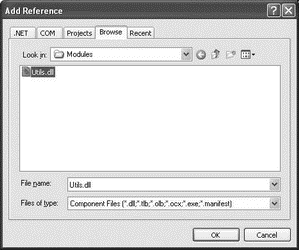
Figure 15-15
In the code-behind of Form1, modify the following code as shown:
namespace WindowsApp_Util {

 public partial class Form1 : Form {

  public Form1() {

   InitializeComponent();

  }

  private void Form1_Load(object sender, EventArgs e) {

   CallMathUtil();

   CallStringUtil();

  }

  private void CallMathUtil() {

   MathUtil.Utils util = new MathUtil.Utils();

   MessageBox.Show(util.Fibonacci(7).ToString());

  }

  private void CallStringUtil() {

   StringUtil.Utils util = new StringUtil.Utils();

   MessageBox.Show(util.ValidateEmail(

    "[email protected]").ToString());

  }

 }

}
The CallMathUtil() function invokes the method defined in the MathUtil module. The CallStringUtil() function invokes the method defined in the StringUtil module.
Set a break point in the Form1_Load event handler, as shown in Figure 15-16, and press F5 to debug the application.
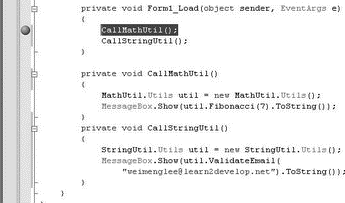
Figure 15-16
When the breakpoint is reached, view the Modules window (Debug?Windows?Modules), and note that the Utils.dll assembly has not been loaded yet (see Figure 15-17).
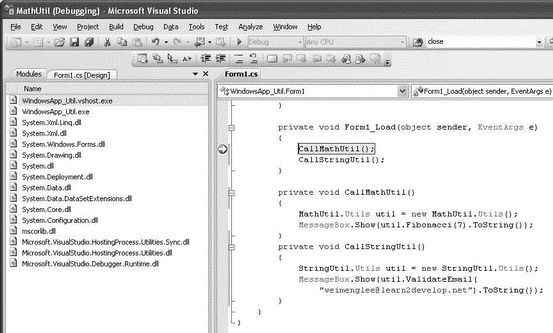
Figure 15-17
Press F11 to step into the CallMathUtil() function, and observe that the Utils.dll assembly is now loaded, together with the MathUtil.netmodule (see Figure 15-18).
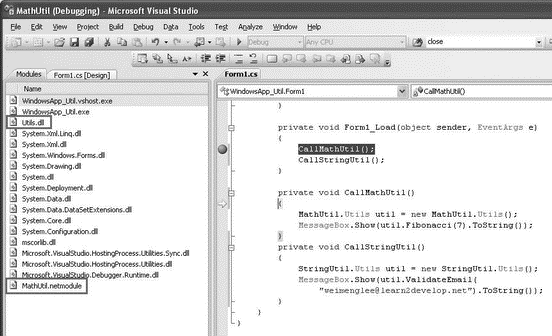
Figure 15-18
Press F11 a few times to step out of the CallMathUtil() function until you step into CallStringUtil(). See that the StringUtil.netmodule is now loaded (see Figure 15-19).
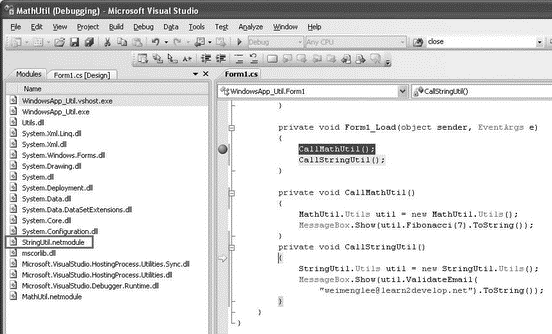
Figure 15-19
This example proves that modules in an assembly are loaded only as and when needed. Also, when deploying the application, the Util.dll assembly and the two modules must be in tandem. If any of the modules is missing during runtime, you will encounter a runtime error, as shown in Figure 15-20.
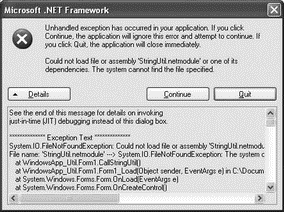
Figure 15-20
- Assemblies
- Shared Cache file
- Одновременный запуск нескольких копий сервера (multi-instancing)
- Безопасность внешних таблиц. Параметр EXTERNAL FILE DIRECTORY
- Разработка приложений баз данных InterBase на Borland Delphi
- Open Source Insight and Discussion
- Introduction to Microprocessors and Microcontrollers
- Chapter 6. Traversing of tables and chains
- Chapter 8. Saving and restoring large rule-sets
- Chapter 11. Iptables targets and jumps
- Chapter 5 Installing and Configuring VirtualCenter 2.0
- Chapter 13. rc.firewall file


