Книга: DirectX 8 Programming Tutorial
Implementing lights in DirectX
Implementing lights in DirectX
In the code for this tutorial, we will have one point light and we'll set the ambient light level pretty low so that the effects of the point light are more obvious. We will also set the material for our objects to be fairly normal and not too reflective (no specular highlights).
Step 1: Modify FVF and Custom Vertex
The first thing to do is to modify our FVF and custom vertex structure. In the FVF we need to remove the D3DFVF_DIFFUSE flag and replace it with the D3DFVF_NORMAL flag. Then in the custom vertex structure, we need to remove the colour attribute and replace it with a Normal attribute. Notice that the texture attributes and flags are specified last. if you don't specify these values last, you may get some strange effects.
//Define a FVF for our cuboids

#define CUBOID_D3DFVF_CUSTOMVERTEX (D3DFVF_XYZ|D3DFVF_NORMAL|D3DFVF_TEX1)

//Define a custom vertex for our cuboids

struct CUBOID_CUSTOMVERTEX {

 FLOAT x, y, z; //Position of vertex in 3D space

 FLOAT nx, ny, nz; //Lighting Normal

 FLOAT tu, tv; //Texture coordinates

};
Step 2: Creating the lights
We need to add a new method to CGame called InitialiseLights. We will put all of our light setup code here. First of all, we'll setup a point light for our scene. To do this we need to populate a D3DLIGHT8 structure with the correct values. To specify that this is a point light we need to use the D3DLIGHT_POINT constant. If you want a directional light use D3DLIGHT_DIRECTIONAL or for a spot light use D3DLIGHT_SPOT. Next, we need to set what light our light will emit. So we must specify the Diffuse, Ambient and Specular RGB values. Note that the values for each RGB element should be between 0 and 1, where 0 is none and 1 is full. Next is the position in 3D space, which is a simple x, y, z value. Finally we set the lights range and attenuation. By specifying that this light has an attenuation value of 1 means that the light will not fade over distance.
Now that we have specified our light, we need to add it to our scene and enable it. To do this we must assign it to our device's light list. We do this my using the SetLight method passing in the position in the list as the first parameter. This is a zero based list, so the first position is index 0. Then, to enable the light (turn it on), we use the LightEnable method. The first parameter is the lights index in the light list and the second parameter defines if we should turn the light on or off (TRUE = on, FALSE = off).
We then call SetRenderState to make sure that lighting in general is enabled. Finally, we call SetRenderState again to setup the ambient light level for the whole scene.
D3DLIGHT8 d3dLight;

//Initialize the light structure.

ZeroMemory(&d3dLight, sizeof(D3DLIGHT8));

//Set up a white point light at (0, 0, –10).

d3dLight.Type = D3DLIGHT_POINT;

d3dLight.Diffuse.r = 1.0f;

d3dLight.Diffuse.g = 1.0f;

d3dLight.Diffuse.b = 1.0f;

d3dLight.Ambient.r = 0.0f;

d3dLight.Ambient.g = 0.0f;

d3dLight.Ambient.b = 0.0f;

d3dLight.Specular.r = 0.0f;

d3dLight.Specular.g = 0.0f;

d3dLight.Specular.b = 0.0f;

d3dLight.Position.x = 0.0f;

d3dLight.Position.y = 0.0f;

d3dLight.Position.z = –10.0f;

d3dLight.Attenuation0 = 1.0f;

d3dLight.Attenuation1 = 0.0f;

d3dLight.Attenuation2 = 0.0f;

d3dLight.Range = 100.0f;

//Assign the point light to our device in poisition (index) 0

m_pD3DDevice->SetLight(0, &d3dLight);

//Enable our point light in position (index) 0

m_pD3DDevice->LightEnable(0, TRUE);

//Turn on lighting

m_pD3DDevice->SetRenderState(D3DRS_LIGHTING, TRUE);

//Set ambient light level

m_pD3DDevice->SetRenderState(D3DRS_AMBIENT, D3DCOLOR_XRGB(32, 32, 32));
Step 3: Setup Material
To setup the materials for our cubes we need to add a new method to CCuboid called SetMaterial which will enable use to have a different material for each cube if we wish. We define a member variable of CCuboid called m_matMaterial which is a structure of type D3DMATERIAL8. We then set values for each attribute of the structure. Set need to define the Diffuse, Ambient and Specular reflection RGBA values followed by the Emissive RGBA value. Make sure that you initialise all of these value (especially Emissive) otherwise you may find that your lighting does not work correctly.
bool CCuboid::SetMaterial(D3DCOLORVALUE rgbaDiffuse, D3DCOLORVALUE rgbaAmbient, D3DCOLORVALUE rgbaSpecular, D3DCOLORVALUE rgbaEmissive, float rPower) {

 //Set the RGBA for diffuse light reflected from this material.

 m_matMaterial.Diffuse = rgbaDiffuse;

 //Set the RGBA for ambient light reflected from this material.

 m_matMaterial.Ambient = rgbaAmbient;

 //Set the color and sharpness of specular highlights for the material.

 m_matMaterial.Specular = rgbaSpecular;

 m_matMaterial.Power = rPower;

 //Set the RGBA for light emitted from this material.

 m_matMaterial.Emissive = rgbaEmissive;

 return true;

}
In the CCuboid constructor, we call SetMaterial to give the cube a default material, as shown below.
//Set material default values (R, G, B, A)

D3DCOLORVALUE rgbaDiffuse = {1.0, 1.0, 1.0, 0.0,};

D3DCOLORVALUE rgbaAmbient = {1.0, 1.0, 1.0, 0.0,};

D3DCOLORVALUE rgbaSpecular = {0.0, 0.0, 0.0, 0.0,};

D3DCOLORVALUE rgbaEmissive = {0.0, 0.0, 0.0, 0.0,};

SetMaterial(rgbaDiffuse, rgbaAmbient, rgbaSpecular, rgbaEmissive, 0);
Finally, in our CCuboid's Render method, we need to use the SetMaterial method to tell DirectX that we want to use our material for all future vertices.
m _pD3DDevice->SetMaterial(&m_matMaterial);
Step 4: Generate Normals
We've changed the way that the cube is made up. Rather than three triangle strips, we are now using a triangle list of 12 triangles which is 36 vertices! So we define our vertices as before, except this time we remove the colour component and replace it with a Normal vector initialised to zero. We then loop around each triangle and calculate what the Normal vector should be for that triangle using the GetTriangeNormal method. We will then set each of the three vertices normals for that triangle to be the same as the triangle polygon Normal itself. The two code snippets below show the GetTriangeNormal method and the triangle looping.
We set the vertices to be that same as the polygon because we are rendering a shape with sharp edges. We only really need to average the normals of shared vertices if we are drawing a smooth shape like a sphere.
D3DVECTOR CCuboid::GetTriangeNormal(D3DXVECTOR3* vVertex1, D3DXVECTOR3* vVertex2, D3DXVECTOR3* vVertex3) {

 D3DXVECTOR3 vNormal;

 D3DXVECTOR3 v1;

 D3DXVECTOR3 v2;

 D3DXVec3Subtract(&v1, vVertex2, vVertex1);

 D3DXVec3Subtract(&v2, vVertex3, vVertex1);

 D3DXVec3Cross(&vNormal, &v1, &v2);

 D3DXVec3Normalize(&vNormal, &vNormal);

 return vNormal;

}

//Set all vertex normals

int i;

for (i = 0; i < 36; i += 3) {

 vNormal = GetTriangeNormal(&D3DXVECTOR3(cvVertices[i].x, cvVertices[i].y, cvVertices[i].z),  &D3DXVECTOR3(cvVertices[i + 1].x, cvVertices[i + 1].y, cvVertices[i + 1].z), &D3DXVECTOR3(cvVertices[i + 2].x, cvVertices[i + 2].y, cvVertices[i + 2].z));

 cvVertices[i].nx = vNormal.x;

 cvVertices[i].ny = vNormal.y;

 cvVertices[i].nz = vNormal.z;

 cvVertices[i + 1].nx = vNormal.x;

 cvVertices[i + 1].ny = vNormal.y;

 cvVertices[i + 1].nz = vNormal.z;

 cvVertices[i + 2].nx = vNormal.x;

 cvVertices[i + 2].ny = vNormal.y;

 cvVertices[i + 2].nz = vNormal.z;

}
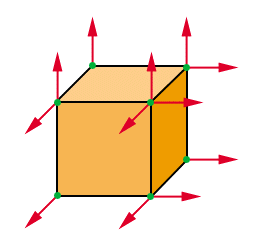
Fig 7.6 below shows the Normals for three of the faces of the cube. The Normals for each of the other vertices will also be the same as the faces. If we were to average the Normals, the cube would appear to have rounded edges. We should only average the Normals of shared vertices if we are rendering a smooth object. I'll show you how to average Normals into one in a future tutorial.

Fig 7.6
Finally, in our CCuboid's Render method, we need to change how we render our cube by using D3DPT_TRIANGLELIST rather than D3DPT_TRIANGLESTRIP.
m_pD3DDevice->DrawPrimitive(D3DPT_TRIANGLELIST, 0, 12);
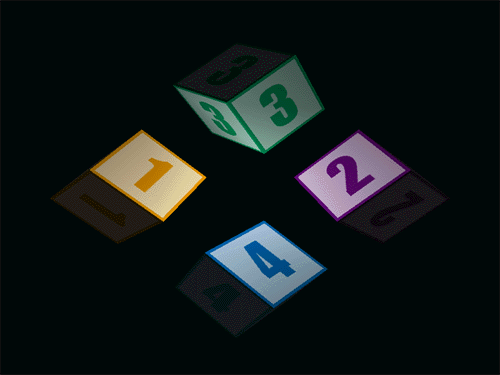
Once you have made these changes, you should finish up with four rotating cubes, each with a different texture (shown below). There is a light source in the center of the four cubes, so as they rotate, you can see that some faces are lit and some are in shadow.

- DirectX Tutorial 7: Lighting and Materials
- Introduction
- DirectX Lighting vs. Real World Lighting
- DirectX Tutorial 1: Getting Started
- DirectX Tutorial 2: Drawing a Polygon
- DirectX Tutorial 3: Rotating 3D Cube
- DirectX Tutorial 4: Full Screen and Depth Buffers
- Implementing Quotas
- Lesson 2: Implementing System Applications
- Implementing RAID on Windows Server 2012 R2
- 2.3.7. Implementing the Client-Server Model
- 4.1.4. Implementing a Threads Package


