Книга: Mastering VMware® Infrastructure3
Managing Client Access to ESX Server
Разделы на этой странице:
Managing Client Access to ESX Server
Starting with VI3, root can no longer log into an ESX Server with a ssh client. This provides better security for the root account, which should be protected at all costs. In previous versions of ESX Server, the root account could log into the Service Console via a remote ssh client session. This provided an avenue to brute-force the root password. The file that defines this policy is sshd_config, located in the /etc/ssh directory, and the attribute that allows or disallows remote root logins is PermitRootLogin. Keeping this attribute set to No is considered a best practice.
For those times when logging into ESX Servers directly is required, limit access to only certain individuals or client computers to help lock down these incoming client connections. These restrictions allow easier compliance with security access policies and can be audited to prove such compliance.
There are two good ways to restrict access to remote client access services. One is to limit the number of user accounts allowed to log on. As discussed earlier, there isn't much need to create and maintain several user accounts locally on an ESX Server. For those times when direct ESX Server access is needed, say with ssh, modify the sshd_config file to allow or to deny specific users. An argument against this technique is that there should only be administrative accounts on the server, so all of them would probably need ssh access and there's no reason to add them to sshd_config.
Perform the following steps to limit ssh connections to specific users:
1. Log into the Service Console as root.
2. If the user accounts have not been created, create them using useradd.
3. Change the working directory to /etc/ssh.
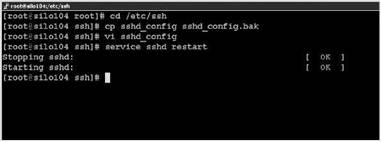
4. Make a copy of the sshd_config file as shown in Figure 12.13.

Figure 12.13 Always create a copy of the original file before making edits.
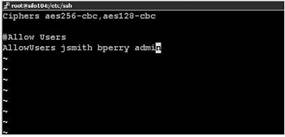
5. Edit the sshd_config file with vi or nano by adding the AllowUsers attribute and the users. Be sure to separate the user accounts with spaces as shown in Figure 12.14.

Figure 12.14 Adding the attribute AllowUsers and the user accounts that will use ssh to remotely access the ESX Server
6. Save the sshd_config file.
7. Restart the sshd service as shown in Figure 12.15.

Figure 12.15 For the edited sshd config file to have an impact, you must restart the sshd service.
8. Test the new sshd_config file by trying to log on with an unspecified account as shown in Figure 12.16.

Figure 12.16 Testing the new users and a bogus user for access with ssh
ssh Access
When using the AllowUser attribute with the sshd_config file, and after only creating the necessary user accounts for administrative purposes, you do not have to specify the DenyUsers attribute. By implicit denial, any other accounts created but not listed in the AllowUsers section are unable to log in remotely with ssh.
User accounts created using the VI Client can be granted shell access by clicking the Allow Shell Access option in the Create User wizard.
Another way to limit access to ESX client services such as ssh and vmware-authd (the process that controls VI Client connections) is to use TCP wrappers. TCP wrappers can restrict specific hosts from connecting to the ESX Server. TCP wrappers are transparent to the underlying services, and there's no need to restart those services when changes have been made to the /etc/hosts.allow or /etc/hosts.deny file (these files are used to allow or deny certain host connections). The syntax for defining the hosts allowed to connect and those that can't is very flexible. Some examples of the syntax for allowing a specific host to connect are as follows:
sshd:192.168.31.42:allow

sshd:host1.abc.com:allow

sshd:192.168.31.0/24:allow
Once the administrator has defined which hosts are allowed to connect, the follow-up is to deny all other hosts. You add this line (or lines) to the /etc/hosts.deny file, or you can consolidate all of the rules in /etc/hosts.allow. Here are some examples of the syntax for denying a specific host or hosts to connect:
vmware-authd:192.168.40.33:deny

vmware-authd:host2.abc.com:deny

vmware-authd:All:deny
hosts.allow and hosts.deny Rules
Be careful when arranging the order of your rules; the first rule matched to a host becomes the policy, even if there is another rule further down that also matches the policy.
Perform the following steps to limit host connections to ssh or vmware-authd:
1. Log into the Service Console as root.
2. Change the working directory to /etc.
3. Make a copy of the hosts.allow file as shown in Figure 12.17.

Figure 12.17 Making a copy of hosts.allow to save the original configuration
4. Edit hosts.allow with vi or nano to include only those hosts that should have access and to restrict all others as shown in Figure 12.18. Remember, you can consolidate your entries into one file, but be careful of their order.

Figure 12.18 Editing the hosts.allow file
5. Save the file.
6. Test the host connections to make sure only those hosts specified have access and all others do not, as shown in Figure 12.19.

Figure 12.19 Looking at /var/log/messages, we can see the refused connection from 172.30.0.104, but an accepted connection from 192.160.2.105.
- Практическая работа 53. Запуск Access. Работа с объектами базы данных
- SERVER CLIENT MAPPING
- Configure Access Control
- Запуск Access. Открытие учебной базы данных Борей
- 7.5.1. Файлы .htaccess
- Основы интерфейса Access 2007
- Листинг 10.2. Пример конфигурационного файла ftpaccess
- Глава 7 Разработка баз данных в программе Access
- Урок 7.1. Знакомство с программой Access
- Access 2007 как реляционная система управления базами данных
- CHAPTER 10 Managing Users
- CHAPTER 15 Remote Access with SSH


