Êíèãà: Beginning Android
Pick and Choose
Pick and Choose
With limited-input devices like phones, having widgets and dialogs that are aware of the type of stuff somebody is supposed to be entering is very helpful. It minimizes keystrokes and screen taps, plus reduces the chance of making some sort of error (e.g., entering a letter someplace where only numbers are expected).
As previously shown, EditText has content-aware flavors for entering in numbers, phone numbers, etc. Android also supports widgets (DatePicker, TimePicker) and dialogs (DatePickerDialog, TimePickerDialog) for helping users enter dates and times.
The DatePicker and DatePickerDialog allow you to set the starting date for the selection, in the form of a year, month, and day of month value. Note that the month runs from 0 for January through 11 for December. Most importantly, each let you provide a callback object (OnDateChangedListener or OnDateSetListener) where you are informed of a new date selected by the user. It is up to you to store that date someplace, particularly if you are using the dialog, since there is no other way for you to get at the chosen date later on.
Similarly, TimePicker and TimePickerDialog let you:
• set the initial time the user can adjust, in the form of an hour (0 through 23) and a minute (0 through 59)
• indicate if the selection should be in 12-hour mode with an AM/PM toggle, or in 24-hour mode (what in the US is thought of as “military time” and in the rest of the world is thought of as “the way times are supposed to be”)
• provide a callback object (OnTimeChangedListener or OnTimeSetListener) to be notified of when the user has chosen a new time, which is supplied to you in the form of an hour and minute
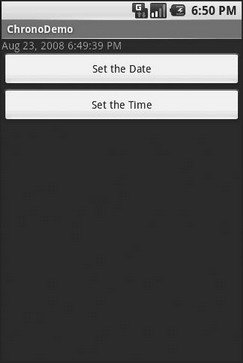
The Fancy/Chrono sample project, found along with all other code samples in this chapter in the Source Code area of http://apress.com, shows a trivial layout containing a label and two buttons — the buttons will pop up the dialog flavors of the date and time pickers:
<?xml version="1.0" encoding="utf-8"?>

<LinearLayout

 xmlns:android="http://schemas.android.com/apk/res/android"

 android:orientation="vertical"

 android:layout_width="fill_parent"

 android:layout_height="fill_parent"

>

 <TextView android:id="@+id/dateAndTime"

  android:layout_width="fill_parent"

  android:layout_height="wrap_content"

 />

 <Button android:id="@+id/dateBtn"

  android:layout_width="fill_parent"

  android:layout_height="wrap_content"

  android:text="Set the Date"

 />

 <Button android:id="@+id/timeBtn"

  android:layout_width="fill_parent"

  android:layout_height="wrap_content"

  android:text="Set the Time"

 />

</LinearLayout>
The more interesting stuff comes in the Java source:
public class ChronoDemo extends Activity {

 DateFormat fmtDateAndTime = DateFormat.getDateTimeInstance();

 TextView dateAndTimeLabel;

 Calendar dateAndTime = Calendar.getInstance();

 DatePickerDialog.OnDateSetListener d =

  new DatePickerDialog.OnDateSetListener() {

  public void onDateSet(DatePicker view, int year, int monthOfYear,

   int dayOfMonth) {

   dateAndTime.set(Calendar.YEAR, year);

   dateAndTime.set(Calendar.MONTH, monthOfYear);

   dateAndTime.set(Calendar.DAY_OF_MONTH, dayOfMonth);

   updateLabel();

  }

 };

 TimePickerDialog.OnTimeSetListener t =

  new TimePickerDialog.OnTimeSetListener() {

  public void onTimeSet(TimePicker view, int hourOfDay,

   int minute) {

   dateAndTime.set(Calendar.HOUR_OF_DAY, hourOfDay);

   dateAndTime.set(Calendar.MINUTE, minute);

   updateLabel();

  }

 };

 @Override

 public void onCreate(Bundle icicle) {

  super.onCreate(icicle);

  setContentView(R.layout.main);

  Button btn = (Button)findViewById(R.id.dateBtn);

  btn.setOnClickListener(new View.OnClickListener() {

   public void onClick(View v) {

    new DatePickerDialog(ChronoDemo.this, d,

     dateAndTime.get(Calendar.YEAR), dateAndTime.get(Calendar.MONTH),

     dateAndTime.get(Calendar.DAY_OF_MONTH)).show();

   }

  });

  btn = (Button)findViewById(R.id.timeBtn);

  btn.setOnClickListener(new View.OnClickListener() {

   public void onClick(View v) {

    new TimePickerDialog(ChronoDemo.this, t,

     dateAndTime.get(Calendar.HOUR_OF_DAY), dateAndTime.get(Calendar.MINUTE),

     true).show();

   }

  });

  dateAndTimeLabel = (TextView)findViewById(R.id.dateAndTime);

  updateLabel();

 }

 private void updateLabel() {

  dateAndTimeLabel.setText(fmtDateAndTime.format(dateAndTime.getTime()));

 }

}
The “model” for this activity is just a Calendar instance, initially set to be the current date and time. We pour it into the view via a DateFormat formatter. In the updateLabel() method, we take the current Calendar, format it, and put it in the TextView.
Each button is given a OnClickListener callback object. When the button is clicked, either a DatePickerDialog or a TimePickerDialog is shown. In the case of the DatePickerDialog, we give it a OnDateSetListener callback that updates the Calendar with the new date (year, month, day of month). We also give the dialog the last-selected date, getting the values out of the Calendar. In the case of the TimePickerDialog, it gets a OnTimeSetListener callback to update the time portion of the Calendar, the last-selected time, and a true indicating we want 24-hour mode on the time selector.
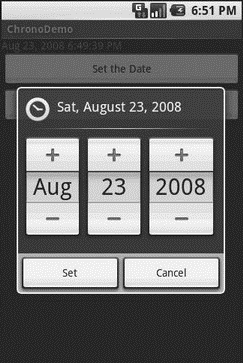
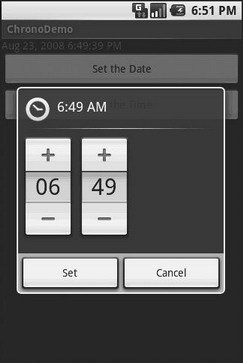
With all this wired together, the resulting activity is shown in Figures 10-1, 10-2, and 10-3.

Figure 10-1. The ChronoDemo sample application, as initially launched

Figure 10-2. The same application, showing the date picker dialog

Figure 10-3. The same application, showing the time picker dialog
- CHAPTER 10 Employing Fancy Widgets and Containers
- Ants and JARs
- And Now, a Word from Our Framework
- Ðàçðàáîòêà ïðèëîæåíèé áàç äàííûõ InterBase íà Borland Delphi
- Open Source Insight and Discussion
- Introduction to Microprocessors and Microcontrollers
- Chapter 6. Traversing of tables and chains
- Chapter 8. Saving and restoring large rule-sets
- Chapter 11. Iptables targets and jumps
- Chapter 5 Installing and Configuring VirtualCenter 2.0
- Chapter 16. Commercial products based on Linux, iptables and netfilter
- Appendix A. Detailed explanations of special commands


