Êíèãà: C# 2008 Programmer
Inline Documentation using XML
Inline Documentation using XML
To see how XML documentation works, create a new class library project in Visual Studio 2008 as shown in Figure C-1. Name the project PointClass.
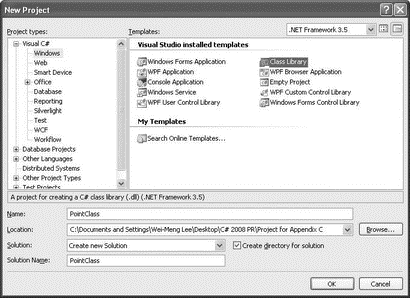
Figure C-1
Populate the default Class1.cs with the following class definition:
using System;

using System.Collections.Generic;

using System.Linq;

using System.Text;

namespace PointClass {

 public class Point {

  //---static variable---

  private static int count;

  //---properties---

  public int x { get; set; }

  public int y { get; set; }

  //---constructors---

  public Point() {

   count++;

  }

  public Point(int x, int y) {

   this.x = x;

   this.y = y;

   count++;

  }

  //---overloaded methods---

  public double Length() {

   return Math.Sqrt(

    Math.Pow(this.x, 2) +

    Math.Pow(this.y, 2));

  }

  public double Length(Point pt) {

   return Math.Sqrt(

    Math.Pow(this.x - pt.x, 2) +

    Math.Pow(this.y - pt.y, 2));

  }

 }

}
The definition for the Point class contains the following members:
? A static private member named count
? Two properties — x and y
? Two overloaded constructors
? Two overloaded Length() methods
To add XML comments to the class, type three slash (/) character in succession: ///. Figure C-2 shows that when you type /// before the Point class definition, an XML comments template is automatically inserted for you.
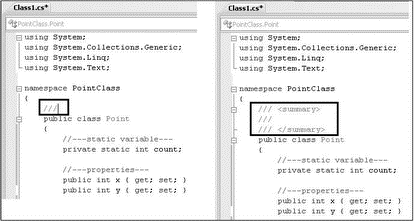
Figure C-2
The <summary> tag is inserted by default, but you can insert additional XML comment tags within the XML comments template, as shown in Figure C-3.
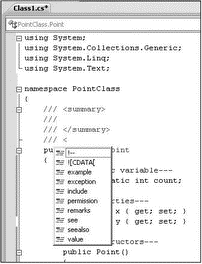
Figure C-3
Following is a list of XML documentation tags. You can find a similar list with a link to each tag's description (its uses) at http://msdn.microsoft.com/en-us/library/5ast78ax.aspx.
<c>             <para>       <see>

<code>          <param>      <seealso>

<example>       <paramref>   <summary>

<exception>     <permission> <typeparam>

<typeparamrefs> <value>      <include>

<remarks>       <list>       <returns>
Using the Point class definition, insert the XML comments highlighted in the following code:
using System;

using System.Collections.Generic;

using System.Linq;

using System.Text;

namespace PointClass {

 /// <summary>

 /// The Point class contains 2 properties, 1 overloaded

 /// constructor, and 1 overloaded method

 /// </summary>

 /// <remarks>

 /// If you need to use the Point class in the System.Drawing

 /// namespace, be sure to reference it using the fully

 /// qualified name, i.e. System.Drawing.Point

 /// </remarks>

 /// <history>

 /// [Wei-Meng Lee] 5/12/2008 Created

 /// </history>

 public class Point {

  //---static variable---

  private static int count;

  //---properties---

  /// <summary>

  /// Property for x-coordinate

  /// </summary>

  /// <returns>

  /// The x-coordinate

  /// </returns>

  public int x { get; set; }

  /// <summary>

  /// Property for y-coordinate

  /// </summary>

  /// <returns>

  /// The y-coordinate

  /// </returns>

  public int y { get; set; }

  //---constructors---

  /// <summary>

  /// Default constructor

  /// </summary>

  /// <remarks>

  /// Creates a new instance of the Point class

  /// </ remarks>

  public Point() {

   count++;

  }

  /// <overloads>

  /// Constructor

  /// </overloads>

  /// <summary>

  /// Constructor with two parameters

  /// </summary>

  /// <param name="x">Parameter x is assigned to the x-coordinate</param>

  /// <param name="y">Parameter y is assigned to the y-coordinate</param>

  /// <remarks>

  /// Creates a new instance of the Point class

  /// </remarks>

  public Point(int x, int y) {

   this.x = x;

   this.y = y;

   count++;

  }

  //---overloaded methods---

  /// <overloads>

  /// Calculates the distance between two points

  /// </overloads>

  /// <summary>

  /// Calculates the distance of a point from the origin

  /// </summary>

  /// <returns>The distance between the current point and the origin

  /// </returns>

  /// <example>This sample shows how to call the <c>length()</c>

  /// method

  /// <code>

  /// Point ptA = new Point(3, 4);

  /// double distance = ptA.Length();

  /// </code>

  /// </example>

  public double Length() {

   return Math.Sqrt(

    Math.Pow(this.x, 2) + Math.Pow(this.y, 2));

  }

  /// <summary>

  /// Calculates the distance of a point from another point

  /// </summary>

  /// <param name="pt">A Point object</param>

  /// <returns>The distance between the current point and the

  /// specified point

  /// </returns>

  /// <example>This sample shows how to call the <c>length()</c> method

  /// with a point specified

  /// <code>

  ///  Point ptA = new Point(3, 4);

  ///  Point ptB = new Point(7, 8);

  ///  double distance = ptA.Length(ptB);

  /// </code>

  /// </example>

  public double Length(Point pt) {

   return Math.Sqrt(

    Math.Pow(this.x - pt.x, 2) + Math.Pow(this.y - pt.y, 2));

  }

 }

}
Take a look at the documentation you have done for one of the overloaded Length() methods:
//---overloaded methods---

/// <overloads>

/// Calculates the distance between two points

/// </overloads>

/// <summary>

/// Calculates the distance of a point from the origin

/// </summary>

/// <returns>T he distance between the current point and the origin

/// </returns>

/// <example> This sample shows how to call the <c>length()</c>

/// method

/// <code>

///  Point ptA = new Point(3, 4);

///  double distance = ptA.Length();

/// </code>

/// </example>
You will notice that there is a new element — <overloads> — that is not in the list specified in the MSDN documentation. The <overloads> element is used to give a general description for methods that are overloaded. You will see the effect of this element later when you generate the documentation using the third-party tool. You only need to specify the <overloads> element on one (any one will do) of the overloaded methods.
You can also include code samples in your documentation using the <example> tag. To format a word (or sentence) as code, use the <c> tag. For multiple lines of code, use the <code> tag.
Because the XML comments that you add to your code may make reading difficult, you can hide the comments by clicking the minus sign (–) on the left of the code window. To reveal the XML documentation, click the plus sign (+) as shown in Figure C-4.

Figure C-4
Once you have inserted the XML comments in your code, right-click the project name in Solution Explorer and select Properties. Select the Build tab and check the XML Documentation File checkbox (see Figure C-5). This indicates to the compiler that after the project is compiled, it should consolidate all the XML comments into an XML documentation file. By default, the XML document will be saved to the bin/Debug folder of your project.
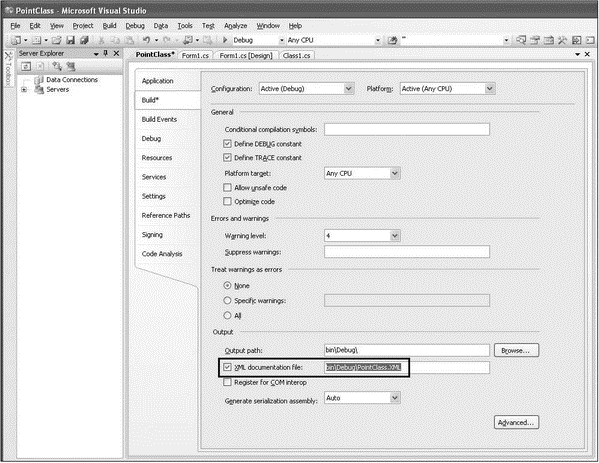
Figure C-5
Build the project by right-clicking the project name in Solution Explorer and then selecting Build. The XML documentation file is now located in the bin/Debug folder of your project, together with the PointClass.dll library. Figure C-6 shows what the XML file looks like.
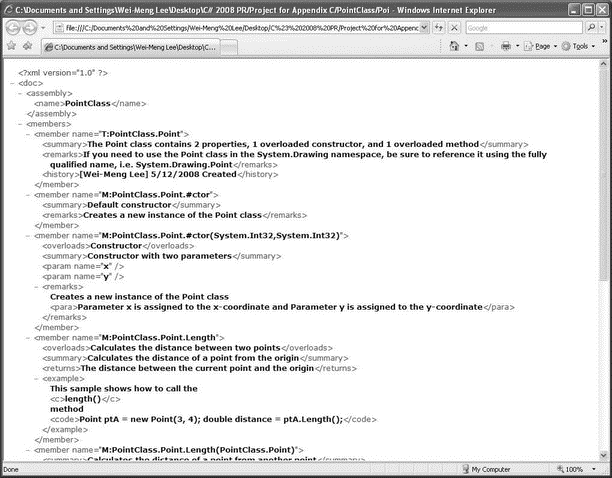
Figure C-6
- Òåñòèðîâàíèå Web-ñåðâèñà XML ñ ïîìîùüþ WebDev.WebServer.exe
- Ïðåîáðàçîâàíèå XML â ðåëÿöèîííóþ áàçó äàííûõ
- Appendix H. GNU Free Documentation License
- Caveats using NAT
- Using Double Quotes to Resolve Variables in Strings with Embedded Spaces
- Data Binding Using the GridView Control
- Using the kill Command to Control Processes
- XMLHttpRequest
- Installing Using a Network
- Using X
- Using a Display Manager
- Starting X from the Console by Using startx


