Êíèãà: C# 2008 Programmer
Playing Media
Ðàçäåëû íà ýòîé ñòðàíèöå:
Playing Media
One of Silverlight's key capabilities is a rich media experience. This section examines how to embed a Windows media file in your Silverlight application and how to control its playback. In addition, it also explains how to create simple effects on the video.
Creating the Silverlight Project
Using Expression Blend 2, create a Silverlight project and name it Media.
In the Project window, right-click on the project name (Media) and select Add Existing Item. Select a Windows Media file (WindowsMedia.wmv, for this example; it's included in the book's code download). After this, the WindowsMedia.wmv file will be added to the project.
Double-click WindowsMedia.wmv in the Project window to add it to the page (see Figure 19-50).

Figure 19-50
You need Windows Media Player 10 or later for this project to work.
The WindowsMedia.wmv file in now contained within a MediaElement control (see also Figure 19-51):
<Canvas

 xmlns="http://schemas.microsoft.com/client/2007"

 xmlns:x="http://schemas.microsoft.com/winfx/2006/xaml"

 Width="640" Height="480"

 Background="White"

 x:Name="Page">

 <MediaElement

  x:Name="WindowsMedia_wmv"

  Width="320" Height="240"

  Source="WindowsMedia.wmv" Stretch="Fill"

  Canvas.Top="8" Canvas.Left="8"

  AutoPlay="True"/>

</Canvas>
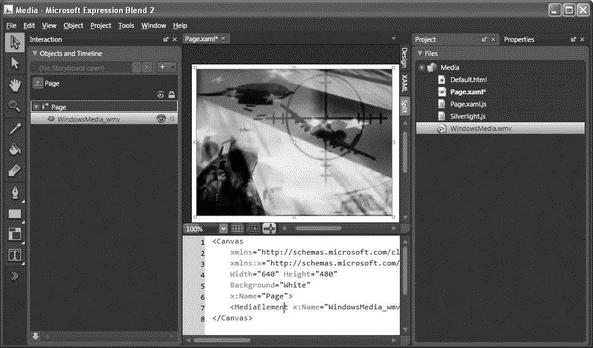
Figure 19-51
Press F5 to test the page. The video automatically starts to play when the page has finished loading (see Figure 19-52).
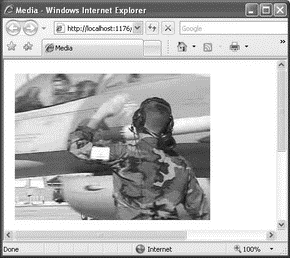
Figure 19-52
Disabling Auto-Play
While automatically playing a video is a useful feature, sometimes you might want to disable this. For example, if you have multiple videos embedded in a page, this feature is actually more nuisance than helpful. To disable the auto-play feature, just set the AutoPlay attribute in the <MediaElement> element to False, like this:
<Canvas

 xmlns="http://schemas.microsoft.com/client/2007"

 xmlns:x="http://schemas.microsoft.com/winfx/2006/xaml"

 Width="640" Height="480"

 Background="White"

 x:Name="Page">

 <MediaElement

  x:Name="WindowsMedia_wmv"

  Width="320" Height="240"

  Source="WindowsMedia.wmv" Stretch="Fill"

  Canvas.Top="8" Canvas.Left="8"

  AutoPlay="False"

 />

</Canvas>
So how and when do you get it to play? You can programmatically play the video when the user's mouse enters the video and pause it when the mouse leaves the video. Also, if the user clicks on the video, the video can stop and return to the beginning. To do so, set the following highlighted attributes:
<Canvas

 xmlns="http://schemas.microsoft.com/client/2007"

 xmlns:x="http://schemas.microsoft.com/winfx/2006/xaml"

 Width="640" Height="480"

 Background="White"

 x:Name="Page">

 <MediaElement

  x:Name="WindowsMedia_wmv"

  Width="320" Height="240"

  Source="WindowsMedia.wmv" Stretch="Fill"

  Canvas.Top="8" Canvas.Left="8"

  AutoPlay="False"

  MouseEnter="MouseEnter"

  MouseLeave="MouseLeave"

  MouseLeftButtonDown="MouseClick"

 />

</Canvas>
Basically, you are setting the event handlers for the various events handled by the <MediaElement> element. To write the event handler, go to the Project window and double-click on the Page.xaml.js file.
Append the Page.xaml.js file with the following code:
function MouseEnter(sender, eventArgs) {

 var obj = sender.findName("WindowsMedia_wmv");

 obj.play();

}

function MouseLeave(sender, eventArgs) {

 var obj = sender.findName("WindowsMedia_wmv");

 obj.pause();

}

function MouseClick(sender, eventArgs) {

 var obj = sender.findName("WindowsMedia_wmv");

 obj.stop();

}
The findName() method allows you to programmatically get a reference to the specified element (via its x:Name attribute) on the Silverlight page. In this case, you are referencing an instance of the MediaElement element. This object supports the play, pause, and stop methods.
Press F5 to test the application again. This time, the video will start to play when the mouse hovers over it and pauses when the mouse leaves it. To restart the video to the beginning, simply click on the video.
Creating the Mirror Effect
One interesting thing you can do with a video is to create a mirror effect. For example, Figure 19-53 shows a video playing with a mirror image at the bottom of it.
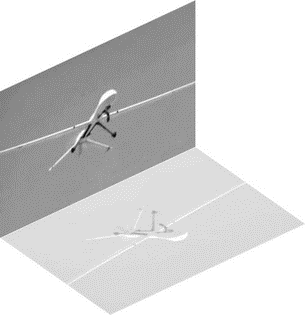
Figure 19-53
Modify the original Canvas control by switching the page to XAML view and adding the following highlighted code:
<Canvas

 xmlns="http://schemas.microsoft.com/client/2007"

 xmlns:x="http://schemas.microsoft.com/winfx/2006/xaml"

 Width="640" Height="480"

 Background="White"

 x:Name="Page">

 <MediaElement

  x:Name="WindowsMedia_wmv"

  Width="238" Height="156"

  Source="WindowsMedia.wmv" Stretch="Fill"

  Canvas.Top="124" Canvas.Left="8"

  AutoPlay="False"

  MouseEnter="MouseEnter"

  MouseLeave="MouseLeave"

  MouseLeftButtonDown="MouseClick">

  <MediaElement.RenderTransform>

   <TransformGroup>

    <ScaleTransform ScaleX="1" ScaleY="1"/>

    <SkewTransform AngleX="0" AngleY="-25"/>

    <RotateTransform Angle="0"/>

    <TranslateTransform X="0" Y="0"/>

   </TransformGroup>

  </MediaElement.RenderTransform>

 </MediaElement>

</Canvas>
This transforms the video into the shape shown in Figure 19-54.
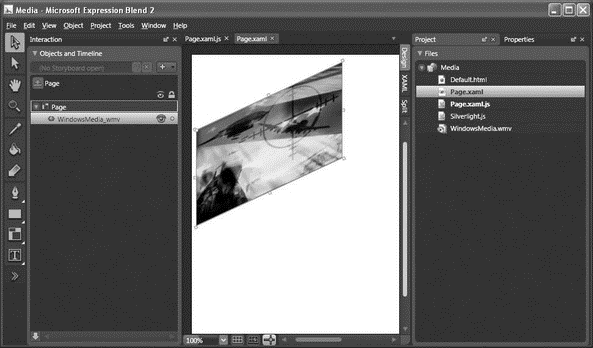
Figure 19-54
Add another <MediaElement> element (highlighted code) to simulate the mirror effect:
<Canvas

 xmlns="http://schemas.microsoft.com/client/2007"

 xmlns:x="http://schemas.microsoft.com/winfx/2006/xaml"

 Width="640" Height="480"

 Background="White">

 <MediaElement

  x:Name="WindowsMedia_wmv"

  Width="238" Height="156"

  Source="WindowsMedia.wmv" Stretch="Fill"

  Canvas.Top="124" Canvas.Left="8"

  AutoPlay="False"

  MouseEnter="MouseEnter"

  MouseLeave="MouseLeave"

  MouseLeftButtonDown="MouseClick">

  <MediaElement.RenderTransform>

   <TransformGroup>

    <ScaleTransform ScaleX="1" ScaleY="1"/>

    <SkewTransform AngleX="0" AngleY="-25"/>

    <RotateTransform Angle="0"/>

    <TranslateTransform X="0" Y="0"/>

   </TransformGroup>

  </MediaElement.RenderTransform>

 </MediaElement>

 <MediaElement

  x:Name="WindowsMedia_wmv1"

  AutoPlay="False"

  MouseEnter="MouseEnter"

  MouseLeave="MouseLeave"

  MouseLeftButtonDown="MouseClick"

  Width="238.955" Height="99.454"

  Source="WindowsMedia.wmv"

  Stretch="Fill"

  Canvas.Left="149.319" Canvas.Top="379.884">

  <MediaElement.RenderTransform>

   <TransformGroup>

    <ScaleTransform ScaleX="1" ScaleY="-1"/>

    <SkewTransform AngleX="55" AngleY="-25"/>

    <TranslateTransform X="0" Y="0"/>

   </TransformGroup>

  </MediaElement.RenderTransform>

 </MediaElement>

</Canvas>
You now have two videos with the second video mirroring the first (see Figure 19-55).
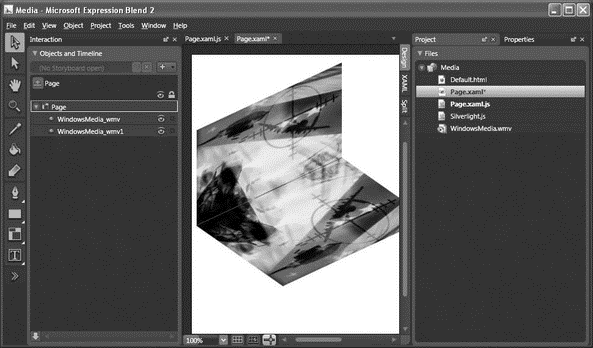
Figure 19-55
To create the translucent effect for the mirror image, set the Opacity attribute to a value between 0 and 1 (in this case it's set to 0.3):
<MediaElement

 x:Name="WindowsMedia_wmv1"

 AutoPlay="False"

 MouseEnter="MouseEnter"

 MouseLeave="MouseLeave"

 MouseLeftButtonDown="MouseClick"

 Width="238.955" Height="99.454"

 Source="WindowsMedia.wmv"

 Stretch="Fill"

 Canvas.Left="149.319" Canvas.Top="379.884"

 Opacity="0.3">
Modify the following block of code in Page.xaml.js highlighted here:
//---make these variables global---

var obj, obj1;

if (!window.Media) Media = {};

Media.Page = function() {}

Media.Page.prototype = {

 handleLoad: function(control, userContext, rootElement) {

  this.control = control; // Sample event hookup:

  rootElement.addEventListener("MouseLeftButtonDown",

   Silverlight.createDelegate(this, this.handleMouseDown));

  //---the original video---

  obj = this.control.content.findName("WindowsMedia_wmv");

  //---the reflected video---

  obj1 = this.control.content.findName("WindowsMedia_wmv1");

 },

 // Sample event handler

 handleMouseDown: function(sender, eventArgs) {

  // The following line of code shows how to find an element by name and call a method on it.

  // this.control.content.findName("Storyboard1").Begin();

 }

}

function MouseEnter(sender, eventArgs) {

 //---mute the reflected video---

 obj1.volume=0;

 //---play the 2 videos---

 obj.play();

 obj1.play();

}

function MouseLeave(sender, eventArgs) {

 //---pause the 2 videos---

 obj.pause();

 obj1.pause();

}

function MouseClick(sender, eventArgs) {

 //---stop the 2 videos---

 obj.stop();

 obj1.stop();

}
Notice that instead of programmatically finding the media object — using the findName() method — in each event handler, you can also locate it via the handleLoad() function. Also, because there are two identical videos in the page, you do not need the audio playback in the mirroring video. Hence, you turn off its volume by setting its volume property to 0 (valid values are from 0 to 1).
Press F5 to test the page. Both videos start to play when the mouse hovers over either of the two videos (see Figure 19-56).
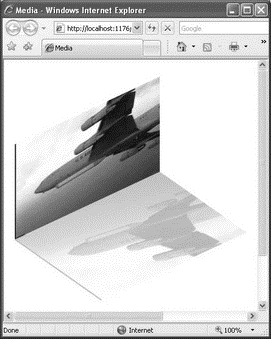
Figure 19-56
- Creating Your Own Media Player
- Displaying Interface Statistics
- Ïðè ïîïûòêå ñêà÷àòü èç Èíòåðíåòà ÌÐ3-ôàéë çàïóñêàåòñÿ Ïðîèãðûâàòåëü Windows Media. Íî ìíå íóæíî ïðîñòî ñêà÷àòü ôàéë. Êàê...
- Óðîê 4.5. Ïðîèãðûâàòåëü Windows Media
- Ðåøåíèå ïðîáëåì ïðè ðàáîòå Ïðîèãðûâàòåëÿ Windows Media
- Ïðàêòè÷åñêàÿ ðàáîòà 27. Ðàáîòà ñ ïðîèãðûâàòåëåì Windows Media
- CHAPTER 7 Multimedia
- Multimedia
- Playing Windows Games with Cedega
- Displaying Free and Used Memory with free
- Choosing Backup Hardware and Media
- Removable Storage Media


