Книга: Windows Server 2012 R2 Storage, Security, & Networking Pocket Consultant
Installing and configuring the DNS Server service
Installing and configuring the DNS Server service
All domain controllers can act as DNS servers, and you might be prompted to install and configure DNS during installation of the domain controller. If you respond affirmatively to the prompts, DNS is already installed, and the default configuration is set automatically. You don’t need to reinstall.
If you’re working with a member server instead of a domain controller, or if you haven’t installed DNS, follow these steps to install DNS:
1. In Server Manager, tap or click Manage, and then tap or click Add Roles And Features, or select Add Roles And Features in the Quick Start pane to start the Add Roles And Features Wizard. If the wizard displays the Before You Begin page, read the Welcome text, and then tap or click Next.
2. On the Installation Type page, Role-Based Or Feature-Based Installation is selected by default. Tap or click Next.
3. On the Server Selection page, you can choose to install roles and features on running servers or virtual hard disks. Either select a server from the server pool or select a server from the server pool on which to mount a virtual hard disk (VHD). If you are adding roles and features to a VHD, tap or click Browse and then use the Browse For Virtual Hard Disks dialog box to locate the VHD. When you are ready to continue, tap or click Next.
NOTE Only servers running Windows Server 2012 R2 and that have been added for management in Server Manager are listed.
4. On the Server Roles page, select DNS Server. If additional features are required to install a role, you’ll get an additional dialog box. Tap or click Add Features to close the dialog box, and add the required features to the server installation. When you are ready to continue, tap or click Next three times.
5. If the server on which you want to install the DNS Server role doesn’t have all the required binary source files, the server gets the files via Windows Update by default or from a location specified in Group Policy.
NOTE You also can specify an alternate path for the required source files. To do this, click the Specify An Alternate Source Path link, enter that alternate path in the box provided, and then tap or click OK. For network shares, enter the UNC path to the share, such as CorpServer82WinServer2012. For mounted Windows images, enter the Windows Imaging (WIM) path prefixed with WIM: and including the index of the image to use, such as WIM: CorpServer82WinServer2012install.wim:4.
6. Tap or click Install to begin the installation process. The Installation Progress page tracks the progress of the installation. If you close the wizard, tap or click the Notifications icon in Server Manager, and then tap or click the link provided to reopen the wizard.
7. When Setup finishes installing the DNS Server role, the Installation Progress page will be updated to reflect this. Review the installation details to ensure that the installation was successful.
8. From now on, the DNS Server service should start automatically each time you restart the server. If it doesn’t start, you need to start it manually. (See “Starting and stopping a DNS server” later in this chapter.)
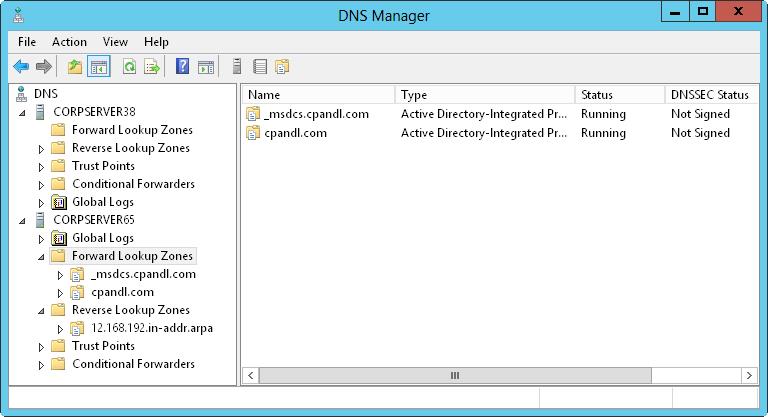
9. After you install a DNS server, you use the DNS console to configure and manage DNS. In Server Manager, tap or click Tools, and then tap or click DNS to open the DNS Manager console, shown in Figure 9–1.

FIGURE 9–1 Use the DNS Manager console to manage DNS servers on the network.
10. If the server you want to configure isn’t listed in the tree view, you need to connect to the server. Press and hold or right-click DNS in the tree view, and then tap or click Connect To DNS Server. Now do one of the following:
If you’re trying to connect to a local server, select This Computer, and then tap or click OK.
If you’re trying to connect to a remote server, select The Following Computer, enter the server’s name or IP address, and then tap or click OK.
11. An entry for the DNS server should be listed in the tree view pane of the DNS Manager console. Press and hold or right-click the server entry, and then tap or click Configure A DNS Server to start the Configure A DNS Server Wizard. Tap or click Next.
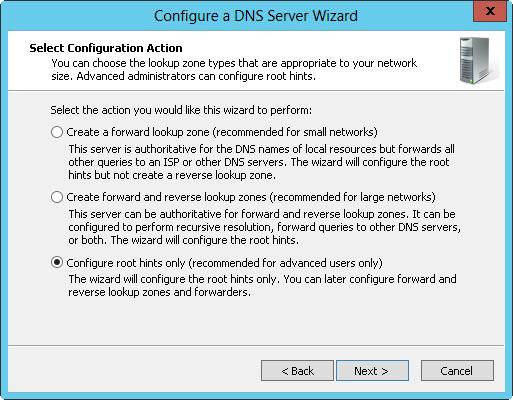
12. On the Select Configuration Action page, shown in Figure 9–2, select Configure Root Hints Only to specify that only the base DNS structures should be created at this time.

FIGURE 9–2 Configure the root hints only to install the base DNS structures.
13. Tap or click Next. The wizard searches for existing DNS structures and modifies them as necessary.
14. Tap or click Finish to complete the process.
REAL WORLD If the wizard wasn’t able to configure the root hints, you might need to configure them manually or copy them from another server. However, a default set of root hints is included with DNS Server, and these root hints should be added automatically. To confirm, press and hold or right-click the server entry in the DNS console, and then select Properties. In the Properties dialog box, the currently configured root hints are shown on the Root Hints tab.
- Тестирование Web-сервиса XML с помощью WebDev.WebServer.exe
- InterBase Super Server для Windows
- Каталог BIN в SuperServer
- Минимальный состав сервера InterBase SuperServer
- InterBase Classic Server под Linux
- Каталог BIN в InterBase Classic Server для Linux
- SuperServer
- Classic vs SuperServer
- Рекомендации по выбору архитектуры: Classic или SuperServer?
- Улучшенное время отклика для версии SuperServer
- Эффективное взаимодействие процессов архитектуры Classic Server
- Yaffil Classic Server - замена InterBase Classic 4.0


