Книга: Windows Server 2012 R2 Storage, Security, & Networking Pocket Consultant
Creating and managing scopes
Разделы на этой странице:
- Creating normal scopes for IPv4 addresses
- Creating normal scopes for IPv6 addresses
- Creating multicast scopes
- Setting scope options
- VIEWING AND ASSIGNING SERVER OPTIONS
- VIEWING AND ASSIGNING SCOPE OPTIONS
- VIEWING AND ASSIGNING RESERVATION OPTIONS
- Modifying scopes
- Activating and deactivating scopes
- Enabling the Bootstrap Protocol
- Removing a scope
- Configuring multiple scopes on a network
Creating and managing scopes
Scopes provide a pool of IP addresses for DHCP clients. A normal scope is a scope with class A, B, or C network addresses. A multicast scope is a scope with class D network addresses. Although you create normal scopes and multicast scopes differently, you manage them in much the same way. The key differences are that multicast scopes can’t use reservations, and you can’t set additional options for WINS, DNS, routing, and so forth.
Creating normal scopes for IPv4 addresses
You can create a normal scope for IPv4 addresses by following these steps:
1. In the DHCP console, expand the node for the server with which you want to work, and then press and hold or right-click IPv4. If you want to add the new scope to a superscope automatically, press and hold or right-click the superscope instead.
2. On the shortcut menu, tap or click New Scope to start the New Scope Wizard. Tap or click Next.
3. Enter a name and description for the scope, and then tap or click Next.
4. The Start IP Address and End IP Address boxes define the valid IP address range for the scope. On the IP Address Range page, enter a start address and an end address in these boxes.
NOTE Generally, the scope doesn’t include the x.x.x.0 and x.x.x.255 addresses, which are usually reserved for network addresses and broadcast messages, respectively. Accordingly, you would use a range such as 192.168.10.1 to 192.168.10.254 rather than 192.168.10.0 to 192.168.10.255.
5. When you enter an IP address range, the bit length and subnet mask are filled in for you automatically (as shown in Figure 8–6). Unless you use subnets, you should use the default values.
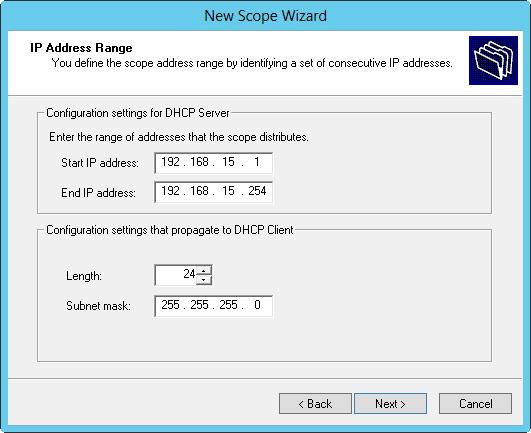
FIGURE 8–6 In the New Scope Wizard, enter the IP address range for the scope.
6. Tap or click Next. If the IP address range you entered is on multiple networks, you’re given the opportunity to create a superscope that contains separate scopes for each network and, in this case, select the Yes option button to continue, and then move on to step 8. If you make a mistake, tap or click Back, and then modify the IP address range you entered.
7. Use the Start IP Address and End IP Address boxes on the Add Exclusions And Delay page to define IP address ranges that are to be excluded from the scope. You can exclude multiple address ranges as follows:
? To define an exclusion range, enter a start address and an end address in the Exclusion Range’s Start IP Address and End IP Address boxes, and then tap or click Add. To exclude a single IP address, use that address as both the start IP address and the end IP address.
? To track which address ranges are excluded, use the Excluded Address Range list.
? To delete an exclusion range, select the range in the Excluded Address Range list, and then tap or click Remove.
8. Tap or click Next. Specify the duration of leases for the scope by using the Day(s), Hour(s), and Minutes boxes. The default duration is eight days. Tap or click Next.
NOTE A lease duration that’s set too long can reduce the effectiveness of DhCP and might eventually cause you to run out of available IP addresses, especially on networks with mobile users or other types of computers that aren’t fixed members of the network. A good lease duration for most networks is from one to three days.
9. You have the opportunity to configure common DHCP options for DNS, WINS, gateways, and more. If you want to set these options now, select Yes, I Want To Configure These Options Now; otherwise, select No, I Will Configure These Options Later and skip steps 10–15.
10. Tap or click Next. The first option you can configure is the default gateway. In the IP Address box, enter the IP address of the primary default gateway, and then tap or click Add. Repeat this process for other default gateways.
11. The first gateway listed is the one clients try to use first. If the gateway isn’t available, clients try to use the next gateway, and so on. Use the Up and Down buttons to change the order of the gateways, as necessary.
12. Tap or click Next. As shown in Figure 8–7, configure default DNS settings for DHCP clients. Enter the name of the parent domain to use for DNS resolution of computer names that aren’t fully qualified.
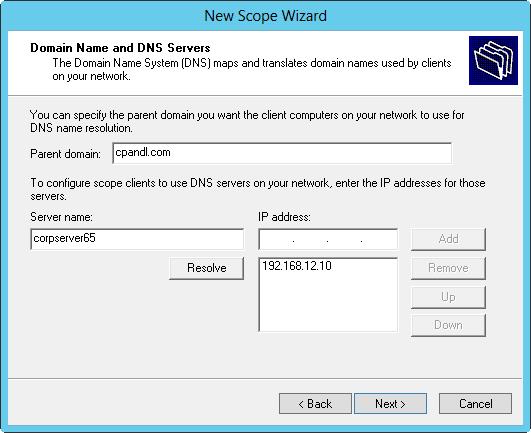
FIGURE 8–7 Use the Domain Name And DNS Servers page to configure default DNS settings for DHCP clients.
13. In the IP Address box, enter the IP address of the primary DNS server, and then tap or click Add. Repeat this process to specify additional DNS servers. Again, the order of the entries determines which IP address is used first. Change the order as necessary by using the Up and Down buttons. Tap or click Next.
TIP If you know the name of a server instead of its IP address, enter the name in the Server Name box, and then tap or click Resolve. The IP address is then entered in the IP Address box, if possible. Add the server by tapping or clicking Add. Using this approach helps to ensure that you’ve entered the correct information.
14. Configure default WINS settings for the DHCP clients. The techniques you use are the same as those previously described. Tap or click Next.
15. If you want to activate the scope, select Yes, I Want To Activate This Scope Now, and then tap or click Next. Otherwise, select No, I Will Activate This Scope Later and then tap or click Next.
16. Tap or click Finish to complete the process.
Creating normal scopes for IPv6 addresses
You create normal scopes for IPv6 addresses by using the New Scope Wizard. When you are configuring DHCP for IPv6 addresses, you must enter the network ID and a preference value. Typically, the first 64 bits of an IPv6 address identify the network, and a 64-bit value is what the New Scope Wizard expects you to enter. The preference value sets the priority of the scope relative to other scopes. The scope with the lowest preference value will be used first. The scope with the second-lowest preference will be used second, and so on.
You can create a normal scope for IPv6 addresses by following these steps:
1. In the DHCP console, expand the node for the server with which you want to work and then expand the IPv6 node.
2. Press and hold or right-click IPv6. On the shortcut menu, tap or click New Scope to start the New Scope Wizard. Tap or click Next.
3. Enter a name and description for the scope, and then tap or click Next.
4. On the Scope Prefix page, shown in Figure 8–8, enter the 64-bit network prefix, and then set a preference value. Tap or click Next.
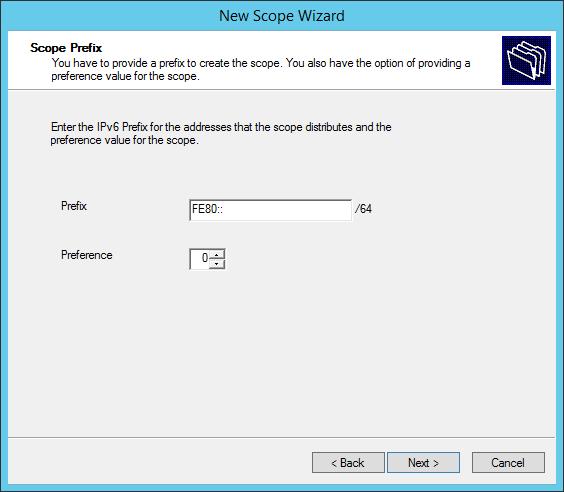
FIGURE 8–8 In the New Scope Wizard, enter the network prefix and preference value.
5. Use the Start IPv6 Address and End IPv6 Address boxes on the Add Exclusions page to define IPv6 address ranges that are to be excluded from the scope. You can exclude multiple address ranges as follows:
? To define an exclusion range, enter a start address and an end address in the Exclusion Range’s Start IPv6 Address and End IPv6 Address boxes, and then tap or click Add. To exclude a single IPv6 address, use that address as the start IPv6 address, and then tap or click Add.
? To track which address ranges are excluded, use the Excluded Address Range list.
? To delete an exclusion range, select the range in the Excluded Address Range list, and then tap or click Remove.
6. Tap or click Next. Dynamic IPv6 addresses can be temporary or nontemporary. A nontemporary address is similar to a reservation. On the Scope Lease page, shown in Figure 8–9, specify the duration of leases for nontemporary addresses by using the Days, Hours, and Minutes boxes under Preferred Life Time and Valid Life Time. The preferred lifetime is the preferred amount of time the lease should be valid. The valid lifetime is the maximum amount of time the lease is valid. Tap or click Next.
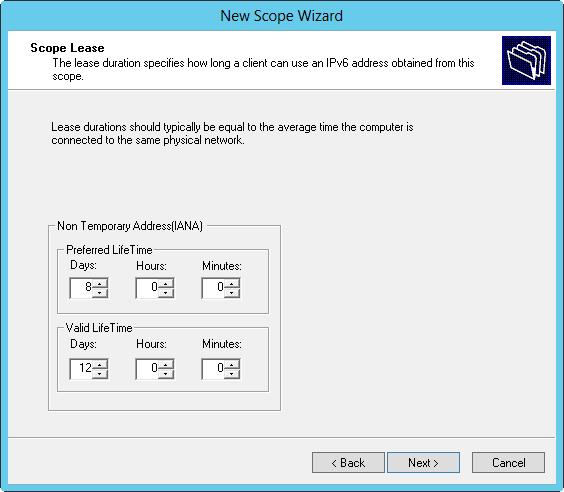
FIGURE 8–9 Specify the duration of nontemporary leases.
NOTE A lease lifetime that’s set too long can reduce the effectiveness of DhCP. A good lease duration for nontemporary leases is from 8 to 30 days.
7. If you want to activate the scope, select Yes under Activate Scope Now, and then tap or click Finish. Otherwise, select No under Activate Scope Now, and then tap or click Finish.
Creating multicast scopes
To create a multicast scope, follow these steps:
1. In the DHCP console, expand the node for the server with which you want to work. Select and then press and hold or right-click IPv4. If you want to add the new scope to a superscope, select and then press and hold or right-click the superscope instead.
2. On the shortcut menu, tap or click New Multicast Scope to start the New Multicast Scope Wizard. Tap or click Next.
3. Enter a name and description for the scope, and then tap or click Next.
4. The Start IP Address and End IP Address boxes define the valid IP address range for the scope. Enter a start address and an end address in these boxes. You must define multicast scopes by using Class D IP addresses. This means the valid IP address range is 224.0.0.0 to 239.255.255.255.
5. Messages sent by computers using multicast IP addresses have a specific time-to-live (TTL) value. The TTL value specifies the maximum number of routers the message can go through. The default value is 32, which is sufficient on most networks. If you have a large network, you might need to increase this value to reflect the actual number of routers that might be used.
6. Tap or click Next. If you make a mistake, tap or click Back, and then modify the IP address range you entered.
7. Use the exclusion range to define IP address ranges that are to be excluded from the scope. You can exclude multiple address ranges as follows:
? To define an exclusion range, enter a start address and an end address in the Start IP Address and End IP Address boxes, and then tap or click Add.
? To track which address ranges are excluded, use the Excluded Addresses list.
? To delete an exclusion range, select the range in the Excluded Addresses list, and then tap or click Remove.
8. Tap or click Next. Specify the duration of leases for the scope by using the Day(s), Hour(s), and Minutes boxes. The default duration is 30 days. Tap or click Next.
TIP If you haven’t worked a lot with multicast, you shouldn’t change the default value. Multicast leases aren’t used in the same way as normal leases. Multiple computers can use a multicast IP address, and all of these computers can have a lease on the IP address. A good multicast lease duration for most networks is from 30 to 60 days.
9. If you want to activate the scope, select Yes, and then tap or click Next. Otherwise, select No, and then tap or click Next.
10. Tap or click Finish to complete the process.
Setting scope options
Scope options enable you to precisely control a scope’s functioning and to set default TCP/IP settings for clients that use the scope. For example, you can use scope options to enable clients to automatically find DNS servers on the network. You can also define settings for default gateways, WINS, and more. Scope options apply only to normal scopes, not to multicast scopes.
You can set scope options in any of the following ways:
? Globally for all scopes by setting default server options
? On a per-scope basis by setting scope options
? On a per-client basis by setting reservation options
? On a client-class basis by configuring user-specific or vendor-specific classes
IPv4 and IPv6 have different scope options. Scope options use a hierarchy to determine when certain options apply. The previous list shows the hierarchy. Basically, this means the following:
? Per-scope options override global options
? Per-client options override per-scope and global options
? Client-class options override all other options
VIEWING AND ASSIGNING SERVER OPTIONS
Server options are applied to all scopes configured on a particular DHCP server. You can view and assign server options by following these steps:
1. In the DHCP console, double-tap or double-click the server with which you want to work, and then expand its IPv4 and IPv6 folders in the tree view.
2. To view current settings, select the Server Options node under IPv4 or IPv6, depending on the type of address with which you want to work. Currently configured options are displayed in the right pane.
3. To assign new settings, press and hold or right-click Server Options, and then tap or click Configure Options to open the Server Options dialog box. Under Available Options, select the check box for the first option you want to configure. Then, with the option selected, enter any required information in the Data Entry panel. Repeat this step to configure other options.
4. Tap or click OK to save your changes.
VIEWING AND ASSIGNING SCOPE OPTIONS
Scope options are specific to an individual scope and override the default server options. You can view and assign scope options by following these steps:
1. In the DHCP console, expand the entry for the scope with which you want to work.
2. To view current settings, select Scope Options. Currently configured options are displayed in the right pane.
3. To assign new settings, press and hold or right-click Scope Options, and then tap or click Configure Options. This opens the Scope Options dialog box. Under Available Options, select the check box for the first option you want to configure. Then, with the option selected, enter any required information in the Data Entry panel, as shown in Figure 8-10. Repeat this step to configure other options.
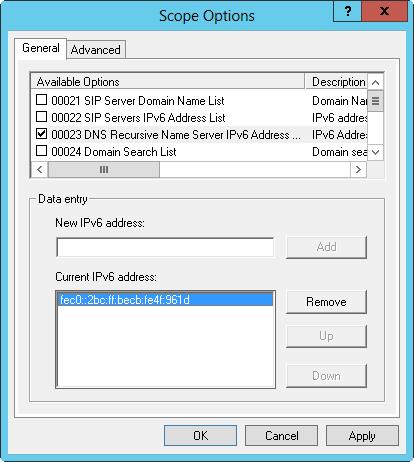
FIGURE 8-10 Select the option you want to configure in the Scope Options dialog box, and then enter the required information on the Data Entry panel.
4. Tap or click OK.
VIEWING AND ASSIGNING RESERVATION OPTIONS
You can assign reservation options to a client that has a reserved IPv4 or IPv6 address. These options are specific to an individual client and override server-specific and scope-specific options. To view and assign reservation options, follow these steps:
1. In the DHCP console, expand the entry for the scope with which you want to work.
2. Double-tap or double-click the Reservations folder for the scope.
3. To view current settings, tap or click the reservation you want to examine. Currently configured options are displayed in the right pane.
4. To assign new settings, press and hold or right-click the reservation, and then tap or click Configure Options to open the Reservation Options dialog box. Under Available Options, select the check box for the first option you want to configure. Then, with the option selected, enter any required information in the Data Entry panel. Repeat this step to configure other options.
Modifying scopes
You can modify an existing scope by following these steps:
1. In the DHCP console, double-tap or double-click the server with which you want to work, and then expand its IPv4 and IPv6 folders in the tree view. This should display the currently configured scopes for the server.
2. Press and hold or right-click the scope you want to modify, and then tap or click Properties.
3. You can now modify the scope properties. Keep the following in mind:
When you modify normal IPv4 scopes, you have the option of setting an unlimited lease expiration time. If you do, you create permanent leases that reduce the effectiveness of pooling IP addresses with DHCP. Permanent leases aren’t released unless you physically release them or deactivate the scope. As a result, you might eventually run out of addresses, especially as your network grows. A better alternative to unlimited leases is to use address reservations, and then only for specific clients that need fixed IP addresses.
When you modify multicast scopes, you have the option of setting a lifetime for the scope. The scope lifetime determines the amount of time the scope is valid. By default, multicast scopes are valid as long as they’re activated. To change this setting, tap or click the Lifetime tab, select Multicast Scope Expires On, and then set an expiration date.
Activating and deactivating scopes
In the DHCP console, inactive scopes are displayed with an icon showing a red arrow pointing down. Active scopes display the standard folder icon.
You can activate an inactive scope by pressing and holding or right-clicking it in the DHCP console, and then selecting Activate. You can deactivate an active scope by pressing and holding or right-clicking it in the DHCP console, and then selecting Deactivate.
IMPORTANT Deactivating turns off a scope but doesn’t terminate current client leases. If you want to terminate leases, follow the instructions in “Releasing addresses and leases” later in this chapter.
Enabling the Bootstrap Protocol
Bootstrap Protocol (BOOTP) is a dynamic IPv4 addressing protocol that predates DHCP. Normal scopes don’t support BOOTP. To enable a scope to support BOOTP, follow these steps:
1. Press and hold or right-click the normal scope for IPv4 addresses that you want to modify, and then tap or click Properties.
2. On the Advanced tab, tap or click Both to support DHCP and BOOTP clients.
3. As necessary, set a lease duration for BOOTP clients, and then tap or click OK.
NOTE The typical lease duration for a BOOTP address is much longer than for a DhCP address. For BOOTP, the default of 30 days is a good compromise, though some scenarios might lend themselves to an unlimited lease duration.
Removing a scope
Removing a scope permanently deletes the scope from the DHCP server. To remove a scope, follow these steps:
1. In the DHCP console, press and hold or right-click the scope you want to remove, and then tap or click Delete.
2. When prompted to confirm that you want to delete the scope, tap or click Yes.
Configuring multiple scopes on a network
You can configure multiple scopes on a single network. A single DHCP server or multiple DHCP servers can serve these scopes. However, any time you work with multiple scopes, it’s extremely important that the address ranges used by different scopes not overlap. Each scope must have a unique address range. If it doesn’t, the same IP address might be assigned to different DHCP clients, which can cause severe problems on the network.
To understand how you can use multiple scopes, consider the following scenario, in which each server has its respective DHCP scope IP address range on the same subnet:
? Server A 192.168.10.1 to 192.168.10.99
? Server B 192.168.10.100 to 192.168.10.199
? Server C 192.168.10.200 to 192.168.10.254
Each of these servers responds to DHCP discovery messages, and any of them can assign IP addresses to clients. If one of the servers fails, the other servers can continue to provide DHCP services to the network. To introduce fault tolerance and provide redundancy, you can use failover scopes as discussed in the next section.
- Managing DHCP scopes
- Creating and managing failover scopes
- Creating an OS Design
- Creating and managing superscopes
- Разработка приложений баз данных InterBase на Borland Delphi
- Open Source Insight and Discussion
- Introduction to Microprocessors and Microcontrollers
- Chapter 6. Traversing of tables and chains
- Chapter 8. Saving and restoring large rule-sets
- Chapter 11. Iptables targets and jumps
- Chapter 5 Installing and Configuring VirtualCenter 2.0
- Chapter 16. Commercial products based on Linux, iptables and netfilter


