Книга: Windows Server 2012 R2 Storage, Security, & Networking Pocket Consultant
Navigating networking in Windows Server 2012 R2
Navigating networking in Windows Server 2012 R2

Windows Server 2012 R2 has an extensive set of networking tools:
? Network Explorer Provides a central console for browsing computers and devices on the network
? Network And Sharing Center Provides a central console for viewing and managing a computer’s networking and sharing configuration
? Network Diagnostics Provides automated diagnostics to help diagnose and resolve networking problems
Before I describe how these networking tools are used, let’s first look at the following Windows Server 2012 R2 features on which these tools rely:
? Network Discovery Controls the ability to view other computers and devices
? Network Awareness Reports changes in network connectivity and configuration
REAL WORLD Computers running Windows Vista with SP1 or later, in addition to later releases of Windows, support extensions to network awareness. These extensions enable a computer connected to one or more networks via two or more interfaces (regardless of whether they are wired or wireless) to select the route with the best performance for a particular data transfer. As part of selecting the best route, Windows chooses the best interface (either wired or wireless) for the transfer. This mechanism improves the selection of wireless over wired networks when both interfaces are present.
Network discovery settings for the computer with which you are working determine the computers and devices you can browse or view in Windows Server 2012 R2 networking tools. Discovery settings work in conjunction with a computer’s Windows Firewall settings to block or allow the following:
? Discovery of network computers and devices
? Discovery of your computer by others
Network discovery settings are meant to provide the appropriate level of security for each of the various categories of networks to which a computer can connect.
The three categories of networks are defined as follows:
? Domain network Designates a network in which computers are connected to the corporate domain to which they are joined
? Private network Designates a network in which computers are configured as members of a homegroup or workgroup and are not connected directly to the public Internet
? Public network Designates a network in a public place, such as a coffee shop or an airport, rather than an internal network
Because a computer saves settings separately for each category of network, different block and allow settings can be used for each network category. When you connect a computer’s network adapter to a network for the first time, Windows sets the network category based on the configuration of the computer. Based on the network category, Windows Server 2012 R2 automatically configures settings that turn discovery on or off. The On (Enabled) state means
? The computer can discover other computers and devices on the network.
? Other computers on the network can discover the computer.
The Off (Disabled) state means
? The computer cannot discover other computers and devices on the network.
? Other computers on the network cannot discover the computer.
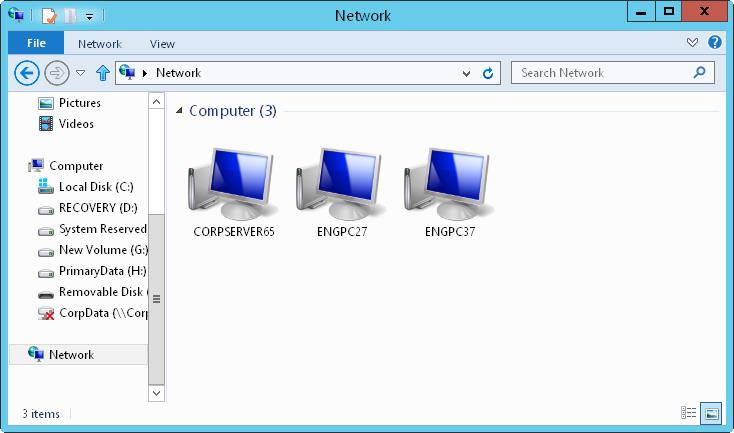
Typically, you will find that a network adapter is set as public before you join a computer to the domain. Network Explorer, shown in Figure 7–1, displays a list of discovered computers and devices on the network. To access Network Explorer, tap or click File Explorer on the Start screen. In File Explorer, tap or click the location path selection button, and then tap or click Network.

FIGURE 7–1 Use Network Explorer to browse network resources.
The computers and devices listed in Network Explorer depend on the network discovery settings of the computer, the operating system, and whether the computer is a member of a domain. If discovery is blocked and a server running Windows Server 2012 R2 is not a member of a domain, you’ll get a warning message about this. When you tap or click the warning message and then select Turn On Network Discovery And File Sharing, you enable network discovery, file sharing, and printer sharing. In addition, related Windows Firewall ports open.
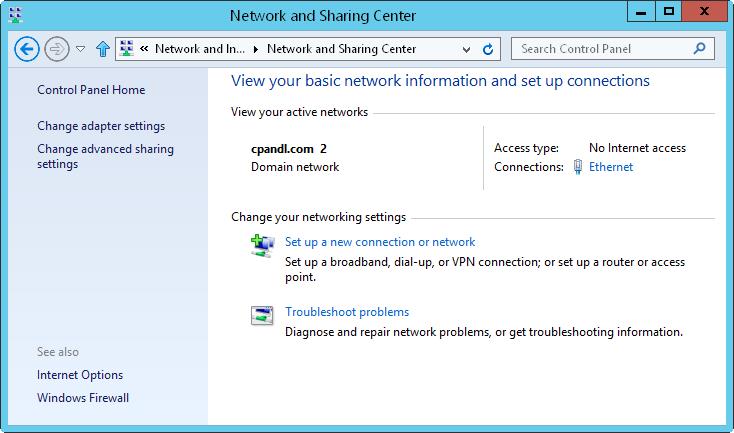
Network And Sharing Center, shown in Figure 7–2, provides the current network status, in addition to an overview of the current network configuration. In Control Panel, you can access Network And Sharing Center by tapping or clicking View Network Status And Tasks under the Network And Internet heading.

FIGURE 7–2 View and manage network settings with Network And Sharing Center.
Network And Sharing Center provides an overview of the network. The value below the network name shows the category of the current network as Domain Network, Private Network, or Public Network. The Access Type box specifies whether and how the computer is connected to its current network. Values for this option are No Network Access, No Internet Access, or Internet. If you tap or click the name of a network connection, you can display the related status dialog box.
Tapping or clicking Change Adapter Settings displays the Network Connections page, which you can use to manage network connections. Tapping or clicking Change Advanced Sharing Settings provides options for configuring the computer’s sharing and discovery settings for each network profile. To manage a profile, expand the profile’s view panel by tapping or clicking the Expand button (showing a down arrow), tap or click the setting with which you want to work, and then tap or click Save Changes. To turn on or off network discovery, tap or click Turn On Network Discovery or Turn Off Network Discovery as appropriate, and then tap or click Save Changes.
From Network And Sharing Center, you can attempt to diagnose a networking problem. To do this, tap or click Troubleshoot Problems, and then tap or click a troubleshooter to run, such as Incoming Connections or Network Adapter, and then follow the prompts. Windows Network Diagnostics then attempts to identify the network problem and provide a possible solution.
NOTE To quickly access Network Connections without opening Network And Sharing Center, enter ncpa.cpl in the everywhere search box. Alternatively, enter ncpa.cpl at a command prompt or a Windows PowerShell prompt.
- CHAPTER 7: Managing TCP
- Managing network connections
- Тестирование Web-сервиса XML с помощью WebDev.WebServer.exe
- InterBase Super Server для Windows
- Каталог BIN в SuperServer
- Минимальный состав сервера InterBase SuperServer
- InterBase Classic Server под Linux
- Каталог BIN в InterBase Classic Server для Linux
- SuperServer
- Classic vs SuperServer
- Рекомендации по выбору архитектуры: Classic или SuperServer?
- Интеграция с платформой Windows NT


