Книга: Windows Server 2012 R2 Storage, Security, & Networking Pocket Consultant
Reviewing and changing template settings
Разделы на этой странице:
Reviewing and changing template settings
The sections that follow discuss how to work with template settings. As you’ll learn, you manage each type of template setting in a slightly different way.
Changing settings for account, local, and event log policies
Account policy settings control security for passwords, account lockout, and Kerberos security. Local policy settings control security for auditing, user rights assignment, and other security options. Event log policy settings control security for event logging. For detailed information on account policy, local policy settings, and configuring event logging, see Chapter 9, “Creating User and Group Accounts” and Chapter 3, “Monitoring Services, Processes, and Events” in Windows Server 2012 R2 Pocket Consultant: Essentials Configuration.
With account, local, and event log policies, you can change template settings by following these steps:
1. In the Security Templates snap-in, expand the Account Policies or Local Policies node as necessary, and then select a related subnode, such as Password Policy or Account Lockout Policy.
2. In the right pane, policy settings are listed alphabetically. The value in the Computer Setting column shows the current setting. If the template changes the setting so that it is no longer defined, the value is listed as Not Defined.
3. Double-tap or double-click a setting to display its Properties dialog box, as shown in Figure 5–2. To determine the purpose of the setting, tap or click the Explain tab. To define and apply the policy setting, select the Define This Policy Setting In The Template check box. To clear this policy and not apply it, clear this check box.
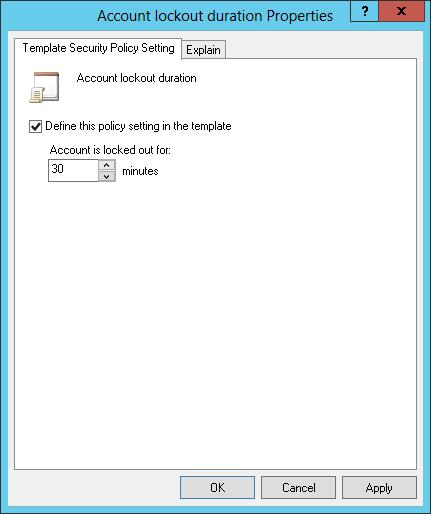
FIGURE 5–2 Change template settings for account and local policies in the Security Templates snap-in.
4. If you enable the policy setting, specify how the policy setting is to be used by configuring any additional options.
5. Tap or click OK to save your changes. You might get the Suggested Value Changes dialog box, shown in Figure 5–3. This dialog box informs you of other values that are changed to suggested values based on your setting change. For example, when you change the Account Lockout Threshold setting, Windows might also change the Account Lockout Duration and Reset Account Lockout Counter After settings, as shown in the figure.
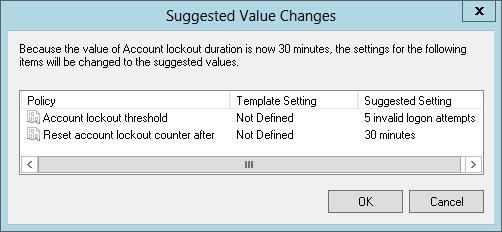
FIGURE 5–3 Review the suggested value changes.
Configuring restricted groups
Restricted groups policy settings control the list of members of groups and the groups to which the configured group belongs. You can restrict a group by following these steps:
1. In the Security Templates snap-in, select the Restricted Groups node. In the right pane, any currently restricted groups are listed by name. Members of the group are listed as well, and so are groups of which the restricted group is a member.
2. You can add a restricted group by pressing and holding or right-clicking the Restricted Groups node in the left pane, and then tapping or clicking Add Group. In the Add Group dialog box, tap or click Browse.
3. In the Select Groups dialog box, enter the name of a group you want to restrict, and then tap or click Check Names. If multiple matches are found, select the account you want to use, and then tap or click OK. If no matches are found, update the name you entered and try searching again. Repeat this step as necessary, and then tap or click OK.
4. In the Properties dialog box, shown in Figure 5–4, you can use the Add Members option to add members to the group. Tap or click Add Members, and then specify the members of the group. If the group should not have any members, remove all members by tapping or clicking Remove. Any members who are not specified in the policy setting for the restricted group are removed when the security template is applied.
5. In the Properties dialog box, tap or click Add Groups to specify the groups to which this group belongs. If you specify membership in groups, the groups to which this group belongs are listed exactly as you’ve applied them (if the groups are valid in the applicable workgroup or domain). If you do not specify membership in groups, the groups to which this group belongs are not modified when the template is applied.
6. Tap or click OK to save your settings.
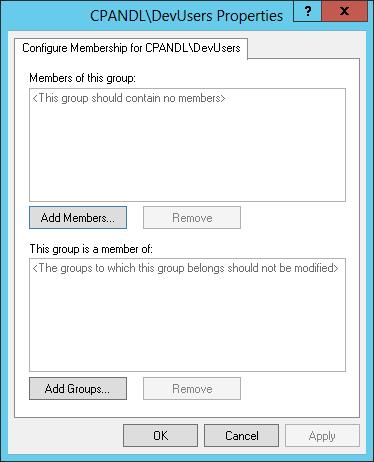
FIGURE 5–4 Configure membership for the selected group.
You can remove a restriction on a group by following these steps:
1. In the Security Templates snap-in, select the Restricted Groups node. In the right pane, any currently restricted groups are listed by name. Members of the group are listed along with the groups of which the restricted group is a member.
2. Press and hold or right-click the group that should not be restricted, and then tap or click Delete. When prompted to confirm the action, tap or click Yes.
Enabling, disabling, and configuring system services
Policy settings for system services control the general security and startup mode for local services. You can enable, disable, and configure system services by following these steps:
1. In the Security Templates snap-in, select the System Services node. In the right pane, all currently installed services on the computer with which you are working are listed by name, startup setting, and permission configuration. Keep the following in mind when working with system services:
? If the template does not change the startup configuration of the service, the value for the Startup column is listed as Not Defined. Otherwise, the startup configuration is listed as one of the following values: Automatic, Manual, or Disabled.
? If the template does not change the security configuration of the service, the value for the Permission column is listed as Not Defined. Otherwise, the security configuration is listed as Configured.
2. Double-tap or double-click the entry for a system service to display its Properties dialog box, shown in Figure 5–5. To define and apply the policy setting, select the Define This Policy Setting In The Template check box. To clear this policy and not apply it, clear this check box.
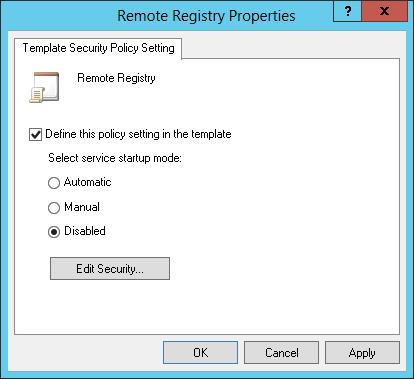
FIGURE 5–5 Change template settings for system services.
3. If you enable the policy setting, specify the service startup mode by selecting Automatic, Manual, or Disabled. Keep the following in mind:
? Automatic ensures that the service starts automatically when the operating system starts. Choose this setting for essential services that you know are secure and that you want to be sure are run if they are installed on the computer to which the template is being applied.
? Manual prevents the service from starting automatically and allows the service only to be started manually, either by a user, application, or other service. Choose this setting when you want to restrict unnecessary or unused services or when you want to restrict services that you know are not entirely secure.
? Disabled prevents the service from starting automatically or manually. Choose this setting only with unnecessary or unused services that you want to prevent from running.
4. If you know the security configuration that the service should use, tap or click Edit Security, and then set the service permissions in the Security For dialog box. You can set permissions to allow specific users and groups to start, stop, and pause the service on the computer.
5. Tap or click OK.
Configuring security settings for registry and file system paths
Policy settings for the file system control security for file and folder paths in the local file system. Policy settings for the registry control the values of security-related registry keys. You can view or change security settings for currently defined registry and file system paths by following these steps:
1. In the Security Templates snap-in, select the Registry node or the File System node, depending on which type of file path with which you want work. In the right pane, all currently secured paths are listed.
2. Double-tap or double-click a registry or file path to view its current settings, as shown in Figure 5–6.
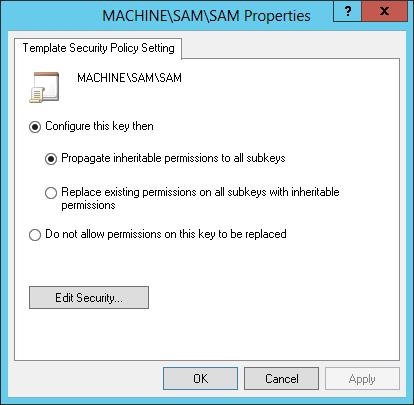
FIGURE 5–6 Change template settings for paths and keys.
3. To ensure that permissions on the path or key are not replaced, select Do Not Allow Permissions On This Key To Be Replaced, and then tap or click OK. Skip the remaining steps in this procedure.
4. To configure the path or key and replace permissions, select Configure This Key Then, and then choose one of the following options:
? Propagate Inheritable Permissions To All Subkeys Choose this option to apply all inheritable permissions to this registry or file path and to all registry and file paths below this path. Existing permissions are replaced only if they conflict with a security permission set for this path.
? Replace Existing Permissions On All Subkeys With Inheritable Permissions Choose this option to replace all existing permissions on this registry or file path and on all registry and file paths below this path. Any existing permissions are removed, and only the current permissions remain.
5. Tap or click Edit Security. In the Security For dialog box, configure security permissions for users and groups. You have the same options for permissions, auditing, and ownership as you do for files and folders used with NTFS. See Chapter 3, “Data sharing and redundancy” for details on permissions, auditing, and ownership.
6. Tap or click OK twice to save the settings.
You can define security settings for registry paths by following these steps:
1. In the Security Templates snap-in, select and then press and hold or right-click the Registry node, and then tap or click Add Key to display the Select Registry Key dialog box, shown in Figure 5–7.
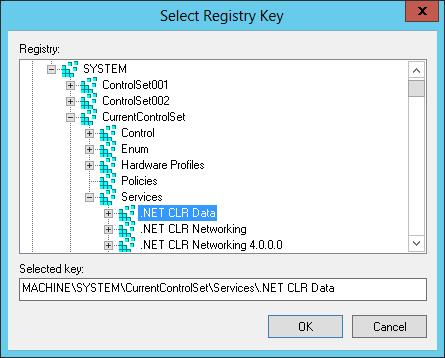
FIGURE 5–7 Select the registry path or value to secure.
2. In the Select Registry Key dialog box, select the registry path or value with which you want to work, and then tap or click OK. Entries under CLASSES_ ROOT are for HKEY_CLASSES_ROOT. Entries under MACHINE are for HKEY_ LOCAL_MACHINE. Entries under USERS are for HKEY_USERS.
3. In the Security For dialog box, configure security permissions for users and groups. You have the same options for permissions, auditing, and ownership as you do for files and folders used with NTFS. See Chapter 3 for details on permissions, auditing, and ownership.
4. Tap or click OK. The Add Object dialog box is displayed. To ensure that permissions on the path or key are not replaced, select Do Not Allow Permissions On This Key To Be Replaced, and then tap or click OK. Skip the remaining steps in this procedure.
5. To configure the path or key and replace permissions, select Configure This Key Then, and then do one of the following:
? Choose Propagate Inheritable Permissions To All Subkeys to apply all inheritable permissions to this registry path and all registry paths below this path. Existing permissions are replaced only if they conflict with a security permission set for this path.
? Choose Replace Existing Permissions On All Subkeys With Inheritable Permissions to replace all existing permissions on this registry path and on all registry paths below this path. Any existing permissions are removed, and only the current permissions remain.
6. Tap or click OK.
You can define security settings for file paths by following these steps:
1. In the Security Templates snap-in, select and then press and hold or right-click the File System node, and then tap or click Add File to display the Add A File Or Folder dialog box, shown in Figure 5–8.
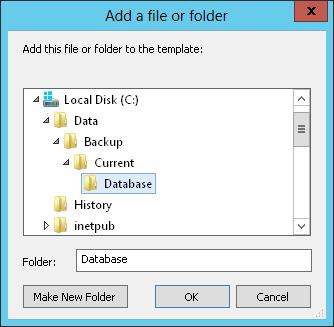
FIGURE 5–8 Select the file or folder path to secure.
2. In the Add A File Or Folder dialog box, select the file or folder path or value with which you want to work, and then tap or click OK.
3. In the Database Security For dialog box, configure security permissions for users and groups. You have the same options for permissions, auditing, and ownership as you do for files and folders used with NTFS. See Chapter 12 for details on permissions, auditing, and ownership.
4. Tap or click OK. The Add Object dialog box is displayed. To ensure that permissions on the path are not replaced, select Do Not Allow Permissions On This File Or Folder To Be Replaced, and then tap or click OK. Skip the remaining steps in this procedure.
5. To configure the path and replace permissions, select Configure This Path Then, and then do one of the following:
? Choose Propagate Inheritable Permissions To All Subfolders to apply all inheritable permissions to this file path and all file paths below this path. Existing permissions are replaced only if they conflict with a security permission set for this path.
? Choose Replace Existing Permissions On All Subfolders With Inheritable Permissions to replace all existing permissions on this file path and on all file paths below this path. Any existing permissions are removed, and only the current permissions remain.
6. Tap or click OK.
- Разработка приложений баз данных InterBase на Borland Delphi
- Open Source Insight and Discussion
- Introduction to Microprocessors and Microcontrollers
- Chapter 6. Traversing of tables and chains
- Chapter 8. Saving and restoring large rule-sets
- Chapter 11. Iptables targets and jumps
- Chapter 5 Installing and Configuring VirtualCenter 2.0
- Chapter 16. Commercial products based on Linux, iptables and netfilter
- Appendix A. Detailed explanations of special commands
- Appendix B. Common problems and questions
- Appendix E. Other resources and links
- IP filtering terms and expressions


