Книга: Windows Server 2012 R2 Storage, Security, & Networking Pocket Consultant
Managing disk quota templates
Managing disk quota templates
You use disk quota templates to define quota properties, including the limit, quota type, and notification thresholds. In File Server Resource Manager, you can view the currently defined disk quota templates by expanding the Quota Management node, and then selecting Quota Templates. Table 4–6, shown earlier, provides a summary of the default disk quota templates. Table 4–7, which follows, shows variables that can be used for automatically generated messages and events.
TABLE 4–7 Key variables available for disk quota messages and event logging
| VARIABLE NAME | DESCRIPTION |
|---|---|
| [Admin Email] | Inserts the email addresses of the administrators defined under the global options |
| [File Screen Path] | Inserts the local file path, such as C: Data |
| [File Screen Remote Path] | Inserts the remote path, such as servershare |
| [File Screen System Path] | Inserts the canonical file path, such as ?VolumeGUID |
| [Server Domain] | Inserts the domain of the server on which the notification occurred |
| [Server] | Inserts the server on which the notification occurred |
| [Source File Owner] | Inserts the user name of the owner of the file/folder |
| [Source File Owner Email] | Inserts the email address of the owner of the file/folder |
| [Source File Path] | Inserts the source path of the file/folder |
You can modify existing disk quota templates by following these steps:
1. In File Server Resource Manager, expand the Quota Management node, and then select Quota Templates.
Currently defined disk quota templates are listed by name, limit, and quota type.
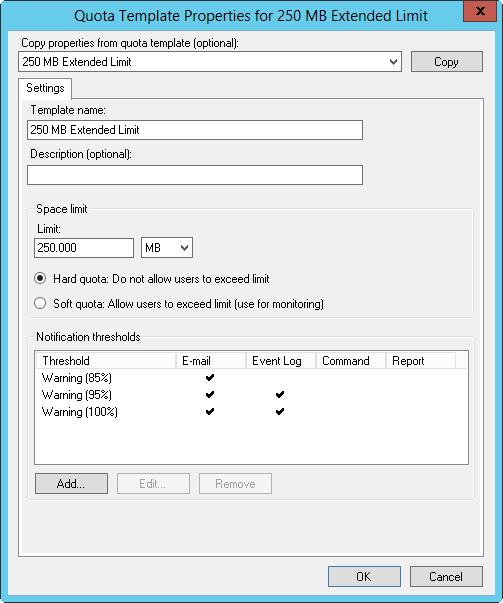
2. To modify disk quota template properties, double-tap or double-click the disk quota template name. This displays a related Properties dialog box, as shown in Figure 4–9.
3. On the Settings tab, you can set the template name, limit, and quota type. Current notification thresholds are listed. To modify an existing threshold, select it and then tap or click Edit. To define a new threshold, tap or click Add.
4. When you have finished modifying the quota template, tap or click OK to ave the changes.

FIGURE 4–9 Use disk quota properties to configure the limit, quota type, and notification thresholds.
You can create a new disk quota template by following these steps:
1. In File Server Resource Manager, expand the Quota Management node, and then select Quota Templates.
2. On the Action menu or in the Actions pane, tap or click Create Quota Template to display the Create Quota Template dialog box.
3. On the Settings tab, set the template name, limit, and quota type. You should create a limit threshold first, and then create additional warning thresholds as necessary. In the Limit list, enter the limit value and specify whether you are setting the limit in kilobytes, megabytes, gigabytes, or terabytes.
4. Tap or click Add to add warning thresholds. In the Add Threshold dialog box, enter a percentage value under Generate Notifications When Usage Reaches (%). Warning thresholds are considered to be any percentage of the limit that is less than 100 percent. Limit thresholds occur when the limit reached is 100 percent.
5. On the E-Mail Message tab, you can configure notification as follows:
? To notify an administrator when the disk quota is triggered, select the Send E-Mail To The Following Administrators check box, and then enter the email address or addresses to use. Be sure to separate multiple email addresses with a semicolon. Use the value [Admin Email] to specify the default administrator as configured previously under the global options.
? To notify users, select the Send E-Mail To The User Who Exceeded The Threshold check box.
? Specify the contents of the notification message in the Subject and Message Body text boxes. Table 4–7 lists available variables and their meanings.
6. On the Event Log tab, you can configure event logging. Select the Send Warning To Event Log check box to enable logging, and then specify the text of the log entry in the Log Entry text box. Table 4–7 lists available variables and their meanings.
7. On the Command tab, you can optionally specify a command or script to run, arguments to pass in to the command or script, and a working directory. The default security context for commands is Local Service, which grants standard user access to local resources but denies access to network resources. If the command requires access to both local and network resources, you can run the command as Network Service.
8. On the Report tab, select the Generate Reports check box to enable incident reporting, and then select the types of reports to generate. Incident reports are stored under %SystemDrive%StorageReportsIncident by default, and they can also be sent to designated administrators. Use the value [Admin Email] to specify the default administrator as configured previously under the global options.
9. Repeat steps 5–7 to define additional notification thresholds.
10. Tap or click OK when you have finished creating the template.
- Creating Resource Manager disk quotas
- DiskExplorer от Runtime Software
- Когда включаю компьютер, при загрузке пишется Insert system disk and press enter. Что нужно делать?
- Acronis Disk Editor
- CHAPTER 10 Managing Users
- CHAPTER 23 Managing DNS
- Managing Files with the Shell
- Configuring and Managing Print Services
- Managing Printing Services
- Managing Groups
- Managing Users
- Managing Permissions


