Книга: Windows Server 2012 R2 Storage, Security, & Networking Pocket Consultant
Setting special permissions on files and folders
Setting special permissions on files and folders
To set special NTFS permissions for files and folders, follow these steps:
1. In File Explorer, press and hold or right-click the file or folder with which you
want to work, and then tap or click Properties.
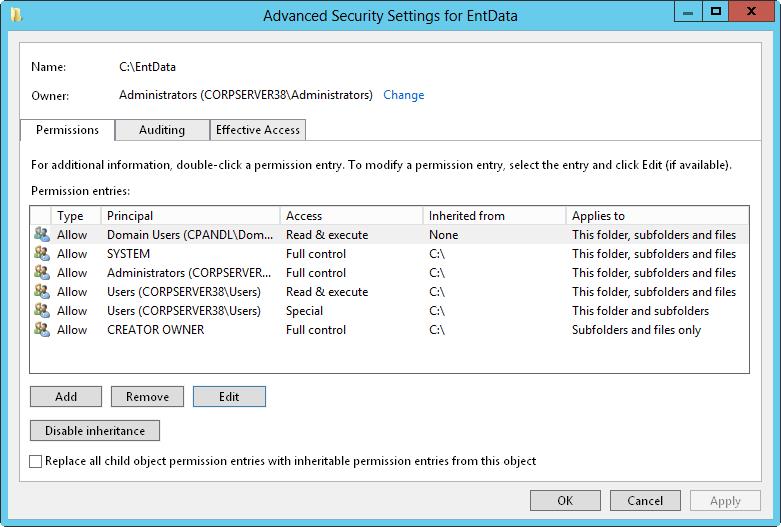
2. In the Properties dialog box, select the Security tab, and then tap or click Advanced to display the Advanced Security Settings dialog box. Before you can modify permissions, you must click Change Permissions. As shown in Figure 4–2, the permissions are presented much as they are on the Security tab. The key differences are that you see individual allow or deny permission sets, whether permissions are inherited and where they are from, and the resources to which the permissions apply.

FIGURE 4–2 Configure special permissions on files and folders.
3. If a user or group already has permissions set for the file or folder (and those permissions are not being inherited), you can modify the special permissions by selecting the user or group, and then clicking Edit. Afterward, skip steps 4–7, and then follow the rest of the steps in this procedure.
4. To add special permissions for a user or group, tap or click Add to display the Permission Entry dialog box. Tap or click Select A Principal to display the Select User, Computer, Service Account, Or Group dialog box.
5. Enter the name of a user or a group account. Be sure to reference the user account name rather than the user’s full name. Only one name can be entered at a time.
6. Tap or click Check Names. If a single match is found for each entry, the dialog box is automatically updated and the entry is underlined; otherwise, you’ll get an additional dialog box. If no matches are found, you either entered the name incorrectly, or you’re working with an incorrect location. Modify the name in the Name Not Found dialog box and try again, or tap or click Locations to select a new location. When multiple matches are found, in the Multiple Names Found dialog box, select the name you want to use, and then tap or click OK.
7. Tap or click OK. The user and group are added as the Principal, and the Permission Entry dialog box is updated to show this.
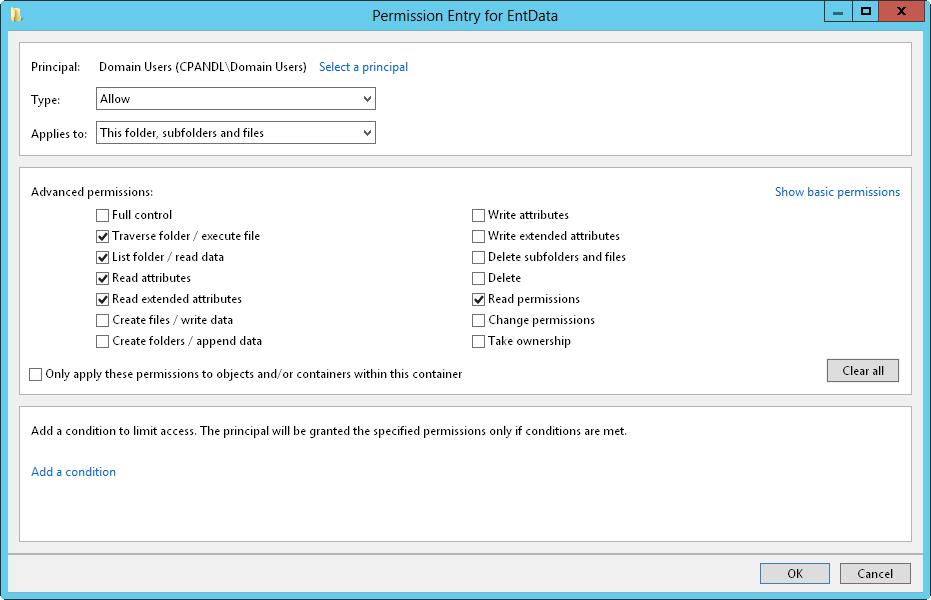
8. When you are editing permissions, only basic permissions are listed by default. Tap or click Show Advanced Permissions to display the special permissions, as shown in Figure 4–3.

FIGURE 4–3 Configure the special permissions that should be allowed or denied.
9. Use the Type list to specify whether you are configuring allowed or denied special permissions, and then select the special permissions you want to allow or deny. If any permissions are dimmed (unavailable), they are inherited from a parent folder.
NOTE You allow and deny special permissions separately. Therefore, if you want to both allow and deny special permissions, you need to configure the allowed permissions, and then repeat this procedure starting with step 1 to configure the denied permissions.
10. If the options in the Applies To list are available, choose the appropriate option to ensure that the permissions are properly inherited. The options include the following:
? This Folder Only The permissions apply only to the currently selected folder.
? This Folder, Subfolders And Files The permissions apply to this folder, any subfolders of this folder, and any files in any of these folders.
? This Folder And Subfolders The permissions apply to this folder and any subfolders of this folder. They do not apply to any files in any of these folders.
? This Folder And Files The permissions apply to this folder and any files in this folder. They do not apply to any subfolders of this folder.
? Subfolders And Files Only The permissions apply to any subfolders of this folder and any files in any of these folders. They do not apply to this folder itself.
? Subfolders Only The permissions apply to any subfolders of this folder but not to the folder itself or any files in any of these folders.
? Files Only The permissions apply to any files in this folder and any files in subfolders of this folder. They do not apply to this folder itself or to subfolders.
11. When you have finished configuring permissions, tap or click OK.
Because shared folders also have NTFS permissions, you might want to set special NTFS permissions by using Server Manager. To do this, follow these steps:
1. In Server Manager, select File And Storage Services, select the server with which you want to work, and then select Shares. Next, press and hold or right-click the folder with which you want to work, and then tap or click Properties to display a Properties dialog box.
2. When you tap or click Permissions in the left pane, the current share permissions and NTFS permissions are shown in the main pane.
3. Tap or click Customize Permissions to open the Advanced Security Settings dialog box with the Permissions tab selected.
Users or groups that already have access to the file or folder are listed under Permission Entries. Use the options provided to view, edit, add, or remove permissions for users and groups. When you are editing or adding permissions in the Permission Entry dialog box, follow steps 8-11 of the previous procedure to display and work with special permissions.
- Understanding file and folder permissions
- File and folder permissions
- Разработка приложений баз данных InterBase на Borland Delphi
- Open Source Insight and Discussion
- Introduction to Microprocessors and Microcontrollers
- Chapter 6. Traversing of tables and chains
- Chapter 8. Saving and restoring large rule-sets
- Chapter 11. Iptables targets and jumps
- Chapter 5 Installing and Configuring VirtualCenter 2.0
- Chapter 16. Commercial products based on Linux, iptables and netfilter
- Appendix A. Detailed explanations of special commands
- Appendix B. Common problems and questions


