Книга: Windows Server 2012 R2 Storage, Security, & Networking Pocket Consultant
Setting basic file and folder permissions
Setting basic file and folder permissions
To set basic NTFS permissions for files and folders, follow these steps:
1. In File Explorer, press and hold or right-click the file or folder with which you want to work, and then tap or click Properties. In the Properties dialog box, tap or click the Security tab.
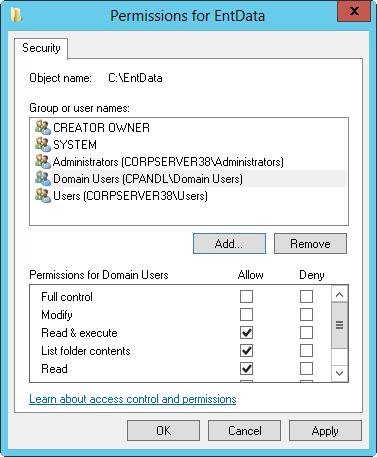
2. Tap or click Edit to display an editable version of the Security tab, as shown in Figure 4–1.

FIGURE 4–1 Configure basic permissions for the file or folder on the Security tab.
3. Users or groups that already have access to the file or folder are listed in the Group Or User Names list. You can change permissions for these users and groups by doing the following:
a. Select the user or group you want to change.
b. Grant or deny access permissions in the Permissions box.
TIP Inherited permissions are shaded (dimmed). If you want to override an inherited permission, select the opposite permission.
4. To set access permissions for additional users, computers, or groups, tap or click Add to display the Select Users, Computers, Service Accounts, Or Groups dialog box.
5. Enter the name of a user, computer, or group in the current domain, and then tap or click Check Names. One of the following actions occurs:
? If a single match is found, the dialog box is updated and the entry is underlined.
? If no matches are found, you entered an incorrect name part or are working with an incorrect location. Modify the name and try again, or tap or click Locations to select a new location.
? If multiple matches are found, select the name or names you want to use, and then tap or click OK. To add more users, computers, or groups, enter a semicolon (;), and then repeat this step.
NOTE The Locations button allows you to access account names in other domains. Tap or click Locations to view a list of the current domain, trusted domains, and other resources you can access. Because of the transitive trusts in Windows Server 2012 R2, you can usually access all the domains in the domain tree or forest.
6. In the Group Or User Names list, select the user, computer, or group you want to configure, and in the check boxes in the Permissions list, allow or deny permissions. Repeat for other users, computers, or groups.
7. Tap or click OK.
Because shared folders also have NTFS permissions, you might want to set basic NTFS permissions by using Server Manager. To do this, follow these steps:
1. In Server Manager, select File and Storage Services, select the server with which you want to work, and then Select Shares.
2. Press and hold or right-click the folder with which you want to work, and then tap or click Properties to display a Properties dialog box.
3. When you tap or click Permissions in the left pane, the current share permissions and NTFS permissions are shown in the main pane.
4. Tap or click Customize Permissions to open the Advanced Security Settings dialog box with the Permissions tab selected.
5. Users or groups that already have access to the file or folder are listed under Permission Entries. Use the options provided to view, edit, add, or remove permissions for users and groups.
- Understanding file and folder permissions
- File and folder permissions
- Shared Cache file
- Безопасность внешних таблиц. Параметр EXTERNAL FILE DIRECTORY
- Разработка приложений баз данных InterBase на Borland Delphi
- Open Source Insight and Discussion
- Introduction to Microprocessors and Microcontrollers
- Chapter 6. Traversing of tables and chains
- Chapter 8. Saving and restoring large rule-sets
- Chapter 11. Iptables targets and jumps
- Chapter 5 Installing and Configuring VirtualCenter 2.0
- Chapter 13. rc.firewall file


