Книга: Fedora™ Unleashed, 2008 edition
Creating a GUI with Gtk#
Creating a GUI with Gtk#
Gtk# was included with Gnome by default for the first time in Gnome 2.16, but it had been used for a couple of years prior to that and so was already mature. MonoDevelop comes with its own GUI designer called Stetic, which lets you drag and drop GUI elements onto your windows to design them.
To get started, go to File, New Project in MonoDevelop, choose C#, then Gtk# 2.0 project. Call it GtkTest, and deselect the box asking MonoDevelop to make a separate directory for the solution. You'll find that Main.cs contains a little more code this time because it needs to create and run the Gtk# application. However, the actual code to create your GUI lives in User Interface in the left pane. If you open that group, you'll see MainWindow, which, when double-clicked, brings up MonoDevelop's GUI designer.
There isn't space for me to devote much time to GUI creation, but it's very easy for you to drag and drop the different window widgets onto your form to see what properties they have. The widgets are all listed on the top right of the GUI designer, with widget proper ties on the bottom-right.
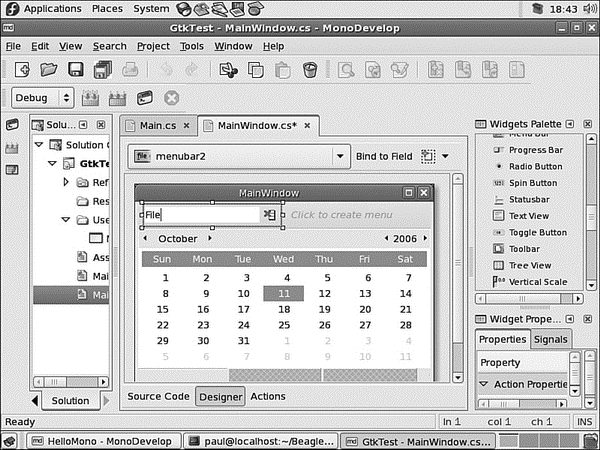
For now, drag a button widget onto your form. It automatically takes up all the space on your window. If you don't want this to happen, try placing one of the containers down first, then putting your button in there. For example, if you want a menu bar at the top, then a calendar, then a status bar, you ought to drop the VBox pane onto the window first, then drop each of those widgets into the separate parts of the VPane, as shown in Figure 29.4.

FIGURE 29.4 Using a VPane lets you space your widgets neatly on your form. Gtk# automatically handles window and widget resizing for you.
Your button will have the text "button1" by default, so click on it to select it, then look in the properties pane for Label. It might be hidden away in the Button Properties group, so you'll need to make sure that's open. Change the label to "Hello." Just at the top of the properties pane is a tab saying Properties (where you are right now), and another saying Signals. Signals are the events that happen to your widgets, such as the mouse moving over them, someone typing, or, of interest to us, when your button has been clicked. Look inside the Button Signals group for Clicked and double-click on it. MonoDevelop automatically switches you to the code view, with a pre-created method to handle button clicks.
Type this code into the method:
button1.Label = "World!";
You need to make one last change before you try compiling. MonoDevelop doesn't automatically give you variables to work with each item in your window — you need to ask for them explicitly. Beneath the code window you will see a button saying Designer — click that to get back to your GUI designer window. Now click the button you created, then click the button marked Bind to Field. This edits your code to create the button1 variable (if you click Source Code, you see the variable near the top). Now press F5 to compile and run, and try clicking the button!
- Using Double Quotes to Resolve Variables in Strings with Embedded Spaces
- Drawbacks with restore
- 7. AGGREGATION WITH INDEPENDENT WORKS
- Creating CDs from the Command Line
- Конструкция with-do
- Creating and Deleting Device Objects
- Creating a Delegate
- 3. Hexadecimal – the way we communicate with micros
- Part Three - Latent Ambiguities
- CHAPTER 3 Working with GNOME
- CHAPTER 8 Printing with Fedora
- CHAPTER 15 Remote Access with SSH


