Книга: Beginning Android
Concepts and Properties
Разделы на этой странице:
Concepts and Properties
To configure a LinearLayout, you have five main areas of control besides the container’s contents: the orientation, the fill model, the weight, the gravity, and the padding.
Orientation
Orientation indicates whether the LinearLayout represents a row or a column. Just add the android:orientation property to your LinearLayout element in your XML layout, setting the value to be horizontal for a row or vertical for a column.
The orientation can be modified at runtime by invoking setOrientation() on the LinearLayout, supplying it with either HORIZONTAL or VERTICAL.
Fill Model
Let’s imagine a row of widgets, such as a pair of radio buttons. These widgets have a “natural” size based on their text. Their combined sizes probably do not exactly match the width of the Android device’s screen — particularly since screens come in various sizes. We then have the issue of what to do with the remaining space.
All widgets inside a LinearLayout must supply android:layout_width and android:layout_height properties to help address this issue. These properties’ values have three flavors:
• You can provide a specific dimension, such as 125px, to indicate the widget should take up exactly 125 pixels.
• You can provide wrap_content, which means the widget should fill up its natural space unless that is too big, in which case Android can use word wrap as needed to make it fit.
• You can provide fill_parent, which means the widget should fill up all available space in its enclosing container after all other widgets are taken care of.
The latter two flavors are the most common, as they are independent of screen size, allowing Android to adjust your view to fit the available space.
Weight
What happens if we have two widgets that should split the available free space? For example, suppose we have two multi-line fields in a column, and we want them to take up the remaining space in the column after all other widgets have been allocated their space.
To make this work, in addition to setting android:layout_width (for rows) or android:layout_height (for columns) to fill_parent, you must also set android:layout_weight. This property indicates what proportion of the free space should go to that widget. If you set android:layout_weight to be the same value for a pair of widgets (e.g., 1), the free space will be split evenly between them. If you set it to be 1 for one widget and 2 for another widget, the second widget will use up twice the free space that the first widget does, and so on.
Gravity
By default, everything is left-and top-aligned. So if you create a row of widgets via a horizontal LinearLayout, the row will start flush on the left side of the screen.
If that is not what you want, you need to specify a gravity. Using android:layout_gravity on a widget (or calling setGravity() at runtime on the widget’s Java object), you can tell the widget and its container how to align it vis-?-vis the screen.
For a column of widgets, common gravity values are left, center_horizontal, and right for left-aligned, centered, and right-aligned widgets, respectively.
For a row of widgets, the default is for them to be aligned so their text is aligned on the baseline (the invisible line that letters seem to “sit on”), though you may wish to specify a gravity of center_vertical to center the widgets along the row’s vertical midpoint.
Padding
By default, widgets are tightly packed next to each other. If you want to increase the whitespace between widgets, you will want to use the android:padding property (or call setPadding() at runtime on the widget’s Java object).
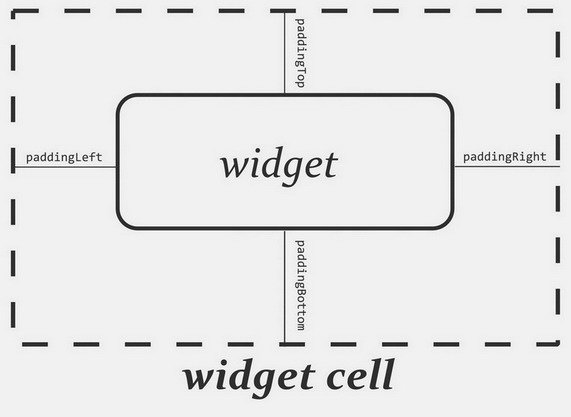
The padding specifies how much space there is between the boundaries of the widget’s “cell” and the actual widget contents. Padding is analogous to the margins on a word-processing document — the page size might be 8.5”?11”, but 1” margins would leave the actual text to reside within a 6.5”?9” area.
The android:padding property allows you to set the same padding on all four sides of the widget, with the widget’s contents centered within that padded-out area. If you want the padding to differ on different sides, use android:paddingLeft, android:paddingRight, android:paddingTop, and android:paddingBottom (see Figure 7-1).

Figure 7-1. The relationship between a widget, its cell, and the padding values
The value of the padding is a dimension, such as 5px for 5 pixels’ worth of padding.


