Книга: Beginning Android
Make the Call
Make the Call
Once you have your Intent, you need to pass it to Android and get the child activity to launch. You have four choices:
• The simplest option is to call startActivity() with the Intent — this will cause Android to find the best-match activity and pass the Intent to it for handling. Your activity will not be informed when the “child” activity is complete.
• You can call startActivityForResult(), passing it the Intent and a number (unique to the calling activity). Android will find the best-match activity and pass the Intent over to it. However, your activity will be notified when the child activity is complete via the onActivityResult() callback (see the text following this list).
• You can call sendBroadcast(). In this case, Android will pass the Intent to all registered BroadcastReceivers that could possibly want this Intent, not just the best match.
• You can call sendOrderedBroadcast(). Here Android will pass the Intent to all candidate BroadcastReceivers one at a time — if any one “consumes” the Intent, the rest of the candidates are not notified.
Most of the time, you will wind up using startActivity() or startActivityForResult() — broadcast Intents are more typically raised by the Android system itself.
With startActivityForResult(), as noted, you can implement the onActivityResult() callback to be notified when the child activity has completed its work. The callback receives the unique number supplied to startActivityForResult(), so you can determine which child activity is the one that has completed. You also get the following:
• A result code from the child activity calling setResult(). Typically this is RESULT_OK or RESULT_CANCELLED, though you can create your own return codes (pick a number starting with RESULT_FIRST_USER).
• An optional String containing some result data, possibly a URL to some internal or external resource — for example, an ACTION_PICK Intent typically returns the selected bit of content via this data string.
• An optional Bundle containing additional information beyond the result code and data string.
To demonstrate launching a peer activity, take a peek at the Activities/Launch sample application in the Source Code section at http://apress.com. The XML layout is fairly straightforward: two fields for the latitude and longitude, plus a button:
<?xml version="1.0" encoding="utf-8"?>

<LinearLayout xmlns:android="http://schemas.android.com/apk/res/android"

 android:orientation="vertical"

 android:layout_width="fill_parent"

 android:layout_height="fill_parent"

>

 <TableLayout

  android:layout_width="fill_parent"

  android:layout_height="wrap_content"

  android:stretchColumns="1,2"

 >

  <TableRow>

   <TextView

    android:layout_width="wrap_content"

    android:layout_height="wrap_content"

    android:paddingLeft="2dip"

    android:paddingRight="4dip"

    android:text="Location:"

   />

   <EditText android:id="@+id/lat"

    android:layout_width="fill_parent"

    android:layout_height="wrap_content"

    android:cursorVisible="true"

    android:editable="true"

    android:singleLine="true"

    android:layout_weight="1"

   />

   <EditText android:id="@+id/lon"

    android:layout_width="fill_parent"

    android:layout_height="wrap_content"

    android:cursorVisible="true"

    android:editable="true"

    android:singleLine="true"

    android:layout_weight="1"

   />

  </TableRow>

 </TableLayout>

 <Button android:id="@+id/map"

  android:layout_width="fill_parent"

  android:layout_height="wrap_content"

  android:text="Show Me!"

 />

</LinearLayout>
The button’s OnClickListener simply takes the latitude and longitude, pours them into a geo scheme Uri, then starts the activity.
package com.commonsware.android.activities;

import android.app.Activity;

import android.content.Intent;

import android.net.Uri;

import android.os.Bundle;

import android.view.View;

import android.widget.Button;

import android.widget.EditText;

public class LaunchDemo extends Activity {

 private EditText lat;

 private EditText lon;

 @Override

 public void onCreate(Bundle icicle) {

  super.onCreate(icicle);

  setContentView(R.layout.main);

  Button btn = (Button)findViewById(R.id.map);

  lat = (EditText)findViewById(R.id.lat);

  lon = (EditText)findViewById(R.id.lon);

  btn.setOnClickListener(new View.OnClickListener() {

   public void onClick(View view) {

    String _lat = lat.getText().toString();

    String _lon = lon.getText().toString();

    Uri uri=Uri.parse("geo:"+_lat+","+_lon);

    startActivity(new Intent(Intent.ACTION_VIEW, uri));

   }

  });

 }

}
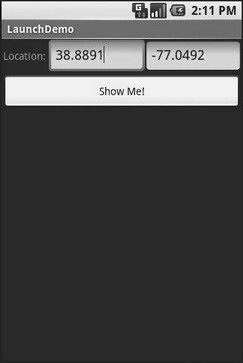
The activity is not much to look at (Figure 24-1).

Figure 24-1. The LaunchDemo sample application, with a location filled in
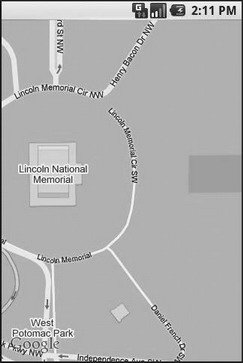
If you fill in a location (e.g., 38.8891 latitude and -77.0492 longitude) and click the button, the resulting map is more interesting (Figure 24-2). Note that this is the built-in Android map activity — we did not create our own activity to display this map.

Figure 24-2. The map launched by LaunchDemo, showing the Lincoln Memorial in Washington DC
In a Chapter 34, you will see how you can create maps in your own activities, in case you need greater control over how the map is displayed.
- 4.4.4 The Dispatcher
- Building Programs with make
- 2.1.3.The Network Layer
- 7.5.1. Remote Procedure Call
- You Make the Call!
- About the author
- Chapter 7. The state machine
- Appendix E. Other resources and links
- Example NAT machine in theory
- The final stage of our NAT machine
- Compiling the user-land applications
- The conntrack entries


