Книга: C# 2008 Programmer
Using the BackgroundWorker Control
Using the BackgroundWorker Control
Because threading is such a common programming task in Windows programming, Microsoft has provided a convenient solution to implementing threading: the BackgroundWorker control for Windows applications. The BackgroundWorker control enables you to run a long background task such as network access, file access, and so forth and receive continual feedback on the progress of the task. It runs on a separate thread.
This section creates a simple Windows application that will show you how the BackgroundWorker component can help make your applications more responsive.
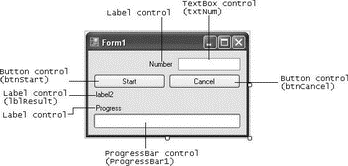
First, start Visual Studio 2008 and create a new Windows application. Populate the default Windows form with the following controls (see Figure 10-12).

Figure 10-12
| Control | Name | Text |
|---|---|---|
Label |
Number |
|
Label |
lblResult |
label2 |
Label |
Progress |
|
TextBox |
txtNum |
|
Button |
btnStart |
Start |
Button |
btnCancel |
Cancel |
ProgressBar |
ProgressBar1 |
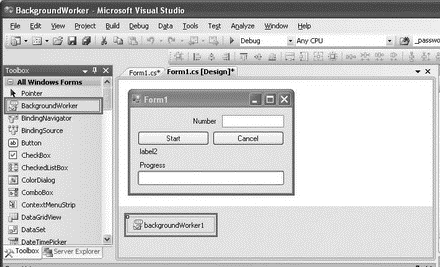
Drag and drop the BackgroundWorker component from the Toolbox onto the form.
The BackgroundWorker is a nonvisual control, so it appears below the form in the component section (see Figure 10-13).

Figure 10-13
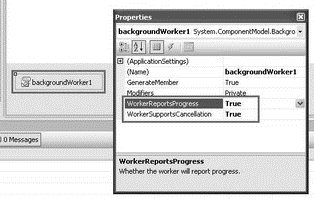
Right-click on the BackgroundWorker component, and select Properties. Set the WorkerReportsProgress and WorkerSupportsCancellation properties to True so that the component can report on the progress of the thread as well as be aborted halfway through the thread (see Figure 10-14).

Figure 10-14
Here is how the application works. The user enters a number in the TextBox control (txtNum) and clicks the Start button. The application then sums all of the numbers from 0 to that number. The progress bar at the bottom of the page displays the progress of the summation. The speed in which the progress bar updates is dependent upon the number entered. For small numbers, the progress bar fills up very quickly. To really see the effect of how summation works in a background thread, try a large number and watch the progress bar update itself. Notice that the window is still responsive while the summation is underway. To abort the summation process, click the Cancel button. Once the summation is done, the result is printed on the Label control (lblResult).
Switch to the code behind of the Windows form to do the coding. When the Start button is clicked, you first initialize some of the controls on the form. You then get the BackgroundWorker component to spin off a separate thread by using the RunWorkAsync() method. You pass the number entered by the user as the parameter for this method:
private void btnStart_Click(object sender, EventArgs e) {

 lblResult.Text = string.Empty;

 btnCancel.Enabled = true;

 btnStart.Enabled = false;

 progressBar1.Value = 0;

 backgroundWorker1.RunWorkerAsync(txtNum.Text);

}
Now, double-click the BackgroundWorker control in design view to create the event handler for its DoWork event.
private void backgroundWorker1_DoWork(object sender, DoWorkEventArgs e) {

 BackgroundWorker worker = (BackgroundWorker)sender;

 e.Result = SumNumbers(double.Parse(e.Argument.ToString()), worker, e);

}
The DoWork event of the BackgroundWorker component invokes the SumNumbers() function (which you will define next) in a separate thread. This event is fired when you call the RunWorkerAsync() method (as was done in the previous step).
The DoWork event handler runs on a separate thread from the UI. Be sure not to manipulate any Windows Forms controls created on the UI thread from this method.
The SumNumbers() function basically sums up all the numbers from 0 to the number specified:
private double SumNumbers(

 double number, BackgroundWorker worker, DoWorkEventArgs e) {

 int lastPercent = 0;

 double sum = 0;

 for (double i = 0; i <= number; i++) {

  //---check if user cancelled the process---

  if (worker.CancellationPending) {

   e.Cancel = true;

  } else {

   sum += i;

   if (i % 10 == 0) {

    int percentDone = (int)((i / number) * 100);

    //---update the progress bar if there is a change---

    if (percentDone > lastPercent) {

     worker.ReportProgress(percentDone);

     lastPercent = percentDone;

    }

   }

  }

 }

 return sum;

}
It takes in three arguments — the number to sum up to, the BackgroundWorker component, and the DoWorkEventArgs. Within the For loop, you check to see if the user has clicked the Cancel button (this event is defined a little later in this chapter) by checking the value of the CancellationPending property. If the user has canceled the process, set e.Cancel to True. After every 10 iterations, you calculate the progress completed so far. If there is progress (when the current progress percentage is greater than the last one recorded), you update the progress bar by calling the ReportProgress() method of the BackgroundWorker component. Do not call the ReportProgress() method unnecessarily because frequent calls to update the progress bar will freeze the UI of your application.
It is important to note that in this method (which was invoked by the DoWork event), you cannot directly access Windows controls because they are not thread-safe. Trying to do so will trigger a runtime error, a useful feature in Visual Studio 2008.
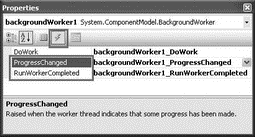
The ProgressChanged event is invoked whenever the ReportProgress() method is called. In this case, you use it to update the progress bar. To generate the event handler for the ProgressChanged event, switch to design view and look at the properties of the BackgroundWorker component. In the Properties window, select the Events icon and double-click the ProgressChanged event (see Figure 10-15).

Figure 10-15
Code the event handler for the ProgressChanged event as follows:
private void backgroundWorker1_ProgressChanged(

 object sender, ProgressChangedEventArgs e) {

 //---updates the progress bar and label control---

 progressBar1.Value = e.ProgressPercentage;

 lblResult.Text = e.ProgressPercentage.ToString() + "%";

}
Now double-click the RunWorkerCompleted event to generate its event handler:
private void backgroundWorker1_RunWorkerCompleted(

 object sender, RunWorkerCompletedEventArgs e) {

 if (e.Error != null) MessageBox.Show(e.Error.Message);

 else if (e.Cancelled) MessageBox.Show("Cancelled");

 else {

  lblResult.Text = "Sum of 1 to " + txtNum.Text + " is " + e.Result;

 }

 btnStart.Enabled = true;

 btnCancel.Enabled = false;

}
The RunWorkerCompleted event is fired when the thread (SumNumbers(), in this case) has completed running. Here you print the result accordingly.
Finally, when the user clicks the Cancel button, you cancel the process by calling the CancelAsync() method:
private void btnCancel_Click(object sender, EventArgs e) {

 //---Cancel the asynchronous operation---

 backgroundWorker1.CancelAsync();

 btnCancel.Enabled = false;

}
- Testing the Application
- 4.4.4 The Dispatcher
- Introduction to Microprocessors and Microcontrollers
- About the author
- Chapter 7. The state machine
- Appendix E. Other resources and links
- Caveats using NAT
- Example NAT machine in theory
- Using Double Quotes to Resolve Variables in Strings with Embedded Spaces
- Data sending and control session
- The final stage of our NAT machine
- Compiling the user-land applications


