Книга: Windows Server 2012 R2 Storage, Security, & Networking Pocket Consultant
Integrating DHCP and NAP
Integrating DHCP and NAP
Network Access Protection (NAP) is designed to protect the network from clients that do not have the appropriate security measures in place. The easiest way to enable NAP with DHCP is to set up the DHCP server as a Network Policy Server. To do this, you need to install the Network Policy And Access Services role, configure a compliant policy for NAP and DHCP integration on the server, and then enable NAP for DHCP. This process enables NAP for network computers that use DHCP, but it does not fully configure NAP for use.
You can create a NAP and DHCP integration policy by following these steps:
1. On the server that you want to designate as the Network Policy Server, use the Add Roles And Features Wizard to install the Network Policy And Access Services role. You should install the Network Policy Server role service at a minimum.
2. In the Network Policy Server Console (Nps.msc), available from the Tools menu in Server Manager, select the NPS (Local) node in the console tree, and then tap or click Configure NAP in the main pane to start the Configure NAP Wizard.
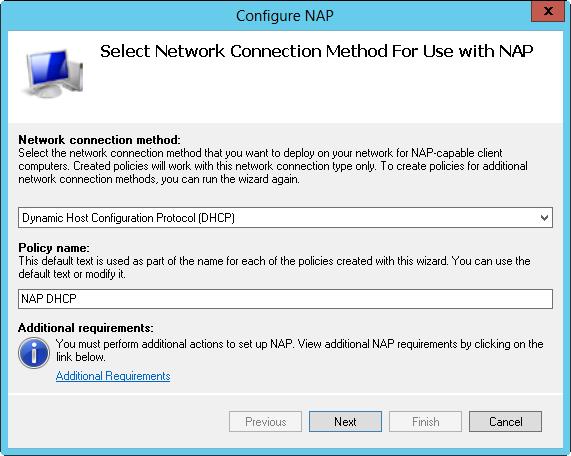
3. In the Network Connection Method list, choose Dynamic Host Configuration Protocol (DHCP) as the connection method you want to deploy on your network for NAP-capable clients. As shown in Figure 8–4, the policy name is set to NAP DHCP by default. Tap or click Next.

FIGURE 8–4 Configure Network Access Protection policy for the local DHCP server.
4. On the Specify NAP Enforcement Servers Running DHCP Server page, you need to identify all remote DHCP servers on your network by doing the following:
? Tap or click Add. In the New RADIUS Client dialog box, enter a friendly name for the remote server in the Friendly Name text box. Then enter the DNS name of the remote DHCP server in the Address text box. Tap or click Verify to ensure that the DNS name is valid.
? In the Shared Secret panel, select Generate, and then tap or click the Generate button to create a long shared-secret keyphrase. You need to enter this keyphrase in the NAP DHCP policy on all remote DHCP servers. Be sure to write down this keyphrase, or copy it to Notepad and save it in a file stored in a secure location. Tap or click OK.
5. Tap or click Next. On the Specify DHCP Scopes page, you can identify the DHCP scopes to which this policy should apply. If you do not specify any scopes, the policy applies to all NAP-enabled scopes on the selected DHCP servers. Tap or click Next twice to skip the Configure Machine Groups page.
6. On the Specify A NAP Remediation Server Group And URL page, select a Remediation Server, or tap or click New Group to define a remediation group and specify servers to handle remediation. Remediation servers store software updates for NAP clients that need them. In the text box provided, enter a URL for a webpage that provides users with instructions on how to bring their computers into compliance with NAP health policy. Be sure that all DHCP clients can access this URL. Tap or click Next to continue.
7. On the Define NAP Health Policy page, use the options provided to determine how NAP health policy works. In many cases, the default settings work fine, though you may want to use the Allow option while you fine-tune policy. With the default settings, NAP-ineligible clients are denied access to the network, and NAP-capable clients are checked for compliance and automatically remediated, which allows them to get needed software updates that you’ve made available. Tap or click Next, and then tap or click Finish.
You can modify NAP settings globally for each DHCP server or on a per-scope basis. To view or change the global NAP settings, follow these steps:
1. In the DHCP console, expand the node for the server with which you want to work, press and hold or right-click IPv4, and then tap or click Properties.
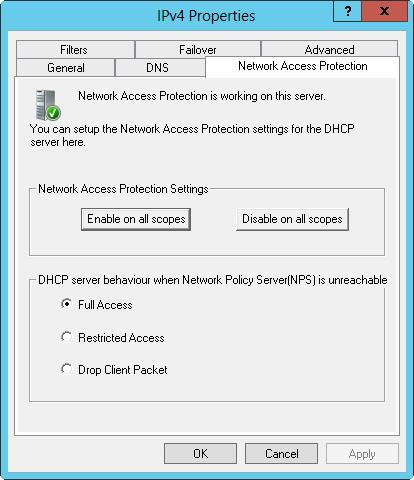
2. On the Network Access Protection tab, shown in Figure 8–5, tap or click Enable On All Scopes or Disable On All Scopes to enable or disable NAP for all scopes on the server.
NOTE When the local DHCP server is also a Network Policy Server, the Network Policy Server should always be reachable. If you haven’t configured the server as a Network Policy Server or the DhCP server is unable to contact the designated Network Policy Server, you’ll get an error stating this on the Network Access Protection tab.

FIGURE 8–5 The Network Access Protection tab controls the protection options for DHCP.
3. Choose one of the following options to specify how the DHCP server behaves if the Network Policy Server is unreachable, and then tap or click OK to save your settings:
? Full Access Gives DHCP clients full (unrestricted) access to the network. This means clients can perform any permitted actions.
? Restricted Access Gives DHCP clients restricted access to the network. This means clients can work only with the server to which they are connected.
? Drop Client Packet Blocks client requests, and prevents the clients from accessing the network. This means clients have no access to resources on the network.
You can view and change the NAP settings for individual scopes by following these steps:
1. In the DHCP console, expand the node for the server with which you want to work, and then expand IPv4.
2. Press and hold or right-click the scope with which you want to work, and then tap or click Properties.
3. On the Network Access Protection tab, tap or click Enable For This Scope or Disable For This Scope to enable or disable NAP for this scope.
4. If you’re enabling NAP and want to use a NAP profile other than the default, tap or click Use Custom Profile on the Network Access Protection tab, and then enter the name of the profile, such as Alternate NAP DHCP .
5. Tap or click OK to save your settings.
- Oldest active и Oldest snapshot
- Разработка приложений баз данных InterBase на Borland Delphi
- Open Source Insight and Discussion
- Introduction to Microprocessors and Microcontrollers
- Chapter 6. Traversing of tables and chains
- Chapter 8. Saving and restoring large rule-sets
- Chapter 11. Iptables targets and jumps
- Chapter 5 Installing and Configuring VirtualCenter 2.0
- Chapter 16. Commercial products based on Linux, iptables and netfilter
- Appendix A. Detailed explanations of special commands
- Appendix B. Common problems and questions
- Appendix E. Other resources and links


