Книга: Beginning Android
Seeing Pestering in Action
Seeing Pestering in Action
Let us now take a peek at the Notifications/Notify1 sample project (available in the Source Code section at http://apress.com), in particular the NotifyDemo class:
public class NotifyDemo extends Activity {

 private static final int NOTIFY_ME_ID = 1337;

 private Timer timer = new Timer();

 private int count = 0;

 @Override

 public void onCreate(Bundle savedInstanceState) {

  super.onCreate(savedInstanceState);

  setContentView(R.layout.main);

  Button btn = (Button)findViewById(R.id.notify);

  btn.setOnClickListener(new View.OnClickListener() {

   public void onClick(View view) {

    TimerTask task = new TimerTask() {

     public void run() {

      notifyMe();

     }

    };

    timer.schedule(task, 5000);

   }

  });

  btn = (Button)findViewById(R.id.cancel);

  btn.setOnClickListener(new View.OnClickListener() {

   public void onClick(View view) {

    NotificationManager mgr =

    (NotificationManager)getSystemService(NOTIFICATION_SERVICE);

    mgr.cancel(NOTIFY_ME_ID);

   }

  });

 }

 private void notifyMe() {

  final NotificationManager mgr =

   (NotificationManager)getSystemService(NOTIFICATION_SERVICE);

  Notification note = new Notification(R.drawable.red_ball,

   "Status message!", System.currentTimeMillis());

  PendingIntent i = PendingIntent.getActivity(this, 0,

   new Intent(this, NotifyMessage.class), 0);

  note.setLatestEventInfo(this, "Notification Title",

   "This is the notification message", i);

  note.number = ++count;

  mgr.notify(NOTIFY_ME_ID, note);
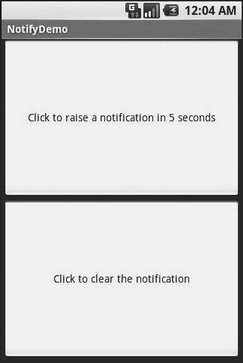
This activity sports two large buttons, one to kick off a notification after a five-second delay, and one to cancel that notification (if it is active). See Figure 32-1.

Figure 32-1. The NotifyDemo activity main view
Creating the notification, in notifyMe(), is accomplished in five steps:
1. Get access to the NotificationManager instance.
2. Create a Notification object with our icon (red ball), a message to flash on the status bar as the notification is raised, and the time associated with this event.
3. Create a PendingIntent that will trigger the display of another activity (NotifyMessage).
4. Use setLatestEventInfo() to specify that, when the notification is clicked on, we are to display a certain title and message, and if that is clicked on, we launch the PendingIntent.
5. Tell the NotificationManager to display the notification.
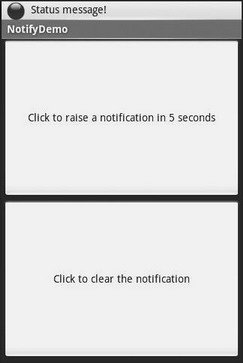
Hence, if we click the top button, after five seconds our red ball icon will appear in the status bar. Our status message will also appear briefly, as shown in Figure 32-2.

Figure 32-2. Our notification as it appears on the status bar, with our status message
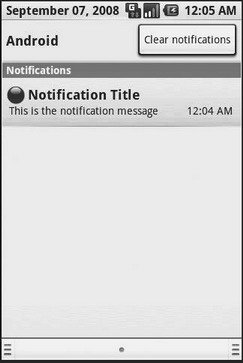
If you click on the red ball, a drawer will appear beneath the status bar. Drag that drawer all the way to the bottom of the screen to show the outstanding notifications, including our own, as shown in Figure 32-3.

Figure 32-3. The notifications drawer, fully expanded, with our notification
If you click on the notification entry in the drawer, you’ll be taken to a trivial activity displaying a message — though in a real application this activity would do something useful based upon the event that occurred (e.g., take users to the newly arrived mail messages).
Clicking on the cancel button, or clicking on the Clear Notifications button in the drawer, will remove the red ball from the status bar.
- seeing(X)
- CHAPTER 32 Alerting Users via Notifications
- Oldest transaction
- Next transaction
- Bumped transaction
- Системные переменные ROWS_AFFECTED, GDSCODE, SQLCODE, TRANSACTIONJD, CONNECTIONJD
- Знакомство с панелью Actions
- include - Импорт текста из внешнего файла ActionScript
- Basic Actions
- 10.6.4. Перехват сигналов: sigaction()
- Subscribing to C++ In Action
- ACID Compliance in Transaction Processing to Protect Data Integrity


