Книга: Mastering VMware® Infrastructure3
Managing and Modifying Virtual Machines
Разделы на этой странице:
Managing and Modifying Virtual Machines
Just as physical machines require upgrading of hardware, a virtual machine may require scaling up on hardware due to performance demands. Perhaps a new memory-intensive client-server application requires an increase in memory, or a new data-mining application requires a second processor or additional network adapters for a bandwidth-heavy FTP site. In each of these cases, the virtual machine requires a modification of the virtual hardware configured for the guest operating system to use.
Modifying a virtual machine requires that the virtual machine exist in a powered-off state for all hardware — except when adding a new hard drive. You can add a new hard drive to a virtual machine with the machine turned off or on. This is a “hot add” process only because a hard disk cannot be removed while the virtual machine continues to run. CD and DVD-ROMs can be mounted and unmounted while a virtual machine is turned on, but new CD/DVD-ROM devices cannot be added. Floppy disk images can be mounted or unmounted while a virtual machine is turned on, but new floppy devices cannot be added. You can assign and reassign adapters to virtual networks while a virtual machine is running, but new adapters cannot be added. Figure 6.22 shows the CD/DVD mapping and the Add Hardware Wizard for a virtual machine. Note how the CD/DVD-ROM can be associated with a new ISO on a datastore; however, adding hardware to a running virtual machine is limited to adding virtual hard drives.
As administrators, we are consistently working with virtual machines, but on occasion we have to work directly with the files that make up the virtual machine. By browsing a datastore, as shown in Figure 6.23, or using an SSH session, you'll find there are many files that relate to a working virtual machine.
Most often, when dealing directly with virtual machine files, we deal with either the VMX configuration file or the VMDK virtual hard disk file. The VMX file identifies the configuration of the virtual machine with respect to the virtual hardware allocated to the virtual machine. Figure 6.24 shows a sample VMX file for a virtual machine named vdcSQL. Reading through the vdcSQL.vmx file, you will notice that the virtual machine uses the following configuration:
? A virtual machine named vdcSQL that runs Windows Server 2003 Standard Edition
? RAM: 1564 MB
? A single hard drive located at vdcSQL-000001.vmdk
? A single CD-ROM that starts connected but not mounted to an image
? A floppy drive that does not start connected
? A single network adapter configured on the ProductionLAN168 virtual switch and a MAC address of 00:0C:29:9b:1e:b2
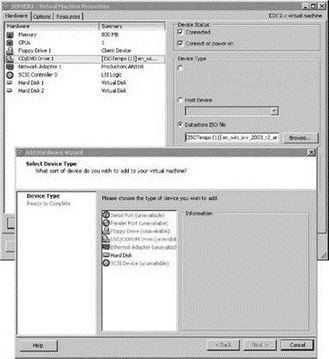
Figure 6.22 A new hard disk is the only hardware that can be added to a running virtual machine. CD/DVD-ROMs, floppy drives, and network adapters can be edited but not added.
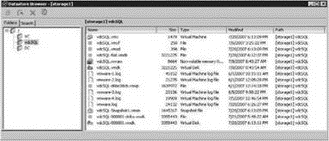
Figure 6.23 A virtual machine consists of many files that can be viewed by browsing a datastore using the VI Client.
While the VMDK file is not human readable, it is arguably the most important file for a virtual machine. You can rebuild a VMX configuration file quite easily, but a VMDK is the data behind the virtual hard drive and is not as easy to rebuild. If you revisit Figure 6.23 and review the files that reside in the folder of a virtual machine's associated files, you will notice the existence of a file that ends with -flat.vmdk. The -flat.vmdk file for a virtual machine is where the actual virtual machine data is stored.
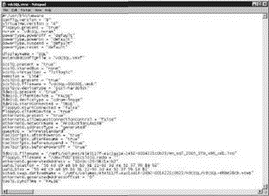
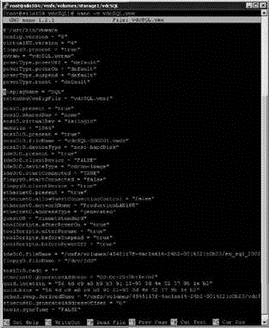
Figure 6.24 A virtual machine's configuration file (VMX) details the virtual hardware available for use by the guest operating system.
Although the -flat.vmdk and the VMDK are the same size, they do not actually both consume the full amount of disk space that is listed. Take, for example, the virtual machine vdcSQL. The virtual machine is configured with a 30GB hard drive. If both the VMDK and the -flat.vmdk files were holding 30GB of data, the total between the two would be 60GB. However, in looking at the total storage capacity and the free space of the datastore where vdcSQL resides, as shown in Figure 6.25, you will notice that the total capacity for the datastore is 62GB and that 7.83GB still remains. Figure 6.26 shows the contents of the storage1 datastore, which identifies the existence of two other virtual machines and a handful of ISO files on the datastore. The file size calculation of the vdcSQL virtual machine, coupled with a look at all of the other data in the datastore, clearly shows that both the VMDK and the -flat.vmdk do not store the full capacity of the space allocated to the virtual machine.

Figure 6.25 The total size of the datastore is 62.5GB with 7.38GB of free space remaining.
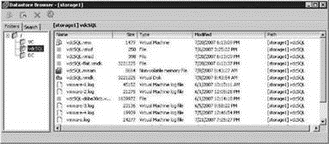
Figure 6.26 The storage1 datastore houses three virtual machines and several ISO images. The existence of free space on the storage1 datastore indicates that the -flat.vmdk and VMDK files are not each consuming the total space of the virtual hard drive.
ESX 3.0 introduces a new snapshot feature that's found in the VMware Workstation product. Snapshots provide administrators with the ability to create point-in-time snapshots of a virtual machine. In addition, snapshots are used heavily by the VMware Consolidated Backup product. A snapshot is not a full copy of a virtual machine. VMware's snapshot technology allows for minimal space consumption while still reverting to a previous snapshot.
VMDK File Size Identification
The VMDK file size is misleading if viewed from the VI Client. Consider the virtual machine with a 30GB hard drive. Using the VI Client, it looks as if the virtual machine hard disk file consumes the exact amount that it was configured as. As noted, this is not the case. If you look at the VMDK file using an SSH client connection to the Service Console, the VMDK file is a few bytes in size, which is a more accurate reflection. However, the -flat.vmdk file is 30GB.
Aligning Virtual Machine File Systems
In Chapter 4 I introduced the concept of aligning the VMFS file system, and I also suggested the virtual machine's file system should be aligned as well. If you construct virtual machines with separate virtual hard drives for operating system and data, then you are most concerned with the alignment of the file system for the data drive because the greatest amount of I/O will occur on that drive. For example, a virtual machine with Disk 0 (that holds the operating system) and a blank disk, Disk 1 (that holds data that will incur significant I/O), should have Disk 1 aligned.
Perform the following steps to align Disk 1 of the virtual machine:
1. Log in to the virtual machine using an account with administrative credentials.
2. Open a command prompt and type Diskpart.
3. Type list disk and press Enter.
4. Type select disk 1 and press Enter.
5. Type create partition primary align = 64 and press Enter.
6. Type assign letter = X, where X is an open letter that can be assigned.
7. Type list part to verify the 64 KB offset for the new partition.
8. Format the partition.
Perhaps you are thinking that this seems like a tedious task to perform for all your virtual machines. It is a tedious task; however, the benefit of doing this is realized most when there is a significant I/O requirement. Also keep in mind that you could also perform this task in the template that is used to provision new virtual machines.
Figure 6.27 shows the details of a folder named SERVER1 that holds virtual machine files and resides on a datastore named LUN10. LUN10, at this point shows a 99.75GB capacity with 14.88GB of free space.
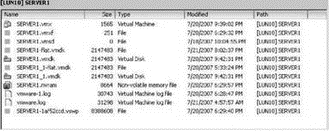
Figure 6.27 A datastore with all the virtual machine files that exist as a default.
Perform the following steps to create a snapshot of a virtual machine:
1. Use the VI Client to connect to a VirtualCenter or an individual ESX Server host.
2. Right-click on the virtual machine name in the inventory tree, select Snapshot, and then select Take Snapshot.
3. As shown in Figure 6.28 provide a name and description for the snapshot and then click OK.
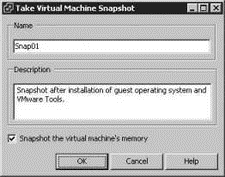
Figure 6.28 Providing names and descriptions for snapshots is an easy way to manage multiple historical snapshots.
It is a common misconception for administrators to think of snapshots as full copies of virtual machine files. SERVER1 is a new virtual machine that runs Windows Server 2003 Enterprise Edition with the VMware Tools installed. The virtual hard drives have been created as a rather small 2GB hard drive for the operating system and a 2GB hard drive for data. For the purposes of explaining the snapshot technology, these smaller drives will suffice. SERVER1 is configured as follows:
? The C: drive maps to the SERVER1. vmdk file with a corresponding SERVER1-flat.vmdk file.
? The E: drive maps to the SERVER11.vmdk file with a corresponding SERVER11-flat.vmdk file.
To demonstrate snapshot technology, I took the following steps:
1. I created the virtual machine with a default installation of Windows Server 2003 with two hard drives (C and E) as outlined earlier.
2. I took a snapshot named SNAP1.
3. I added approximately 500MB of data to drive E (SERVER11.vmdk).
4. I took a second snapshot named SNAP2.
5. I once again added approximately 500MB of data to drive E (SERVER11.vmdk).
Review Table 6.1 for the results I recorded after each step.
Despite the storage efficiency that snapshots attempt to maintain, they can over time eat up a considerable amount of disk space. Therefore, you should use them as needed but also remove older snapshots on a regular basis. There are performance ramifications to using snapshots. Virtual machines will perform more slowly and LUNs will become locked each time the snapshot grows. Snapshot files grow in 16 MB increments to minimize the LUN locking that the ESX Server host performs to update the metadata files (.sf files) in order to prevent corruption by other ESX Server hosts (which see a change to the LUN and could want to update the metadata files at the same time).
Table 6.1: Snapshot Demonstration Results
| Post Step1 | VMFS Size | NTFS Size | NTFS Free Space | |
|---|---|---|---|---|
| SERVER1.vmdk | 2GB | 1.99GB | 855 MB | |
| SERVER1-flat.vmdk | 2GB | - | - | |
| SERVER11.vmdk | 2GB | 1.99GB | 1.97GB | |
| SERVER11-flat.vmdk | 2GB | - | - | |
| Post Step 2 (SNAP1) | ||||
| SERVER1.vmdk | 2GB | 1.99GB | 855 MB | |
| SERVER1-flat.vmdk | 2GB | - | - | |
| SERVER11.vmdk | 2GB | 1.99GB | 1.97GB | |
| SERVER11-flat.vmdk | 2GB | - | - | |
| Created by SNAP1 | SERVER1-Snapshot1.vmsn | 805 MB | - | - |
| SERVER1-000001.vmdk | 16MB | - | - | |
| SERVER1-000001-delta.vmdk | 16MB | - | - | |
| SERVER11-000001.vmdk | 16MB | - | - | |
| SERVER11-000001-delta.vmdk | 16MB | - | - | |
| Post Step 3 (Add 500 MB to Drive E) | ||||
| SERVER1.vmdk | 2GB | 1.99GB | 855 | |
| SERVER1-flat.vmdk | 2GB | - | - | |
| SERVER11.vmdk | 2GB | 1.99GB | 1.5GB* | |
| SERVER11-flat.vmdk | 2GB | - | - | |
| SERVER1-Snapshot1.vmsn | 800 MB | - | - | |
| SERVER1-000001.vmdk | 16MB | - | - | |
| SERVER1-000001-delta.vmdk | 16MB | - | - | |
| SERVER1 1-000001.vmdk | 512MB* | - | - | |
| SERVER1 1-000001-delta.vmdk | 512MB* | - | - | |
| Post Step 4 (Snap 2) | ||||
| SERVER1.vmdk | 2GB | 1.99GB | 855 MB | |
| SERVER1-flat.vmdk | 2GB | - | - | |
| SERVER11.vmdk | 2GB | 1.99GB | 1.5GB | |
| SERVER1 1-flat.vmdk | 2GB | - | - | |
| SERVER1-Snapshot1.vmsn | 800 MB | - | - | |
| SERVER1-000001.vmdk | 16MB | - | - | |
| SERVER1-000001-delta.vmdk | 16MB | - | - | |
| SERVER11-000001.vmdk | 512MB | - | - | |
| SERVER11-000001-delta.vmdk | 512MB | - | - | |
| Created by SNAP2 | SERVER1-Snapshot2.vmsn | 800 MB | - | - |
| SERVER1-000002.vmdk | 16MB | - | - | |
| SERVER1-000002-delta.vmdk | 16MB | - | - | |
| SERVER11-000002.vmdk | 16MB | - | - | |
| SERVER11-000002-delta.vmdk | 16MB | - | - | |
| Post Step 5 (Add Another 500 MB to Drive E) | ||||
| SERVER1.vmdk | 2GB | 1.99GB | 855 MB | |
| SERVER1-flat.vmdk | 2GB | - | - | |
| SERVER11.vmdk | 2GB | 1.99GB | 1.02* | |
| SERVER11-flat.vmdk | 2GB | - | - | |
| SERVER1-Snapshot1.vmsn | 800 MB | - | - | |
| SERVER1-000001.vmdk | 16MB | - | - | |
| SERVER1-000001-delta.vmdk | 16MB | - | - | |
| SERVER11-000001.vmdk | 512MB | - | - | |
| SERVER11-000001-delta.vmdk | 512MB | - | - | |
| SERVER1-Snapshot2.vmsn | 800 MB | - | - | |
| SERVER1-000002.vmdk | 16MB | - | - | |
| SERVER1-000002-delta.vmdk | 16MB | - | - | |
| SERVER1_1-000002.vmdk | 496 MB* | - | - | |
| SERVER1_1-000002-delta.vmdk | 496 MB* | - | - | |
Snapshots are an excellent addition to the feature set of ESX 3.0. You'll find snapshots helpful when making risky changes to production servers (such as renaming the domain or installing service packs). You use the Snapshot Manager to view and delete snapshots or revert to an earlier snapshot.
Perform the following steps to access the Snapshot Manager:
1. Use the VI Client to connect to a VirtualCenter or an individual ESX Server host.
2. In the inventory tree, right-click on the name of the virtual machine to restore a snapshot.
3. Select Snapshot and then click Snapshot Manager.
4. Select the appropriate snapshot to fall back to and then click the Go To button, as shown in Figure 6.29.
Reverting to a Snapshot
Reverting back to a snapshot incurs a loss of data. Any data that was written since the snapshot has occurred will no longer be available, along with any applications that were installed since the snapshot was taken. Therefore, revert to snapshots only if you have determined that the loss of data is acceptable.
- Chapter 6 Creating and Managing Virtual Machines
- Разработка приложений баз данных InterBase на Borland Delphi
- Open Source Insight and Discussion
- Introduction to Microprocessors and Microcontrollers
- Chapter 6. Traversing of tables and chains
- Chapter 8. Saving and restoring large rule-sets
- Chapter 11. Iptables targets and jumps
- Chapter 5 Installing and Configuring VirtualCenter 2.0
- Chapter 16. Commercial products based on Linux, iptables and netfilter
- Appendix A. Detailed explanations of special commands
- Appendix B. Common problems and questions
- Appendix E. Other resources and links
